background image

DECT G966 Handset Basic User Guide 


© NEC Nederland B.V. 2014 

All  right  are  reserved.  Reproduction  in  whole  or  in  part  is  prohibited  without  the  written  consent  of  the  copyright  owner.  All  brand  names  and 
product names in  this  document  are  trademarks  or  registered  trademarks of their respective companies. 

|17 


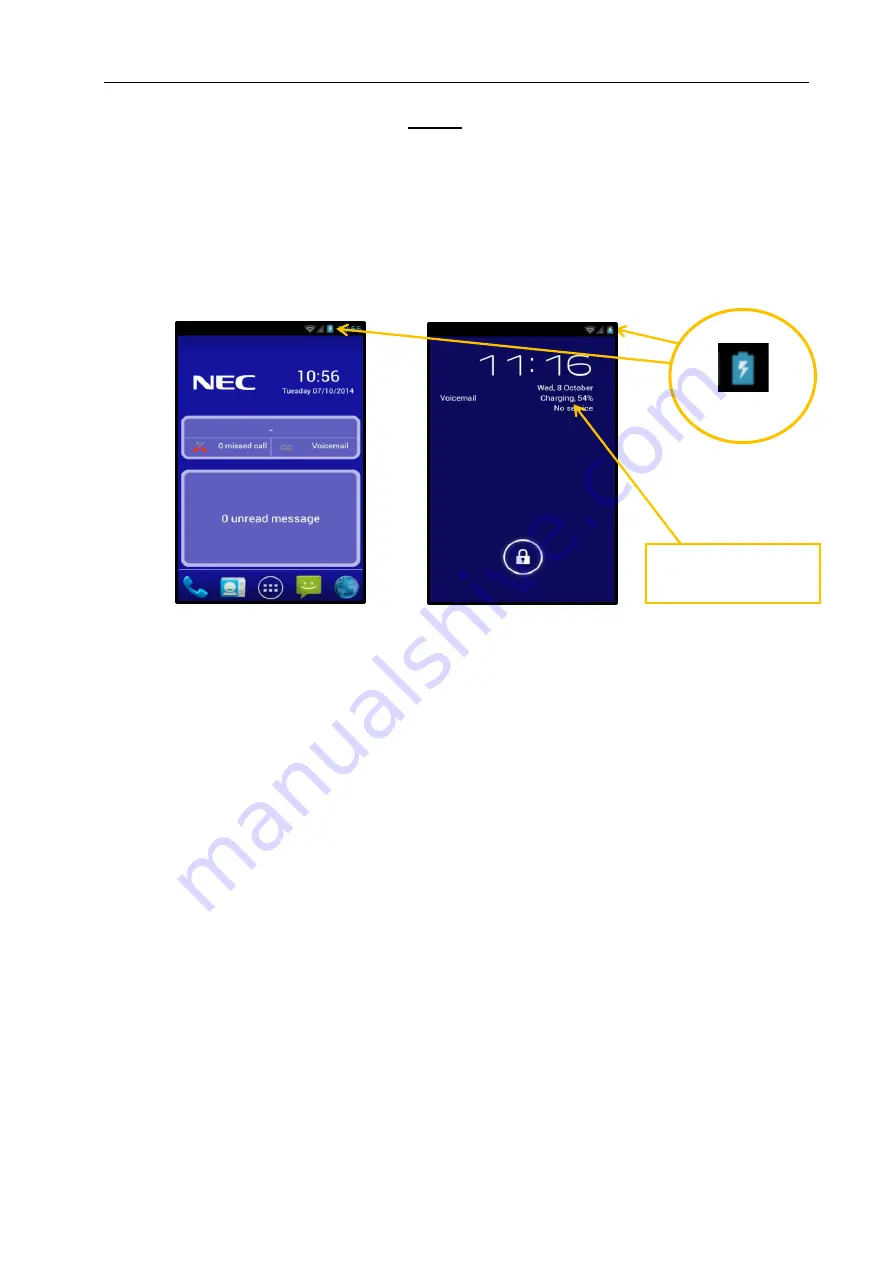
Place the  handset in a charger as shown  in  Figure 1. The battery charging indicator will show along 
the Android notification area at the top of the screen. When the screen is locked the charge status 
will also be displayed: 

Attention: 

A  red  light  blinks  once  if  you  press  the  LOCK/PWR  key  when  there  is  not  enough 
battery power to turn on the device. If so, charge the battery for at least ten minutes 
before you turn on the power. 


Figure 2: Battery charging display 


Attention: 

The handset, if switched off, automatically switches on  when placed in the charger. 


2.5  Charging guidelines 

Please read the concerning section in the DECT Handsets –  General Information guide carefully! 


2.6  Charging and operating times 

Discharged  batteries  require  <  3  hours  (using  the  spare  battery  slot  might  take  longer)  to  charge. 
to 90%. Charged  batteries provide the handset with: 

> 8 hours of talk time (DECT mode only) 

> 6 hours of talk time (WiFi mode only) 

> 72 hours standby (WiFi and BT are off, DECT is standby) 

336 hours whilst turned off 

Charging Icon 

Charging indication 
on Lock Screen 

Summary of Contents for G966

Page 1: ...Business Mobility IP DECT DECT G966 Handsets Basic User Guide ...

Page 2: ...t are trademarks or registered trademarks of their respective companies 2 Date October 2014 Great care has been taken to ensure that the information contained in this handbook is accurate and complete Should any errors or omissions be discovered or should any user wish to make a suggestion for improving this handbook they are invited to send the relevant details to NEC Nederland B V P O BOX 32 120...

Page 3: ...ademarks or registered trademarks of their respective companies 3 Disclaimer NEC Enterprise Solutions reserves the right to revise or make changes or improvements to the products described in the user manual or to this user manual itself at any time without obligation to notify any person of such revision or improvements The pictures icons screen shots and diagrams used in this user manual have be...

Page 4: ...eproduction in whole or in part is prohibited without the written consent of the copyright owner All brand names and product names in this document are trademarks or registered trademarks of their respective companies 4 Revision History October 2014 Creation of this Basic User Manual ...

Page 5: ...t 13 1 3 2 Important battery information 13 1 4 Safety precautions 14 1 4 1 Switch off in restricted areas 14 1 4 2 Switch off in explosive or dangerous areas 14 1 4 3 Environments with metal particles 14 1 5 Basic instructions 14 1 5 1 Usefull tips 14 1 5 2 Pop up windows 15 2 Getting started 16 2 1 Installing the microSD card 16 2 2 Installing the battery pack 16 2 3 Installing the charger 16 2 ...

Page 6: ...reating a wallpaper for the home screen 26 2 12 Applications menu 27 3 Connectivity 28 3 1 Using a DECT network 28 3 1 1 Connecting to a DECT network 28 3 1 2 Disconnecting from a DECT network 28 3 1 3 Network Select 28 3 2 Using a WiFi network 28 3 2 1 Connecting to a WiFi network 28 3 2 2 Disconnecting from a WiFi network 29 3 2 3 Searching for WiFi networks 29 3 2 4 Adding a WiFi network 29 3 3...

Page 7: ...roup 37 4 4 5 Renaming groups 37 4 4 6 Deleting a group 37 4 4 7 Transferring contacts 37 4 5 Messaging 37 4 5 1 Sending a message 38 4 5 2 Viewing message conversations 39 4 5 3 Deleting a message conversation 39 4 5 4 Deleting all message conversations 39 4 5 5 Message Settings 40 4 6 Email 40 4 6 1 Setting up an email account 40 4 6 2 Adding a new email account 41 4 6 3 Viewing incoming message...

Page 8: ...ng an event 46 5 3 2 Viewing the calendar 47 5 3 3 Setting reminders 47 5 3 4 Editing events 47 5 3 5 Deleting events 47 5 3 6 Refreshing the calendar 47 5 4 Clock 48 5 4 1 Adding a new alarm 48 5 4 2 Changing an alarm 48 5 4 3 Turning off the alarm 48 5 4 4 Adjusting alarm settings 48 5 5 Downloads 49 5 5 1 View files 49 5 5 2 Open a file 49 5 5 3 Share a file 50 5 5 4 Delete a file 50 5 6 ES Fil...

Page 9: ...tings 79 5 10 3 Changing Scene Mode Settings 80 5 10 4 Changing white balance settings 80 5 11 Search 80 5 11 1 Searching for information with Google 80 5 11 2 Setting search options 80 5 11 3 Selecting items that can be searched 81 5 12 Video camera 81 5 12 1 Recording a video 82 5 12 2 Changing camera settings 82 5 12 3 Changing time lapse settings 82 5 12 4 Changing white balance settings 82 6 ...

Page 10: ...e internal media storage 86 6 5 2 Erasing data on the embedded memory 87 6 5 3 USB connection settings 87 6 6 Call settings 87 6 6 1 Setting silent charging 87 6 6 2 Setting answer mode 87 6 6 3 Setting exit to home 88 6 6 4 Setting emergency call mode 88 6 7 Battery 89 6 8 Apps 89 6 8 1 Managing applications 89 6 9 Accounts sync 89 6 9 1 Adding an account 89 6 10 Location services 89 6 10 1 Setti...

Page 11: ...ting the G966 92 6 15 Date time 92 6 15 1 Allowing date and time to be set automatically 92 6 15 2 Setting date 92 6 15 3 Setting time 93 6 15 4 Setting time zone 93 6 15 6 Selecting time and date format 93 6 16 Accessibility 93 6 17 Developer options 93 6 18 About phone 94 6 18 1 Checking the status of the smartDECT 94 7 Regulatory information 95 7 1 Regulatory information Europe 95 7 1 1 Declara...

Page 12: ...xperience offering the following feature capabilities Sophisticated DECT handset with rich call control features and apps that tightly integrate with the NEC communication servers Mobile Unified Communications like central directory presence messaging alarming and localization facilitated by DECT Android and WiFi to support business applications with the option to tightly integrate the application...

Page 13: ...calls such as medical emergencies 1 3 Important safety information Only use this product in countries where the relevant authorities have authorised its operation 1 3 1 Sensitive electronic equipment Any radio based equipment can potentially cause interference with other equipment and can be interfered from other equipment This also applies for DECT equipment However due to the very low transmissi...

Page 14: ...areas with explosive or dangerous materials such as fuels fuel stations or areas containing chemical goods and obey any instructions or signs 1 4 3 Environments with metal particles The G966 handsets are not meant for use in industrial and or production environments Using the G966 handset in environments with metal particles will cause small metal particles to stick to the loudspeaker and to the e...

Page 15: ...ication 1 5 2 Pop up windows Pop up windows can appear on the screen in the following cases and the running application s can stop operating When the remaining battery capacity is insufficient When the remaining memory space is insufficient In the above cases charge the battery or secure enough memory space and take the relevant steps Please note that Instructions of this user guide are written ba...

Page 16: ... the battery pack into the casing 5 Replace the battery cover 2 3 Installing the charger 1 Place the charger on a flat surface 2 Connect the micro B USB connector of the USB cable to the back of the charger 3 Connect the type A USB connector to the USB AC DC Adapter 4 Connect the adapter to an electrical outlet 5 Place the handset on the charger as shown in Figure 1 Figure 1 G966 Desktop Charging ...

Page 17: ...he LOCK PWR key when there is not enough battery power to turn on the device If so charge the battery for at least ten minutes before you turn on the power Figure 2 Battery charging display Attention The handset if switched off automatically switches on when placed in the charger 2 5 Charging guidelines Please read the concerning section in the DECT Handsets General Information guide carefully 2 6...

Page 18: ...le this message is displayed 2 7 Turning the G966 on off To turn on the G966 1 Press and hold the LOCK PWR key for a few seconds 2 Unlock the screen with your finger To turn off the G966 1 Press and hold the LOCK PWR key 2 Tap OK The screen will turn off in a few seconds 2 8 Unlocking locking screen The screen is locked by default when you turn on power To unlock the screen 1 Press the LOCK PWR ke...

Page 19: ... on the touch screen Therefore it is essential to know how to use the touch screen The following finger actions might help you easily understand how to use the touch screen Tap hold Touch hold an item on the screen by touching it and not lifting your finger until an action occurs Drag Touch hold an item for a moment and then without lifting your finger move your finger on the screen until you reac...

Page 20: ...panies 20 Attention Do not use sharp tools that can scratch the touch screen Do not allow the touch screen to come in contact with chemicals The screen may malfunction in chemicals Do not sit on the G966 the touch screen can be damaged 2 10 Handset keys and display areas Figure 3 Front view of the G966 Figure 4 Side views of the G966 Headset Jack Lock Power Micro SD Card Slot Volume up Volume down...

Page 21: ... and return to the central Dial Used to go off hook and to initiate enquiry hold shuttle Cancel Use the cancel key to release a call MENU Used to display in context menus for device features and applications BACK Opens the previous screen you were working in even if it was in a different app Once you back up to the Home screen you can t go back any further in your history SOS Long press on the SOS...

Page 22: ...ons on the G966 You are able to configure up to 5 Home Screens which can hold app and widget icons plus folders To see additional Home Screens swipe your finger quickly left or right To open an app folder or widget tap its icon Press if you want to move to the central home screen at any time At the bottom of the Home Screen is the Favourites Tray The app icons you keep in the tray remain visible o...

Page 23: ...le 2 Favourites tray icons Icon Name Function Dialer Contacts All Applications Opens the application menu Central Directory Web Browser 2 10 3 Status icons Icons below indicate the current status of the G966 Check them and take any necessary steps Icon Description Displays the current time Sync is in progress There is an error with sync The USB debugging is connected The USB is connected to the G9...

Page 24: ...this document are trademarks or registered trademarks of their respective companies 24 Icon Description There is no memory card Strength of battery The battery is charging DECT signal strength WiFi signal strength DECT registration status Music is being played Incoming call Ringer is silent Vibrate mode Alarm is set There is an upcoming event A new message has arrived There is an error There are m...

Page 25: ...nd alarms as well as ongoing events such as when you ve configured your phone as a Wi Fi hotspot When you receive a notification its icon appears in the top left corner of the screen Depending on your Sound settings you may also hear a sound See your notifications Swipe your finger down from the top of the screen Respond to a notification Tap it Dismiss a notification Swipe it sideways Dismiss all...

Page 26: ...e 2 Select and tap a language that you want to use for the G966 Note It is recommended to set the language option first before using other functions 2 11 3 Adding a widget 1 Tap Apps WIDGETS 2 Tap and hold a widget and release it to the screen where you want to place Note You can also make a shortcut of an application 2 11 4 Deleting a widget 1 In idle mode tap and hold a widget that you want to d...

Page 27: ...rohibited without the written consent of the copyright owner All brand names and product names in this document are trademarks or registered trademarks of their respective companies 27 2 12 Applications menu Figure 7 Applications and widget menus Icon Function APPS Displays all applications WIDGETS Displays all widgets ...

Page 28: ... 1 Tap Apps Settings DECT 2 Tap Register 3 Enter the Access Code Park Code optional Network Name optional Number optional 4 Tap Register 5 Select and tap a save slot to store the network details 3 1 2 Disconnecting from a DECT network 1 Tap Apps Settings DECT 2 Tap Deregister 3 Select and tap a network to remove 3 1 3 Network Select 1 Tap Apps Settings DECT 2 Tap Network select 3 Select and tap a ...

Page 29: ...activate The G966 scans networks automatically every six seconds The newly found networks appear on the bottom of the list If you want to find Wi Fi networks manually available around you tap ADD NETWORK or tap SCAN 3 2 4 Adding a WiFi network 1 Tap Apps Settings Wi Fi 2 Tap OFFnext to WiFito activate 3 Tap ADD NETWORK at the bottomright side of the screen 4 Enter a Network SSID and select the sec...

Page 30: ... the Phone app opens to a list of numbers instead of the keypad swipe left or tap the Dialler tab to return to the keypad 2 Tap the digit keys to enter a number 3 Tap Dial below the keypad to dial You can switch applications during a call for example to look up information by using the Browser The grey phone icon appears in the Status bar while the call is in progress To return to the Phone app wh...

Page 31: ...the top of the phone You can make calls from any of them The Dialer tab lets you dial manually Tap the keys to enter the number and then tap the Phone icon below the keypad to dial or alternatively press the Off Hook key If you enter a wrong number tap Delete to erase digits one by one To dial an international number tap hold the 0 key to enter the plus symbol Then enter the international prefix f...

Page 32: ...e a voicemail message Silence the ringer 4 1 4 In call options During an active call you can Answer another incoming call You see the Incoming Call screen displaying the caller ID and any additional information about the caller that you ve entered in People As with any incoming call touch the white phone icon and slide to answer respond with a text message or send the call to voicemail If you answ...

Page 33: ...ey to put the other party on hold Press again to resume the call If a second call is in progress the key will act as a toggle allowing the user to switch between each call 4 1 4 3 Blind transfer 1 During an active call press the Off Hook key to initiate the hold feature 2 With the call on hold you can use the icons near the bottom of the screen to Switch to the dialler for example to enter a code ...

Page 34: ...con at the bottom of the screen or alternatively press the On Hook key 4 1 5 Working with the call log The Call log is a list of all the calls you ve placed received or missed It provides a convenient way to redial a number return a call or add a number to your Contacts Within the Phone app the Call log is under the middle tab Touch a number for more information about the call or touch the phone i...

Page 35: ...mber of unread messages and a number to dial 3 Tap New voicemail Your phone dials the voicemail message Follow the instructions to retrieve your messages 4 2 2 To enable your voicemail service 1 Tap the Phone icon on a Home or All Apps screen 2 Press the Menu key then tap Settings 3 Under VOICEMAIL tap OFF next to Mode to activate 4 Enter the voicemail access number 4 3 SOS Use this option to make...

Page 36: ...hat you want to add a new contact 3 Enter the contacts name If you want to add a photo for the contact tap and take the necessary steps You can also add other personal information 4 Tap DONE if you are done with creating a new contact 4 4 2 Editing contacts 1 Tap Apps People 2 Tap the contact that you want to edit 3 Press Menu and tap Edit 4 Edit information of the contact and tap DONE when you ha...

Page 37: ...the group name and tap DONE 4 4 6 Deleting a group 1 Tap Apps People 2 Tap GROUP on the top left of the screen 3 Tap the group that you want to delete 4 Press Menu and tap Delete 5 Tap OK 4 4 7 Transferring contacts 1 Press Menu in the contacts screen and tap Import Export 2 Select the way that you want to transfer contacts Tap Import from SIM card if you want to receive contacts from the SIM card...

Page 38: ...Tap New Message 3 Enter the recipient s at the top 4 Enter the message details 5 Tap SEND 4 5 1 1 Inserting smiley characters 1 Tap Messaging 2 Tap New Message 3 Press Menu Insert smiley 4 Tap a smiley option to include in the message 4 5 1 2 Changing message priority 1 Tap Messaging 2 Tap New Message 3 Press Menu Change priority 4 Select the urgency level of the message by tapping either Normal o...

Page 39: ... 5 2 2 Replying to an incoming message 1 Tap Messaging 2 Tap a conversation to open and read the latest message 3 Enter your response in the text box at the bottom 4 Tap SEND to reply 4 5 5 3 Forwarding an incoming message 1 Tap Messaging 2 Tap a conversation to open and tap and hold the message you want to forward 3 Tap Forward from the Message Options 4 Enter the recipient s at the top 5 Modify ...

Page 40: ...Settings 3 Adjust Storage Text Message and Notification settings as you prefer 4 6 Email You can check your corporate and Internet email accounts and send responses photos websites and more 4 6 1 Setting up an email account 1 Tap Apps Email 2 Select email account and enter your email address and password for the first use 3 Tap MANUAL SETUP or NEXT 4 If you tap MANUAL SETUP tap POP3 or IMAP set th...

Page 41: ...s Email 2 Select and tap an account and tap a message you want to read Note Make sure to secure enough internal memory space you might experience difficulties receiving or sending emails when the memory space is low 4 6 4 Sending an email 1 Tap Apps Email 2 Tap a Note If you have added more than one email account on the phone you can choose the account by tapping the mailbox on the top left of the...

Page 42: ...Tap Apps Email 2 Tap and hold a desired email 3 Tap Mark as unread The title of the email is displayed in regular type 4 6 8 Removing the email account 1 Tap Apps Email 2 Press Menu and tap Settings in the Inbox screen 3 Tap the account that you want to remove 4 Tap Remove account 5 Tap OK 4 6 9 Email settings 1 Tap Apps Email 2 Press Menu and tap Settings in the Inbox screen 3 Tap the General or ...

Page 43: ...of the screen 3 Tap Stop to end recording a Tap to play back and listen to the recording 4 Tap Done and the recorded voice is saved automatically Note If the alarm is activated while a voice memo is being recorded a pop up window appears and the G966 stops recording the memo and saves it automatically 4 7 2 Possible recording time When you can record for the following time The following message ap...

Page 44: ...e screen just touch Search to enter an address Note If you can t connect contact your service provider Reload If a page doesn t load correctly try pressing Menu Refresh 5 1 1 Downloads Warning Apps downloaded from the web can be from unknown sources To protect your phone and personal data only download apps from sources you trust like Google Play Note To let your phone install apps that are not fr...

Page 45: ...s Tap and hold it to choose Save image To show the picture tap Apps My Gallery My library Download 5 2 Calculator Carry out mathematical calculations with the Calculator app on the G966 5 2 1 Working with the calculator 1 Tap Apps Calculator 2 Enter a number and tap a mathematical sign you want to use 3 Tap Delete to delete a previous digit Press and hold Delete to delete the whole digit 5 3 Calen...

Page 46: ...eb browser they are synced automatically across all the places you need them To change the Calendar view touch the date at the top and choose Day Week Month or Agenda Swipe the screen to scroll vertically or horizontally In the Day or Week views spread your fingers apart or pinch them together to zoom in or out From any of these views you can Read or edit event details Tap an event to view its det...

Page 47: ...tting reminders 1 Tap Calendar 2 Press Menu Settings 3 Tap General Settings and adjust Notification options 4 Tap Choose ringtone and select and tap one for calendar reminders 5 Tap Vibrate and tap Always Only when silent or Never 6 Tap Pop up notification if you want a pop up window appears for notification 7 Tap Default reminder time and change the default reminder time 5 3 4 Editing events 1 Ta...

Page 48: ...arm 4 Enter the hour and the minute and tap Set 5 Adjust settings for alarm and tap Done You should find the checkbox in front of the new alarm checked 5 4 2 Changing an alarm 1 Tap Apps Clock 2 Tap Alarm set which indicates the next alarm 3 Select and tap the alarm time to change 4 Change the time and settings and tap Done Note If you want to deactivate an alarm deselect the checkbox in front of ...

Page 49: ...5 Downloads Files apps and other items you download from the Internet Email Android Market or in other ways are stored in your device s internal storage You can use the Downloads app to view reopen or delete what you ve downloaded Downloaded files are stored in the Download directory that s visible when your device is connected to a computer You can view and copy files from this directory 5 5 1 Vi...

Page 50: ...e a file 1 Tap Apps Downloads 2 Tap an item you want to delete Then tap the Trash icon 5 6 ES File Explorer ES File Explorer is a fully featured local LAN FTP Bluetooth Cloud Storage file security application as well as a task bookmark manager Application features include Local LAN FTP Bluetooth and Cloud Storage file operations Multi operate on files apps and powerful clipboard Change Views and S...

Page 51: ...eck files with MD5 SHA Set folder as home in local Set folder as server in Remote Analyse use of space on SD card App backup un install make shortcut Root explorer 5 6 1 Navigation 5 6 1 1 Left sidebar Tap Left Sidebar to access Favourites You can see files and folders you have added as favourites here Tap and hold a file or folder to manage it Local Home Shows the default folder location which is...

Page 52: ...es Show all image files found locally and across configured network devices Music Shows all audio files across storage locations in your device Movies Shows all video files across storage locations in your device Books Shows all documents across storage locations in your device Network LAN Shows files located on devices in your LAN Share Cloud Shows files located on the most popular Cloud Storage ...

Page 53: ...ches to ES Task Manager if installed If not currently installed will prompt to take user to the developer website to install SD Card Analyst Displays the total disk capacity and the shared of capacity and the rest of capacity Remote Manager Use your device as an FTP server for managing files remotely Net Manager Show WLAN settings Clipboard Open Clipboard Hide List Manage hidden files Root Explore...

Page 54: ...it Exit ES File Explorer Recommend View the latest and most popular software Theme Change ES File Explorer for a variety of themes Settings Access ES File Explorer application settings 5 6 1 2 Address bar At the top of the screen this shows the current storage location address Left most button in the address bar displays the navigation sidebar There s a button on the right most side of address bar...

Page 55: ...re trademarks or registered trademarks of their respective companies 55 5 6 1 3 Toolbar New Tap to create a new file or folder Search Tap to search for files images video music apks zip etc Refresh Tap to refresh files View Tap to switch between Icon List and Detail views and change sort by name type size etc Windows Tap to manage windows Tap the Default button where you can set which windows open...

Page 56: ...tive companies 56 If you have checked Show the select button in Settings Display settings you will also see Select displayed on the toolbar which when pressed can be used to select a file 5 6 2 Local operation 5 6 2 1 File operation Tap file or folder Open file or open the sub directory of current folder Tap and hold folder Accesses the options of Cut Copy Rename Delete Hide Add to desktop Share O...

Page 57: ...owner All brand names and product names in this document are trademarks or registered trademarks of their respective companies 57 Tap and hold file Accesses the options of Cut Copy Rename Delete Hide Add to desktop Share Open As Add to favorite Set background Send Compression Properties Move to Copy to Drag and drop You can drag and drop files to share copy send or delete ...

Page 58: ...this document are trademarks or registered trademarks of their respective companies 58 5 6 2 2 Play video audio files Tap and open a suitable media file ES Media Player supports MP3 MPS AMR WAV WMA MP4 3GP WMV formats accessed from the internal sdcard the external microSD card or remote PC While in ES Media Player you can swipe the screen to get to the playlist page and drag and drop songs to chan...

Page 59: ... and product names in this document are trademarks or registered trademarks of their respective companies 59 5 6 2 3 View pictures Local pictures Tap and open a suitable file ES Image Browser now supports jpg png gif bmp from the internal sdcard or external microSD card You can set pictures as wallpaper as a contact icon and view or set the properties of pictures Pictures on a remote computer ...

Page 60: ...s on the Internet Tap Pictures from sidebar Library tap address bar to switch to Net to manage your images in either Flickr Instagram or Facebook 5 6 3 Network 5 6 3 1 LAN LAN can stream media files view remote pictures and operate files between your device and another networked computer Create server Method One Tap Scan on toolbar to scan network and select a server Method Two Tap New input the I...

Page 61: ...his document are trademarks or registered trademarks of their respective companies 61 5 6 3 2 Cloud Now ES File Explorer supports Box SugarSync Dropbox Skydrive Gdrive S3 Kuaipan Kanbox Vdisk Baidu Yandex Ubuntu etc 1 Tap New 2 Select your cloud storage option 3 Enter your username and password if you do not have an account you need to register first 4 Tap OK After creating you can manage your fil...

Page 62: ...tered trademarks of their respective companies 62 5 6 3 3 FTP Servers The FTP server can establish connection to either FTP FTPS SFTP WEBDAV 1 Tap New 2 Tap a supported protocol option 3 Enter the server address and username and password along with any other configuration items 4 Tap OK 5 6 3 4 Bluetooth 1 Switch to Bluetooth device page 2 Tap Yes to the Bluetooth access permission request 3 Then ...

Page 63: ...ct names in this document are trademarks or registered trademarks of their respective companies 63 5 7 4 Tools 5 6 4 1 App Manager From the Left Sidebar Tools App Manager You can manage your apps from this screen Top toolbar You can tap the address bar at the top of the screen to switch to User Apps All apps you installed System Apps All your system apps Installed on phone All apps stored on your ...

Page 64: ...heir respective companies 64 Installed in sdcard All apps stored on your external microSD card Backup Apps All apk files of the apps you have backed up All apks Show all the apk files on your device Bottom toolbar Search Find apps faster Refresh Click to refresh Sort Sort by Name Backup Category Modified and Size View Click to switch to Icon List and Details view You can select apps you need to un...

Page 65: ...brand names and product names in this document are trademarks or registered trademarks of their respective companies 65 While in app manager you may notice that some apps are in green and some are in red Green means you have backed up the version of the app you have currently installed Red means the version you have backed up is older than the one currently installed 5 6 4 2 Gesture ...

Page 66: ... owner All brand names and product names in this document are trademarks or registered trademarks of their respective companies 66 You can create custom gestures to quickly perform operations Tap Gesture on Left sidebar Tap Add a gesture Select an action Draw a gesture Next time on any screen you can click the gesture water drop to draw a gesture to perform the operation ...

Page 67: ...ht owner All brand names and product names in this document are trademarks or registered trademarks of their respective companies 67 5 6 4 3 SD card analyst Address Bar Use this to switch device storage including the internal sdcard external microSD card for analysis Exit Close window Analysis Displays the total disk capacity the used capacity and the available capacity ...

Page 68: ...ied and Size You can tap a folder to analyze its contents in detail Tap and hold a folder and you can delete it 5 6 4 4 Remote You can manage files on your device from a remote computer on the same LAN without requiring a USB connection 1 In Remote Manager tap Turn on You will see an IP address displayed with ftp 2 Type it in a web browser address bar at your remote computer 3 Then you can see all...

Page 69: ...ohibited without the written consent of the copyright owner All brand names and product names in this document are trademarks or registered trademarks of their respective companies 69 5 6 4 5 Net manager Net Manager can open wireless network settings directly Create or join a network so you can share files on the device ...

Page 70: ...ct names in this document are trademarks or registered trademarks of their respective companies 70 5 6 4 6 Hide file To hide files add a in front of the file name and then tap Settings Display settings uncheck the option Show Hidden Files Select the file or folders you want to hide and add them to the hide list Tap More Hide From the Left Sidebar Tools Hide list you can find and manage your hidden...

Page 71: ...er All brand names and product names in this document are trademarks or registered trademarks of their respective companies 71 5 6 4 7 Clipboard toolbar After files are copied they will be available on the clipboard You can paste one file or a selection to any folder at any time To clear the clipboard tap Clear All to delete all files currently on the clipboard 5 6 4 8 Search ...

Page 72: ...ective companies 72 Tap Search on the bottom toolbar and input keywords such as mp3 text etc You can choose a category of files or even advanced options to find the target 5 6 4 9 Backup settings You can make a backup of all your app settings with ES File Explorer After you have customised all your settings you can go to Settings Backup Settings Next time you update ES File Explorer or reinstall E...

Page 73: ...roduct names in this document are trademarks or registered trademarks of their respective companies 73 5 6 4 10 Change theme Tap the Theme button on the Left Sidebar and you can change the theme and set the background color text color folder style etc of the ES File Explorer app 5 6 4 11 Password protection Password Protection can be enabled to protect your network resources in a more convenient w...

Page 74: ...assword you configured 5 6 5 Settings 5 6 5 1 File settings Display settings Show hidden files Show files whose name start with a Show scroll thumb Show scroll thumb while long scrolling Close notification Close notification when the task is finished Show the select button Show the select button on the toolbar Show the Windows button Show the Windows button on the toolbar Show the name on the tool...

Page 75: ...ath 5 6 5 2 Security settings Password settings Start protect Need password to access ES File Explorer Turn on network protection Turn on password to protect your network resources Hide list protection Turn on password to protect your hide list resources Change password Change the password Backup settings Backup Backup settings Restore Restore settings 5 6 5 3 Tools settings App manager settings B...

Page 76: ...ually Help You can find user manual of ES File Explorer About Show version information 5 7 Central directory If provided by your communication system your handset allows you to use the Central Directory to dial a number The Central Directory is a database that contains user names and Directory Numbers DNR 5 7 1 Dialling a central directory contact 1 Tap Apps Central Directory 2 Enter a name or the...

Page 77: ... either on the internal phone memory or external microSD card 5 8 1 Viewing pictures 1 Tap Apps Gallery 2 Tap a picture to view it 5 8 2 Editing pictures 1 Tap Apps Gallery 2 Tap a picture to edit 3 Press Menu and select an option listed o Delete Deletes the currently selected picture o Slideshow Displays pictures in a slideshow o Edit Edit the picture with various effects o Rotate Left Rotates th...

Page 78: ...nds it will resume playing from the previous part Note If the video is finished the screen returns back to the gallery 3 Follow the on screen instructions 5 9 Music Enjoy music on the G966 Make sure to insert a microSD card to transfer music to the G966 and listen to it 5 9 1 Playing songs 1 Tap Apps Music 2 Select and tap a song from the screen Files that the G966 supports include MP3 AAC AAC eAA...

Page 79: ...mputer where your songs are stored and move them to the G966 5 Tap Turn off USB storage after you finish transferring songs 5 10 Picture camera Take pictures with the built in camera They can be saved and used via available applications 5 10 1 Takingpictures 1 Tap Apps Camera 2 Tap Settings if you want to adjust options or settings of the photo 3 Focus on the object and tap The taken picture is sa...

Page 80: ...g on the lighting conditions Night Adjusts scene mode settings specifically for taking photos in low light conditions 5 10 4 Changing white balance settings 1 Tap Settings while in camera mode 2 Tap White balance settings and adjust settings White Balance Settings Auto Automatically adjusts white balance settings for taking photos depending on the lighting conditions Incandescent Adjusts white bal...

Page 81: ...he web history for the account to pause delete or remove the individual items Clear on device search history Clears the previous search history when not using a Google account by unchecking Use Web History Use My Location Sets to use my location for Google search results and other Google services Search on google com Sets to use google com to search instead of your local domain 5 11 3 Selecting it...

Page 82: ...stop recording 5 12 2 Changing camera settings 1 Tap Settings while in camera mode 2 Tap Video settings and adjust settings Camera Settings Store Location To geo tag and store location information for the video you take Restore Defaults Resets settings to default parameters 5 12 3 Changing time lapse settings 1 Tap Settings while in camera mode 2 Tap Time lapse interval settings and adjust setting...

Page 83: ...istered trademarks of their respective companies 83 White Balance Settings Auto Automatically adjusts white balance settings for taking photos depending on the lighting conditions Incandescent Adjusts white balance settings in favour of internal spaces using incandescent lighting Daylight Adjusts white balance settings in favour of outdoor day lighting Fluorescent Adjusts white balance settings in...

Page 84: ...ore information 6 1 2 Setting Wi Fi networks 1 Tap Apps Settings 2 Tap Wi Fi to manage the wireless network Refer to section 3 2 Using a WiFi network for more information 6 1 3 Setting Bluetooth 1 Tap Apps Settings 2 Tap Bluetooth to manage the wireless technology option 6 2 Sound 6 2 1 Setting to vibrate 1 Tap Apps Settings Sound 2 Tap Silent mode and tap Vibrate 6 2 2 Setting volume 1 Tap Apps S...

Page 85: ...1 Tap Apps Settings Sound Notification tones 2 Select and tap a ringtone for notifications 3 Tap OK 6 2 5 Setting feedback options 1 Tap Apps Settings Sound 2 Tap Touch sounds if you want to play sound when making selection on the screen 3 Tap Screen lock sounds if you want to play sound when locking and unlocking the screen 4 Tap Vibrate on touch if you want the G966 to vibrate when you tap soft ...

Page 86: ...d Yellow Green or Blue to configure 3 Tap the notification the LED will indicate Missed call Text message Voice message Text or Voice message Bluetooth active Low battery Charging Silent charging 6 5 Storage 6 5 1 Viewing the status of space 1 Tap Apps Settings Storage Flick the screen downward and you can see the status of space available for the G966 2 Tap Unmount SD card OK if you want to remov...

Page 87: ...he following setting options USB Storage Import or export files from to device s internal memory and SD card to a PC Media device MTP Sets to transfer media files between the phone and a PC Camera PTP Sets to transfer photos from the phone to a PC PC data mode Sets to transfer files with PC tools Show settings when USB connected Sets to view settings when connected via a USB cable Tips Views tips ...

Page 88: ... Use the Emergency call feature to dial a number send a text message or run an application on the G966 when the Emergency key is pressed Emergency Call Settings Off Default Emergency call function key is disabled Text Message Send an emergency message If you define a message up to 160 characters the handset sends the message to the number specified You can send text messages only if your system su...

Page 89: ...r Emergency tap Mode and select App 3 Tap App and if suitable applications that can be used with this feature are installed they will be listed to select 6 7 Battery 1 Tap Apps Settings Battery 2 View battery usage 6 8 Apps 6 8 1 Managing applications 1 Tap Apps Settings Apps 2 Tap an option to manage applications 3 Tap DOWNLOADED if you want to manage downloaded applications You can stop an appli...

Page 90: ... want to lock the screen 4 Tap Slide Pattern PIN or Password if you want to lock the screen with slide pattern PIN or password and take the necessary steps 6 12 2 Setting screen lock with a pattern 1 Tap Apps Settings Security Screen lock Pattern 2 Watch how you should draw a pattern and tap Next 3 Drag your pattern on the screen and tap Continue Make sure to connect the pattern with at least four...

Page 91: ...s information on the screen 1 Tap Apps Settings Security Owner info 2 Tap Show owner info on lock screen if you want to show information on the locked screen Note You have to configure the screen lock first 3 Enter a phrase on the box The phrase will appear when you turn on the screen 6 12 6 Allowing installation of unknown applications 1 Tap Apps Settings Security 2 Tap Unknown sources if you wan...

Page 92: ...o the factory reset to the G966 the following items will be cleared All externally installed apps and data All internal app data including call log contacts etc User settings System cache SD card if selected in UI DECT EEPROM The following will be kept ARM production data DECT Factory adjusted EEPROM settings Initial XML provisioning data including DECT Registrations and Protected settings on SD C...

Page 93: ... time and date format 1 Tap Apps Settings Date time 2 Tap Use 24 hour format if you want to see time in a 24 hour format 3 Tap Select date format and select a preferred date format 6 16 Accessibility 1 Tap Apps Settings Accessibility 2 Adjust the following setting options TalkBack Turns on or off TalkBack which provides spoken feedback to help blind or visually impaired users Large text Sets to en...

Page 94: ...in thread Pointer location Sets to display the current touch data Show touches Sets to display a feedback for touches Show screen updates Sets the updating area of the screen to flash Show CPU usage Sets to display the current CPU usage Force GPU rendering Sets to use 2D hardware acceleration in applications Window animation scale Sets a window animation scale Transition animation scale Sets a tra...

Page 95: ...tp www nec enterprise com declaration of conformity Deutsch Hiermit erklärt NEC Enterprise Solutions dass sich das Gerät G966 in Übereinstimmung mit den grundlegenden Anforderungen und den übrigen einschlägigen Bestimmungen der Richtlinie 1999 5 EG befindet http www nec enterprise com declaration of conformity Eesti Käesolevaga kinnitab NEC Enterprise Solutions seadme G966 vastavust direktiivi 199...

Page 96: ...entes de la directive 1999 5 CE http www nec enterprise com declaration of conformity Íslenska Hér með lýsir NEC Enterprise Solutions yfir því að G966 er í samræmi við grunnkröfur og aðrar kröfur sem gerðar eru í tilskipun 1999 5 EC http www nec enterprise com declaration of conformity Italiano Con la presente NEC Enterprise Solutions dichiara che questo G966 è conforme ai requisiti essenziali ed ...

Page 97: ...Solutions dat het toestel G966 in overeenstemming is met de essentiële eisen en de andere relevante bepalingen van richtlijn 1999 5 EG http www nec enterprise com declaration of conformity Norsk NEC Enterprise Solutions erklærer herved at utstyret G966 er i samsvar med de grunnleggende krav og øvrige relevante krav i direktiv 1999 5 EF http www nec enterprise com declaration of conformity Polski N...

Page 98: ...rprise com declaration of conformity NEC Enterprise Solutions Anton Philipsweg 1 1223 KZ Hilversum The Netherlands 7 1 2 Regulatory information United States 7 1 2 1 FCC Information This device complies with Part 15 of the FCC Rules Operation is subject to the following two conditions 1 this device may not cause harmful interference and 2 this device must accept any interference received including...

Page 99: ...l safety margin designed to assure the safety of all persons regardless of age and health This device and its antenna must not be co located or operating in conjunction with any other antenna or transmitter This product has been shown to be capable of compliance for localized specific absorption rate SAR for uncontrolled environment general population exposure limits specified in ANSI IEEE Std C95...

Page 100: ...essories should be disposed of separately in order to allow proper treatment recovery and recycling These products should be taken to a designated facility where the best available treatment recovery and recycling techniques are available Separate disposal has significant advantages valuable materials can be re used and it prevents the dispersion of unwanted substances into the municipal waste str...

Page 101: ...owner All brand names and product names in this document are trademarks or registered trademarks of their respective companies 101 8 3 Battery disposal information Defect or exhausted batteries should never be disposed of as municipal waste Return old batteries to the battery supplier a licensed battery dealer or a designated collection facility Do not incinerate batteries ...

Reviews: