7
3. Names of parts
①
⑥
⑧
②
③
④
⑨
⑤
⑦
⑩
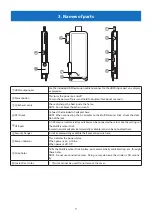
①
HDMI output port
Use the included HDMI extension cable to connect to the HDMI input port on a display
or projector.
②
Power button
This turns the power on and off.
To turn the power off, press and hold the button (for about 5 seconds).
③
⑨
Exhaust vents
These discharge the heat inside the frame.
NOTE: Do not block the exhaust vents.
④
DC IN jack
Connect the included AC adapter here.
NOTE: When connecting the AC adapter to the MultiPresenter Stick, check the direc-
tion of the jack.
⑤
USB port
A USB mouse (commercially available) can be connected here to make the settings of
the MultiPresenter Stick.
A wired network adapter (commercially available) can also be connected here.
⑥
Security hanger
Install a commercially available theft prevention wire here.
⑦
Power indicator
This indicates the power status.
When power is on: Lit blue
When power is off: Off
⑧
Strap holes
To fix the MultiPresenter Stick in place, put a commercially available strap, etc., through
these holes.
NOTE: Do not use conductive wires. Doing so may decrease the wireless LAN sensitiv-
ity.
⑩
microSD card slot
* This slot cannot be used. Do not remove the cover.


