10
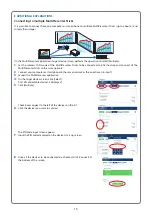
4-2-1. Making the initial settings using a computer or smartphone
First, connect the computer or smartphone to the same network as the MultiPresenter Stick (SSID displayed on the screen).
* The following explanation is for Windows 7.
1
.
Click the wireless LAN icon on the task tray.
2
.
From the list of wireless networks, select the SSID shown on the
screen (“SetupMultiPresenter_1234567890” (NOTE: the 1234567890
section differs from product to product)), then click [Connect].
3
.
Launch the web browser and input the URL indicated on the
screen (“http://192.168.120.1”).
The language selection menu appears.
4
.
Select [English] on the web browser screen, then click [NEXT].
5
.
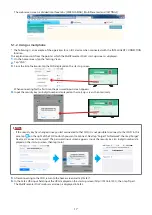
Select [INTELLIGENT CONNECTION (recommended)] or [INFRA-
STRUCTURE], then click [NEXT].
• When [INTELLIGENT CONNECTION (recommended)] was select-
ed, this completes the initial settings. Close the web browser.
Proceed to “4-3. Preparing the MultiPresenter application” on
page 12.
• When [INFRASTRUCTURE] was selected, the connection set-
tings screen appears. Proceed to step
6
below.
6
.
Follow the instructions of your network administrator for the set-
tings for connecting to an existing network.
Example of operation
①
Click [SITE SURVEY] and select the SSID (access point).
②
Input the SSID’s security key (password).
③
To confirm, input the security key again.
①
②
③
7
.
After making the connection settings, click [NEXT].
The next screen appears.


