12
USIM Card
USIM Card is an IC card containing phone number and other
customer information.
Handling USIM Card
Check the following regarding USIM Card handling.
IC Chip
For handling USIM Card, see the following SoftBank Website
(Japanese).
https://www.softbank.jp/mobile/support/protect/usim/
(Japanese)
・Always keep the IC chip clean.
・Wipe clean with a dry, soft cloth.
・Avoid applying labels. May cause malfunction.
USIM Card Cautions
Observe the following when using USIM Card.
・Customer is responsible for any damage caused by inserting
USIM Card in another-brand IC card reader, etc. SoftBank
Corp. is not responsible in such case.
・USIM Card is the property of SoftBank Corp.
・USIM Card is replaceable (at cost) in case of loss/damage.
・Return USIM Card to SoftBank Corp. when canceling
subscription.
・Returned USIM Cards are recycled for environmental
purposes.
・Note that USIM Card specifications and performance may
change without notice. Please be forewarned.
・It is recommended that you keep a separate copy of
information that is stored on USIM Card. SoftBank Corp. is
not responsible for damages from saved information that
is lost.
・Always follow emergency procedures to suspend service
if your USIM Card or Wi-Fi router (USIM Card inserted) is
lost/stolen. Contact "
・Be sure to power off Wi-Fi router before installing/
removing USIM Card.
・If USIM Card of another company is used, services and
functions may be limited. SoftBank Corp. does not
guarantee any operation.
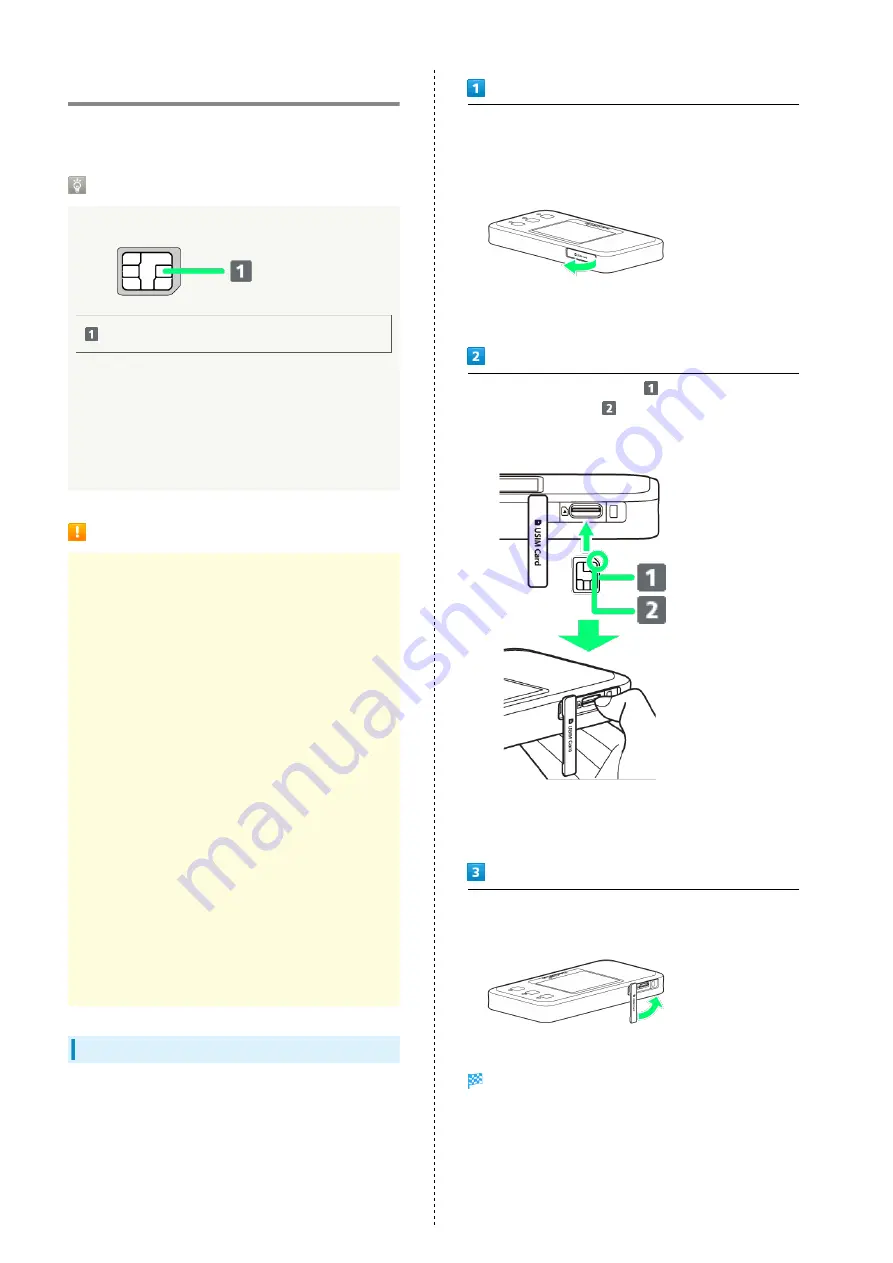
Installing USIM Card
Be sure to power off Wi-Fi router before doing this.
Hook your fingernail or something similar in the groove on the
side of USIM Cover on the side of Wi-Fi router, and open USIM
Cover in the direction of the arrow
・Be careful not to hurt your fingernail.
Face the IC chip (metal surface) (
) of USIM Card upward,
insert the notched part (
) of USIM Card straight into
USIM Card Slot, and press it in with your fingertip or something
similar until it clicks
・Note the orientation of the notch.
・When installing USIM Card, take care not to touch the IC chip
or scratch the surface.
Close USIM Cover
USIM Card installation is complete.
・Use your finger to press on USIM Cover, to fit it to Wi-Fi
router.
Summary of Contents for A201NE
Page 1: ...A201NE User Guide ...
Page 2: ......
Page 8: ...6 ...
Page 36: ...34 ...
Page 40: ...38 ...
Page 44: ...42 ...
Page 112: ...110 Layout of the Settings Screen Item Description ...
Page 121: ...119 Settings Using Web UI A201NE Traffic Counter Traffic Counter screen appears ...
Page 124: ...122 Wi Fi Spot Wi Fi Spot screen appears ...
Page 133: ...131 Settings Using Web UI A201NE Wi Fi Settings Guest SSID Guest SSID settings screen appears ...
Page 140: ...138 WPS Settings WPS Settings screen appears ...
Page 143: ...141 Settings Using Web UI A201NE ECO Settings The ECO Settings screen appears ...
Page 144: ...142 Set each item in ECO Settings Apply ECO Settings are set ...
Page 150: ...148 LAN Settings LAN Settings screen appears ...
Page 154: ...152 Select the target interface Select Add IPv4 Packet Filter Settings Add screen appears ...
Page 158: ...156 Select the target interface Select Add IPv6 Packet Filter Settings Add screen appears ...
Page 167: ...165 Settings Using Web UI A201NE ...
Page 168: ...166 Other Setting items are set ...
Page 185: ...183 Settings Using Web UI A201NE Exit Home Screen appears ...
Page 188: ...186 Open ...
Page 189: ...187 Settings Using Web UI A201NE PIN Authentication ...
Page 196: ...194 Restart Confirmation screen appears OK ...
Page 197: ...195 Settings Using Web UI A201NE OK Wi Fi router restarts ...
Page 200: ...198 ...
Page 203: ...201 Settings Using Web UI A201NE Connection History Connection History screen appears ...
Page 206: ...204 Check UPnP Info IP address and port number appear ...
Page 210: ...208 Manual A website on which the manual is available is opened ...
Page 232: ...230 ...
Page 235: ......


