


2x20 Customer Display Interface
9-97
Set Screen Save Walk
Format
1B 0A
Description
This command causes the visible display to walk right to left when the Screen Save timer
expires (five minutes). The characters on the display appear to walk across the
corresponding display row from right to left. The two lines in the 2x20 Display walk in
parallel completely off the left side of the display, and then the two lines appear to come
back from the right. If the display is space filled, then no effect is perceived even though
the walking is taking place. The Screen Save Blank mode is the default mode after power
up.
Turn On Screen Save
Format
1B 0B
Description
This command causes one of the screen save functions (Set Screen Save Blank or Set
Screen Save Walk) to activate immediately rather than waiting for the screen save timer
to expire. If the Disable Screen Save command is in effect when this command is issued,
it is canceled, and the screen saver is enabled and activated immediately.
Disable Screen Save Option
Format
1B 0C
Description
The firmware ceases to keep time for the screen save activity from the host software, and
the display neither goes blank nor begins to walk due to inactivity from the host. This
command can be canceled by the Turn On Screen Save, Set Screen Save Blank, and Set
Screen Save Walk commands.
Summary of Contents for XR3 (7613)
Page 1: ...User Guide NCR RealPOS XR3 7613 Release 1 0 BCC5 0000 5154 Issue B...
Page 13: ...xi...
Page 20: ...Product Overview 1 7 Label Locations...
Page 62: ...4 49 Disk Image Backup and Recovery Tool 2 Click on the USB Button...
Page 69: ...Disk Image Backup and Recovery Tool 4 56 A progress bar is displayed as the image is applied...
Page 70: ...4 57 Disk Image Backup and Recovery Tool A message is displayed when the load is complete...
Page 71: ...Disk Image Backup and Recovery Tool 4 58 5 Reboot the POS...
Page 82: ...5 69 Power Management 2 Select Network Adapters Realtek PCIe GBE Family Controller 2...
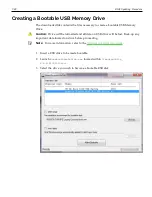
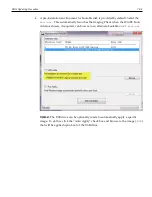
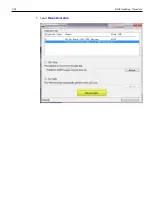
Page 98: ...7 85 BIOS Updating Procedure 5 Select Make Bootable...
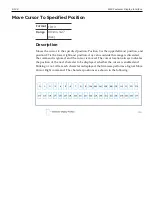
Page 124: ...2x20 Customer Display Interface 9 111 245 246 247 248 249 250 251 252 253 254 255...
Page 132: ...2x20 Customer Display Interface 9 119 245 246 247 248 249 250 251 252 253 254 255...
Page 140: ...2x20 Customer Display Interface 9 127 245 246 247 248 249 250 251 252 253 254 255...
Page 144: ...10 131 Wireless Adapter Switching 6 Select Create a new package OK...
Page 151: ...B 138 Touch Screen Calibration Do NOT touch the bezel with your other fingers...