


Chapter 7:
BIOS Setup
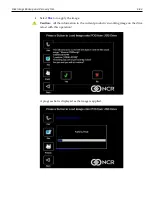
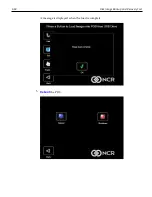
Entering Setup
1. Connect an alphanumeric USB keyboard to the terminal.
2. Apply power to the terminal.
3. When you see the NCR logo displayed, select
Del
or
F2
.
How to Select Menu Options
The following keyboard controls are used to select the menu options and to make
changes to their values.
•
Use the arrow keys to select (highlight) options and menu screens.
•
Use the [
Enter
] key to select a submenu.
•
Use the [
+
] and [
-
] keys to change field values.
•
To view help information on the possible selections for the highlighted item, select
F1
.
•
To save the changes, move the cursor to the
Exit Menu
, select either
Save Changes
& Exit
or
Save Changes
, and select
Enter
.
Restoring Factory Settings
To reset all values to their default settings for the
current screen
, select [
F9
] and then
[
Enter
] when the confirmation message is displayed. The terminal automatically loads
the BIOS default values. To reset all BIOS settings to their default settings go to the Exit
menu, select F9, select either
Save Changes & Exit
or
Save Changes
, and select
[
Enter
].
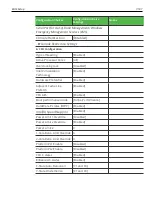
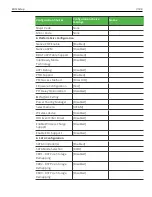
See the
BIOS Default Settings
sections later in this chapter for the pre-installed Setup
defaults.
Summary of Contents for POS XR8
Page 1: ...User Guide NCR POS XR8 XR8c 7607 B005 0000 2436 Issue C ...
Page 9: ...vii Touch Screen Cleaning Procedures 141 ...
Page 27: ...Chapter 2 External Connectors Motherboard Release 1 x Release 2 x Display Port Connections ...
Page 28: ...2 18 External Connectors Release 3 x XR8c ...
Page 42: ...2 32 ...
Page 59: ...Hardware Installation 3 49 24V Powered USB and RS232 Cables ...
Page 61: ...Hardware Installation 3 51 24V Powered USB and RS232 Cables ...
Page 70: ...3 60 Hardware Installation NCR 5932 5715 Big Ticket USB Keyboard ...
Page 72: ...3 62 Hardware Installation NCR 5932 6674 POS Compact Alphanumeric USB Keyboard ...
Page 77: ...Hardware Installation 3 67 3 Disconnect the SATA Power connector from the Drive ...
Page 78: ...3 68 Hardware Installation 4 Unscrew the Drive from the Hard Drive chassis Retain the screws ...
Page 79: ...Hardware Installation 3 69 5 Slide the drive out of the chassis bracket ...
Page 80: ...3 70 Hardware Installation 6 Slide in the new drive and secure with the retained screws ...
Page 81: ...Hardware Installation 3 71 7 Connect the SATA Power connector to the Drive ...
Page 82: ...3 72 Hardware Installation 8 Replace the Sled Cover and reconnect power to the terminal ...
Page 92: ...5 82 ...
Page 130: ...7 120 ...
Page 147: ...Configuring a Second HDD for RAID 10 137 7 Select Next ...
Page 152: ...11 142 ...


