Kit Instructions
2-Pack Large Basket Module (Medium Gray)
7358-K705Issue B
Page 1: ...Kit Instructions 2 Pack Large Basket Module Medium Gray 7358 K705 Issue B...
Page 2: ...tions of an agreement you have with NCR NCR s copyright notice must be included It is the policy of NCR Corporation NCR to improve products as new technology components software and firmware become av...
Page 3: ...sion Record Issue Date Remarks A Mar 2021 First Issue B May 2021 Updated illustration and part numbers in the Kit Contents section Updated procedures Added procedures for NCR FastLane SelfServ Checkou...
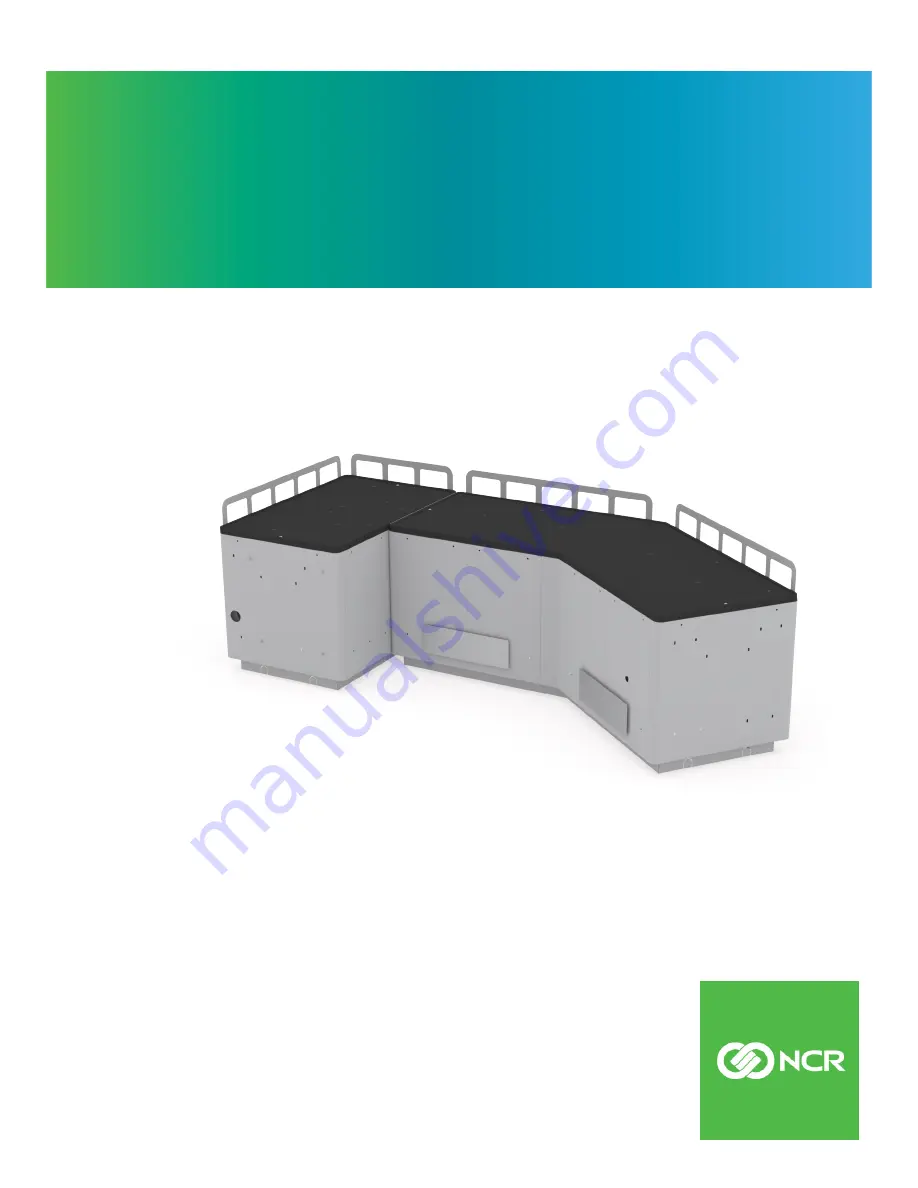
Page 4: ...Basket Basket Module can be configured for either Left hand LH orientation or Right hand RH orientation which refers to the direction customers scan and bag items Left hand LH orientation Customers sc...
Page 5: ...2 2 Pack Large Basket Module Medium Gray Kit Contents Part Number Description 497 0530587 Large Basket Kit WM Medium Gray 2 Pack 497 0530518 Hole Plug 2 000 WM Medium Gray 10 pcs...
Page 6: ...If needed use these screws to mount Bag Racks on the Top Trays 497 0457054 Black Nylon Spacer 15Mm Od X 10 4Mm Id X 10Mm L 8 pcs 497 0528528 Large Basket Angled Tie Bar 4 pcs 497 0528530 Large Basket...
Page 7: ...Basket Inner Angled Panel WM Medium Gray 2 pcs 795 0286828 Large Basket Corner Center Panel WM Medium Gray 4 pcs 795 0287628 Hole Cover Label For LBSCO WM Medium Gray 4 pcs 795 0287828 Large Basket U...
Page 8: ...e approximate shipping dimension and weight for the 7358 K705 2 Pack Large Basket Module Medium Gray Note These values are for reference only Shipping Dimension Shipping Weight Height Length Width Pou...
Page 9: ...he approximate dimension and weight of the 7358 K705 2 Pack Large Basket Module Medium Gray Note These values are for reference only Dimension 1 Module Weight 1 Module Height Length Width Pounds lbs K...
Page 10: ...Required Tools The 7358 K705 2 Pack Large Basket Module Medium Gray is designed to be assembled without tools But if a push in rivet needs to be removed NCR recommends using any of the following tools...
Page 11: ...r Bagwell Corner Bagwell on page 22 2 Installing Corner Bagwell Assembly 7358 on page 30 3 Installing Corner Bagwell Fences on page 28 4 Setting Up Modular Large Basket Angled Bagwell V Bagwell on the...
Page 12: ...sket Angled Bagwell V Bagwell follow these steps Note The procedure uses the Right hand RH orientation for reference 1 Lay the U Module on its side as shown in the image below 2 Attach the End Panel b...
Page 13: ...10 2 Pack Large Basket Module Medium Gray b Slide the End Panel to engage the hooks into the U Module slots Ensure that the End Panel snaps in place c Verify that all hooks are properly engaged...
Page 14: ...nd Panel and U Module together using two 2 push in rivets 3 Slightly lift the U Module to align its slots with the hooks two on each side of the End Module assembly and then slide down to engage the h...
Page 15: ...ks of the U Module assembly and then slide down to engage the hooks Ensure that the Modules are secure and well aligned 5 Slightly lift the Inner Angled Panel to align its slots with the hooks of the...
Page 16: ...ner between the U Module and Angled Panels Ensure that the Tie Bar hooks are properly engaged 7 Slightly lift the U Module to align its slots with the hooks two on each side of the Angled Panels and t...
Page 17: ...r between the U Module and Angled Panels Ensure that the Tie Bar hooks are properly engaged 9 Slightly lift the U Module to align its slots with the hooks two on each side of the U Module assembly and...
Page 18: ...slots with the hooks two on each side of the U Module assembly and then slide down to engage the hooks Ensure that the Modules are secure and well aligned 11 Secure each module and tie bar connection...
Page 19: ...es For more information refer to Installing V Bagwell Fences on the facing page Install the Bagwell Bumpers For more information refer to Installing V Bagwell Bumpers on page 20 Install the Angled Bag...
Page 20: ...es follow these steps Note For the purpose of illustration only this procedure shows images using Right hand RH orientation 1 Assemble the V Bagwell For more information refer to Setting Up Modular La...
Page 21: ...18 2 Pack Large Basket Module Medium Gray 3 Secure the Fence using three 3 wing nuts 4 Insert the Fence studs into the corresponding holes on the Bagwell as shown in the image below...
Page 22: ...2 Pack Large Basket Module Medium Gray 19 5 Secure the Fence using three 3 wing nuts...
Page 23: ...V Bagwell To install the bumpers follow these steps Note For the purpose of illustration only this procedure shows images using Right hand RH orientation 1 Assemble the V Bagwell For more information...
Page 24: ...Do the following a Position each Bumper so that the screws are aligned with the holes on the Bagwell b Secure each Bumper on the Bagwell using two 2 wing nuts Note To install the V Bagwell Fences refe...
Page 25: ...he Corner Bagwell follow these steps Note The procedure uses the Right hand RH orientation for reference 1 Lay the U Module on its side as shown in the image below 2 Attach the End Panel by doing the...
Page 26: ...2 Pack Large Basket Module Medium Gray 23 b Slide the hooks into the U Module slots to engage the hooks Ensure that the End Panel snaps in place c Verify that all hooks are properly engaged...
Page 27: ...ether using two 2 push in rivets 3 Attach the Center Panels on each side of the U Module by doing the following a Align the hooks with the slots two on each side of the End Module assembly and then sl...
Page 28: ...using one 1 push in rivet on each side 4 Attach the U Module to the Center Panel assembly by doing the following a Align the hooks with the slots two on each side of the Center Panel assembly and the...
Page 29: ...ssembly using one 1 push in rivet on each side 5 Attach the End Panel to the U Module assembly by doing the following a Align the hooks with the slots two on each side of the U Module assembly and the...
Page 30: ...2 Pack Large Basket Module Medium Gray 27 b Secure the End Panel using one 1 push in rivet on each side...
Page 31: ...s 1 Assemble the Corner Bagwell For more information refer to Setting Up Modular Large Basket Corner Bagwell Corner Bagwell on page 22 2 Install the Rear Fence by doing the following a Insert the Fenc...
Page 32: ...Basket Module Medium Gray 29 3 Install the End Fence by doing the following a Insert the Fence studs into the corresponding holes on the Bagwell as shown in the image below b Secure the Fence using tw...
Page 33: ...rmation refer to Setting Up Modular Large Basket Corner Bagwell Corner Bagwell on page 22 2 Align the holes on the End Panel of the Corner Bagwell with the four 4 holes on the side of the Core Cabinet...
Page 34: ...2 Pack Large Basket Module Medium Gray 31 5 Secure the Corner Bagwell using four 4 black knob screws 6 Install Hole Plugs on the sides of the Corner Bagwell assembly as shown in the image below...
Page 35: ...ce 1 Assemble the modular Corner Bagwell For more information refer to Setting Up Modular Large Basket Corner Bagwell Corner Bagwell on page 22 2 Align the holes on the Bagwell with the two 2 holes on...
Page 36: ...2 Pack Large Basket Module Medium Gray 33 5 Secure the Bagwell using two 2 red knob screws 6 Install a hole plug in the area not covered by the Pedestal as shown in the example below...
Page 37: ...steps Note The procedure uses the Right hand RH orientation of the 7358 unit for reference 1 Install the Corner Bagwell to the Core Cabinet For more information refer to Installing Corner Bagwell Ass...
Page 38: ...Gray 35 3 Secure the V Bagwell to the Corner Bagwell using four 4 knob screws 4 Insert hole plugs in their corresponding holes as shown in the example below Note The hole closest to the end of the Bag...
Page 39: ...agwell Assembly 7370 on page 32 2 Install the Angled Bagwell For more information refer to Installing V Bagwell Assembly on page 34 3 Install the Weatherstrip Gasket on the Corner Bagwell Top Tray by...
Page 40: ...Top Tray by doing the following a Place the Top Tray on the Corner Bagwell Ensure that the captive screws on both ends of the Top Tray are aligned with the corresponding screw holes on the Bagwell b T...
Page 41: ...fill the gap between the Corner Bagwell Top Tray and Angled Bagwell Top Tray a Remove the adhesive strip from the back of the Weatherstrip Gasket b Attach the Weatherstrip Gasket at the end of the Top...
Page 42: ...ll Top Tray by doing the following a Place the Top Tray on the Angled Bagwell Ensure that the captive screws on each end of the Top Tray are aligned with the corresponding screw holes on Bagwell b Tig...
Page 43: ...ack Large Basket Module Medium Gray c Ensure that the Weatherstrip Gaskets are aligned and properly filled the gap between the Corner Bagwell Top Tray and Angled Bagwell Top Tray as shown in the image...
Page 44: ...about changing the orientation of the Bottom of Basket Camera refer to 7358 K582 Bottom of Basket Camera Kit Instructions c Remove the Corner Bagwell For more information refer to Removing Corner Bagw...
Page 45: ...asket Bagwell Top Trays To remove the Top Trays from the Bagwells follow these steps 1 Remove the Angled Bagwell Top Tray by doing the following a Loosen the captive screws at each end of the Top Tray...
Page 46: ...Module Medium Gray 43 2 Remove the Top Tray from the Corner Bagwell by doing the following a Loosen the captive screws at each end of the Top Tray as shown in the image below a Lift the Top Tray from...
Page 47: ...Bagwell assembly follow these steps Note The procedure uses the Right hand RH orientation for reference 1 Remove the Top Trays from the Bagwells For more information refer to Removing Modular Large B...
Page 48: ...2 Pack Large Basket Module Medium Gray 45 3 Pull the V Bagwell assembly away from the Corner Bagwell assembly as shown in the image below...
Page 49: ...Lane SelfServ Checkout 7358 follow these steps Note The procedure uses the Right hand RH orientation for reference 1 Remove the Angled Bagwell assembly from the Corner Bagwell assembly For more inform...
Page 50: ...2 Pack Large Basket Module Medium Gray 47 3 Pull the Corner Bagwell assembly away from the Core Cabinet as shown in the image below...
Page 51: ...Pedestal of an NCR FastLane SelfServ Checkout 7370 follow these steps Note The procedure uses the Right hand RH orientation for reference 1 Remove the Top Tray For more information refer to Removing...
Page 52: ...2 Pack Large Basket Module Medium Gray 49 3 Pull the Bagwell assembly away from the Pedestal as shown in the image below...
Page 53: ...50...