background image

13

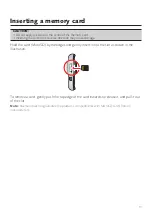
Inserting a memory card

CAUTION:


• 

Do not apply pressure to the centre of the memory card.

• 

Inserting the card in the reverse direction may cause damage.

Hold the card (MicroSD) by the edges and gently insert it into the slot as shown in the 
illustration.

To remove a card, gently push the top edge of the card inwards to release it, and pull it out 
of the slot.

Note: 

Navman does not guarantee the product’s compatibilities with MicroSD cards from all 

manufacturers.

Summary of Contents for EZY260LMT

Page 1: ...EZY260LMT MY550LMT MY650LMMT User Manual EZY Series MY Series...

Page 2: ...st trip 19 How do I preview the destination on map 20 How do I preview a route 21 Changing the navigation mode 21 Large Vehicle and Professional Truck modes 21 Pedestrian mode 22 How do I view my rout...

Page 3: ...s 40 How do I find the nearest POIs using the POI category buttons 41 How do I search for a POI by type 42 How do I search for a POI by Smart Find Keyword 43 How do I receive current traffic informati...

Page 4: ...es 74 Image Search 75 How do I search for a NavPix on the Internet 75 How do I import NavPix to My Places 75 Application Gallery 76 How do I rearrange Main Menu items on my Navman 76 How do I remove a...

Page 5: ...nfigure NavDesk 86 Reference 87 About GPS and signal reception 87 Caring for your Navman 87 Troubleshooting 88 For more information 89 Online support 89 Navman customer support 89 Speed limit 89 Safet...

Page 6: ...the distance shown on road signs Road signs show the distance to the start of an exit while your Navman shows the distance to the next intersection i e the end of the exit ramp or road To prepare to e...

Page 7: ...e battery Use a specified battery in the equipment CAUTION The battery can burst or explode releasing hazardous chemicals To reduce the risk of fire or burns do not disassemble crush puncture or dispo...

Page 8: ...is chapter Some notices apply to specific models only The user needs to switch off the device when exposed to areas with potentially explosive atmospheres such as petrol stations chemical storage depo...

Page 9: ...r Indicates the level of battery charge Green battery full Amber battery charging Touch screen Displays the output of your Navman Tap the screen with your fingertip to select menu commands or enter in...

Page 10: ...has been started 1 2 3 4 5 Enabling traffic TMC reception Note Traffic information is not available on all models and is only available in selected countries Your Navman has a built in TMC receiver Y...

Page 11: ...to the last screen that you used To lock the screen briefly press the power button then tap Lock To unlock the screen briefly press the power button then tap Unlock To turn off your Navman press and h...

Page 12: ...B cable directly into a USB port on your computer not a USB hub and plug the small end into the mini USB connector on your Navman 3 When your Navman is turned on and connected to the computer you can...

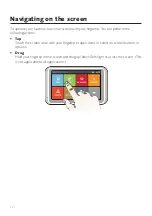
Page 13: ...fingertip You can perform the following actions Tap Touch the screen once with your fingertip to open items or select on screen buttons or options Drag Hold your fingertip on the screen and drag up do...

Page 14: ...ction may cause damage Hold the card MicroSD by the edges and gently insert it into the slot as shown in the illustration To remove a card gently push the top edge of the card inwards to release it an...

Page 15: ...lled or Navman model Icon Description Search for places areas and streets to help plan your route Display the Map screen Access your saved locations Explore the area around your current position or de...

Page 16: ...g Get help with just a phone call when your car breaks down on the road Set or navigate to your home address Search for the nearest petrol stations Search for the nearest emergency services including...

Page 17: ...to the Main Menu by tapping the Main Menu button Note In some menu screens the Main Menu button will not appear in the title bar In this instance you may have to tap the Back button twice In some men...

Page 18: ...h various layouts depending on the information you need to enter including alphabets numbers alternate characters and combinations of these To select a character tap the character To delete a characte...

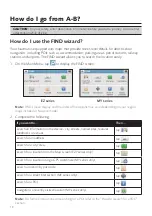
Page 19: ...FIND screen display and the order of the options may vary depending on your region maps installed or Navman model 2 Complete the following If you want to Then search all information on the device cit...

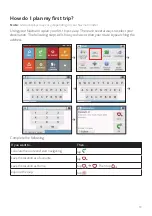
Page 20: ...rip is easy There are several ways to select your destination The following steps will show you how to plan your route by searching the address Complete the following If you want to Then calculate the...

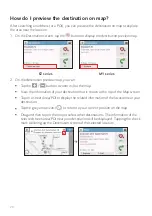
Page 21: ...ton to zoom in out the map View the information of your destination that is shown at the top of the Map screen Tap on a street area POI to display the related information of the location near your des...

Page 22: ...will display the calculated route in route simulation mode The simulated route will be displayed as orange colour Select a route type and tap and the route demonstration will start automatically Chan...

Page 23: ...rdous Materials and then select the correct option from the list enable disable the speed limit alerts tap Speed limit display Speed limit alerts to turn it on or off Note By default the speed limit a...

Page 24: ...vigating Note For more information on setting the preferred route type refer to the Route options section in Customising the system settings The driving map When a route has been calculated and select...

Page 25: ...For example the Speed Limit icon on the Map screen The Speed Limit icon shows the speed limit of the current road If greyed out you are below this speed limit When over set limit you will be warned w...

Page 26: ...hen your trip contains multiple waypoints and the traffic delay information if a traffic event occurs in your trip How do I adjust the volume 1 From the Map options screen tap 2 The volume buttons wil...

Page 27: ...res Smart Routes which intelligently anticipates congested roads at peak times so that they can be avoided Smart Routes does this by using historical anomalised data from millions of fellow drivers Si...

Page 28: ...options screen A warning will display asking you to confirm the cancellation If confirmed both the recalculation and your current route will be cancelled Parking assistant Note This feature is not av...

Page 29: ...o via each of these points in the specified order 1 On the Main Menu tap 2 Tap Create New Trip 3 Tap Add Use the FIND address wizard Explore map My Places Recent Locations menu or Here Return to start...

Page 30: ...ly if your trip returns to the start location How do I edit the waypoints in the trip 1 On the Main Menu tap 2 Tap the trip to edit 3 Tap the desired waypoint in the trip 4 Complete the following If y...

Page 31: ...y Places Note Tapping Save as Car will save the current car location in My Places How do I capture a journey To enable capturing of journeys you must first enable Capture Journey from the Main Menu ta...

Page 32: ...ulate a route from your current location How do I navigate to the saved car location Note This feature may not be available for all models 1 On the Main Menu tap 2 Tap Find My Car 3 Tap Your Navman wi...

Page 33: ...n will be added to My Places 3 To save the location as Home tap The location will be set as Home How do I navigate to a location I have saved 1 On the Main Menu tap 2 Tap the Sort by button to change...

Page 34: ...t place To make navigating to a location easier your Navman will automatically save all your start locations and destinations in a list of recent places 1 On the Main Menu tap 2 Tap 3 Tap a recent pla...

Page 35: ...avPix Note For more information about importing the NavPix to your Navman refer to the Photo Album section in What is NavDesk 1 On the Main Menu tap 2 Tap NavPix 3 From the list select the album you w...

Page 36: ...tart navigating Tap to display the NavPix Details screen How do I edit the NavPix 1 From the Album screen tap the desired thumbnail to open the NavPix in full screen 2 Tap 3 Complete the following If...

Page 37: ...36 If you want to Then explore the map tap...

Page 38: ...POIs using Near Me Note Near Me is not available on all models Near Me services allow you to quickly search the local area for common types of important POIs Search for the nearest restaurants cafes f...

Page 39: ...or navigate to an address If you do not have a GPS fix the map will display your last known position 1 On the Main Menu tap 2 On the Explore map you can View the information of the selected POI that...

Page 40: ...the POI cluster Tapping on the selected POI will bring up the screen with the POI destination details Complete the following If you want to Then calculate the route and start navigating tap save the l...

Page 41: ...ete the following If you want to Then display all POI icons tap Show all display no POI icons tap Hide all Note Hiding POIs will stop you from finding them when using explore mode cluster search selec...

Page 42: ...ch for the nearest cafe tap search for the nearest hotels motels tap search for the nearest parking places tap search for the nearest banks and ATMs tap 2 A list of the selected POI category based upo...

Page 43: ...owing If you want to Then search for POIs by keyword tap After you have entered a keyword tap OK search for restaurants cafes fast food premises and other dining establishments tap search for petrol s...

Page 44: ...e to a POI or the street address that you find by keyword 1 On the Main Menu tap 2 Tap Enter the keyword of the POI or street address that you want to search 3 Complete the following If you want to Th...

Page 45: ...rough an area in which you can receive traffic updates your Navman will decode these events and display them An icon will display at the event location on the Map screen and an audible warning is give...

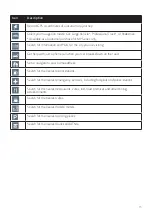
Page 46: ...list of all events on my route Your Navman creates a list of events as they are received on the All traffic events screen On the Traffic screen tap Item Description Tap to return to the previous scree...

Page 47: ...avoid the event Only available if a detour or re route is available The Unavoid button is displayed when a re route has been calculated Note When the detour information is provided the details will b...

Page 48: ...stant to re route You are too distant to accept this clearance The event is currently too distant to affect your journey Detour not found Clearance route not found A detour re route could not be calcu...

Page 49: ...ffic signal automatically Accept recommended detours automatically When the Accept recommended detours is selected your route will be re planned automatically when the detour is recommended by the tra...

Page 50: ...rd party Navman does not guarantee the accuracy of the data contained within this database either expressed or implied How do I search for a POI using Travel Book 1 On the Main Menu tap 2 Follow the p...

Page 51: ...a Bluetooth device 1 On the Main Menu tap Bluetooth 2 Tap The Search New Devices screen will display a list of nearby Bluetooth devices 3 Select the device from the list The Connecting screen will dis...

Page 52: ...enter the required information Note If the Internet settings are not available a warning message will be displayed For more information contact your mobile phone service provider How do I add contacts...

Page 53: ...try code is separated from the rest of the number sequence by a sign If you are making an international call tap and hold 0 until the sign displays 4 Tap to place the call Making a call from the phone...

Page 54: ...e the device volume To end the call tap Hang Up How do I view my call history From the Phone screen tap The Call History screen lists the calls made during the time your Navman is connected to a mobil...

Page 55: ...referred language refer to the Voice Command section in What is the NavDesk 1 On the Main Menu tap Note When in navigation mode you can launch Voice Command directly by tapping the icon on the Map scr...

Page 56: ...ng status on enabled off disabled Audio If you want to Then increase decrease the volume tap Note You can simply tap on the volume bar and the volume will be set immediately at the position you tapped...

Page 57: ...alerts which warn you of the speed limit on any given road tap Speed limit alerts and select Off disable the speed limit alert Auto set the system to alert automatically while your speed is above the...

Page 58: ...Note Not all options are available on all models set route type options for your route tap Route type to select your route type preference from the list Fastest The route that should be the fastest wh...

Page 59: ...p Note To edit the assigned avoidance tap the item from the Custom Avoidance screen and then select Enabled Disabled Rename or Delete display the installed custom POI tap Custom POI alerts display the...

Page 60: ...Version to display a list of all maps and the detailed information select a set of maps to load tap Map set then select your preference from the list This may not be available in all regions check th...

Page 61: ...e change the time zone manually select Manual time zone then adjust the setting by tapping Bluetooth Note This feature is not available on all models The Bluetooth option allows you to pair a Bluetoot...

Page 62: ...es destinations and My Drive profile on the device will be deleted reset the GPS tap Reset GPS When the warning dialog box displays tap Yes Note Occasionally the GPS fix may need to be reset This may...

Page 63: ...nt to Then view the tutorial tap View Tutorial To display the tutorial on each start up select the Show tutorial on start up option on the initial screen of tutorial view copyright and trademark infor...

Page 64: ...ows 7 Windows 8 or Mac OS X and above Internet Explorer 6 and later versions or Safari DVD drive USB port Internet connection for activation Note Microsoft NET 2 0 3 0 and 3 5 will be installed on you...

Page 65: ...a voice command file Custom POIs Application that allows you to import custom POIs Photo Album Import and edit NavPix images Image Search Search online and download NavPix which can be added to My Pl...

Page 66: ...Select a region 3 Select a subscription or offer then click Purchase an activation key from the Navman store 4 Follow the prompts to purchase your subscription A product key will be sent to you via em...

Page 67: ...ubscriptions to recover all subscriptions My Maps NavDesk My Maps My Maps allows you to install new maps remove maps from your Navman and purchase new maps Note The downloaded purchased map iso from N...

Page 68: ...e installed to your Navman are yellow The maps that require activation before being installed to your Navman are red The maps that are available for purchase from Navman are blue Note If your computer...

Page 69: ...hange colour to green Do not disconnect the USB cable until the installed map or maps have changed colour to green 9 To use your Navman disconnect the USB cable You may need to manually reset your Nav...

Page 70: ...mmand files section select the desired voice command file and click Install selected files remove a voice command file in the Installed voice command files section select the voice file you would like...

Page 71: ...our local or network drive then click Open 3 From the POI Category section If you want to Then use an existing custom POI category select Existing category then select a type from the drop down list r...

Page 72: ...e proximity do one of the followings Select a sound file from the list Click Add to select a sound file WAV format from your local or network drive When you have located the file select it and click O...

Page 73: ...will be active Search Type to search for a NavPix by name Album display area Displays thumbnails of pictures in the selected album Selected picture When a thumbnail is selected it displays with a blue...

Page 74: ...may be included in multiple albums remove a picture from an album in the Desktop albums section select the album containing the NavPix you want to remove Right click on the selected picture and selec...

Page 75: ...s Photo Album preferences NavDesk MY Navman Options Photo Album Complete the following If you want to Then change your NavPix location on your computer click Change and select a location for your NavP...

Page 76: ...search description for the image you are looking for 2 Select one of the Sort by options 3 Click Search Thumbnails of the NavPix will be displayed in the NavPix display area Note You can narrow your s...

Page 77: ...tems on my Navman 1 Select the desired item from the Device Main Menu screen section 2 Drag the item to the position that you would like it to appear on your Navman 3 Click Save to Device The order of...

Page 78: ...en Click Reset to Default Settings to restore the Main Menu screen to the factory default configuration Unlock Features NavDesk Unlock Features If you have purchased a map unlock code or subscriptions...

Page 79: ...enter the product key using the Redeem application Please note that the product key can only be used once and is not transferable Note Make sure you have an active Internet connection for this featur...

Page 80: ...tion from the computer to your Navman from the My Places panel click Import Locate the file you want to import and then click Open Note The supported file format for importing includes KML and KMZ exp...

Page 81: ...rney your friend will receive the journey as a KMZ file attached to the email Your friend will need to have Google Earth installed on the computer to view the KMZ file delete the location click then c...

Page 82: ...e Select the desired mode to plan your route Type of route Select a way to plan your route Avoidance Avoid Unsurfaced roads Toll roads Ferry routes or Special zone on your route Note The Route option...

Page 83: ...o the route you want to remove My Navman NavDesk MY Navman How do I change the displayed language for NavDesk 1 Click Language 2 Select your preferred language How do I install or remove a voice file...

Page 84: ...IN you want to assign to your Navman Your PIN must be between four and eight numerical digits 6 Click OK The PIN for your Navman has been set You will be required to enter your PIN when you turn on yo...

Page 85: ...ps of data from your Navman and later restore it if required 1 Click Backup and Restore 2 Complete the following If you want to Then backup your Navman click Create new backup Select the data you woul...

Page 86: ...r Navman before you can use the updates If the new version is detected a message will display to ask you to upgrade the system When prompted click Yes to start upgrading the system 2 Complete the foll...

Page 87: ...etween imperial and metric units Select or clear the Use decimal degrees checkbox to change between decimal degrees and latitude longitude co ordinates change the Mileage Reporter settings click Milea...

Page 88: ...negative effect on your reception Caring for your Navman Taking good care of your Navman will ensure trouble free operation and reduce the risk of damage to your Navman Keep your Navman away from exc...

Page 89: ...RMA will be created to fix the unit or replace the in car charger I can not get a GPS signal Make sure you are stationary and have a clear line of site to the sky If this fails to resolve the issue p...

Page 90: ...flict with local law and or regulations It is your responsibility to make sure that your use of the data is in compliance with local laws and or regulations Usage is at your own risk Safety camera POI...

Page 91: ...town or village Coffee shop College University Community centre Commuter railway station Courthouse Dentist Doctor Embassy Exhibition centre Ferry terminal Fire Brigade Golf course Government office G...

Page 92: ...tation Speed check Sport centre Sports hall Sports complex Stadium Tennis court Travel agency Transport ferry Veterinarian Winery Zoo Note The POI categories and the order may differ depending on your...

Page 93: ...the route but it is not serious enough to be considered a dangerous situation for example a minor accident has taken place Forecast An event is expected to occur on a route Restrictions There is a re...

Page 94: ...without notice Notes Not all models are available in all regions Depending upon the specific model purchased the colour and look of your device and accessories may not exactly match the graphics shown...

Reviews: