background image

2.1

Loading a Drum Kit from the Factory Library


First  you  will  choose  a  complete  drum  kit  from  the  huge  factory  library  included  with  MA-

SCHINE, and load it using the MASCHINE Browser. The Browser is your tool for finding, tag-

ging and categorizing all types of objects used in MASCHINE.
A drum kit basically consists of several instruments — called Sounds in MASCHINE terminolo-

gy. Those Sounds are put together into a Group, which represents the complete kit. In addition,
A MASCHINE Project can have any number of Groups which are organized into Banks. The first
Group bank is labeled 

A1

 to 

H1

 in the MASCHINE software and the second is labeled 

A2

 to

H2

, the third 

A3

 to 

H3

, and so on. So let’s look for a nice kit and load it into Bank 1 Group A

which is selected by default when you start a new Project.

2.1.1

Loading a Drum Kit from the Factory Library in the MASCHINE Software


In the MASCHINE software, the Browser is found in the left part of the window.
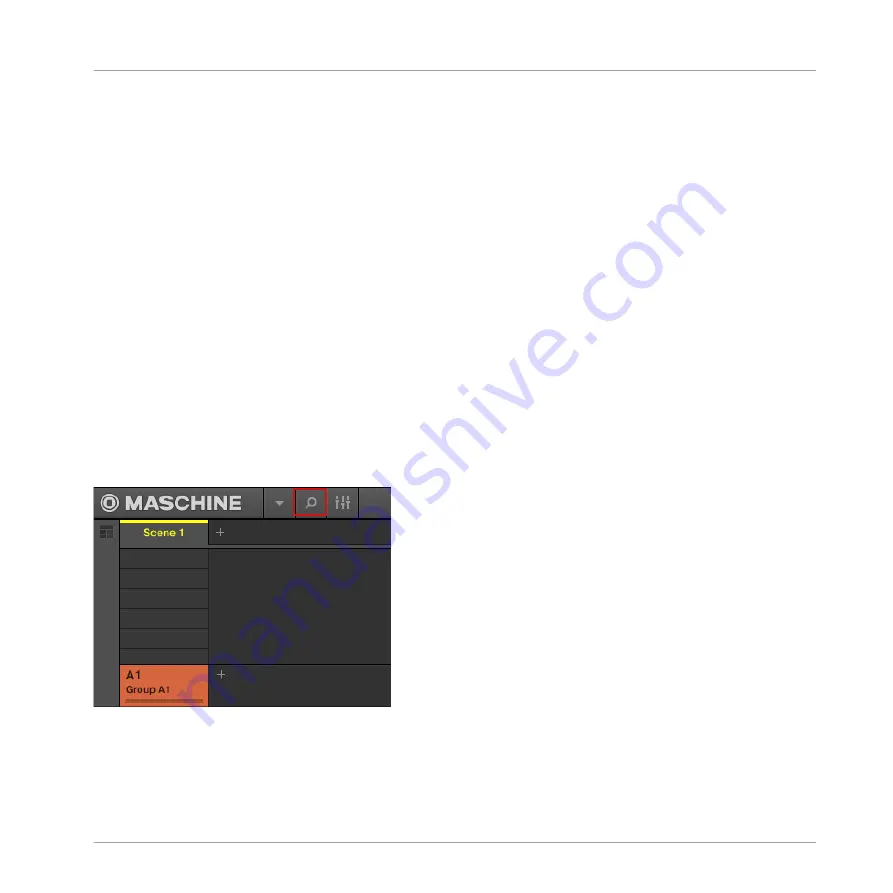
If you cannot see the Browser in the MASCHINE software, click the magnifying glass icon in
the Header at the top of the MASCHINE window in order to show the Browser:

Enable the magnifying glass to display the Browser.

To load a drum kit, do the following:
1.

Click the 

LIBRARY

 tab to open the 

LIBRARY

 pane.

First Steps

Loading a Drum Kit from the Factory Library


MASCHINE MIKRO - Getting Started - 17

Summary of Contents for Maschine Mikro MK2

Page 1: ...GETTING STARTED...

Page 2: ...red to as Native Instruments Native Instruments NI and associated logos are registered trademarks of Native Instru ments GmbH ASIO VST HALion and Cubase are registered trademarks of Steinberg Media Te...

Page 3: ...uya ku Tokyo 150 0001 Japan www native instruments co jp NATIVE INSTRUMENTS UK Limited 18 Phipp Street London EC2A 4NU UK www native instruments co uk NATIVE INSTRUMENTS FRANCE SARL 113 Rue Saint Maur...

Page 4: ...Using Solo and Mute 27 2 4 2 Using Note Repeat 29 2 5 Saving Your Project 30 2 6 To Sum Up 31 3 Building Your Own Drum Kit 32 3 1 Opening Your Project 32 3 2 Customizing Your Drum Kit 36 3 2 1 Selecti...

Page 5: ...the Software 65 4 4 Saving Your Project 66 4 5 To Sum Up 67 5 Adding a Bass Line 68 5 1 Selecting Another Group 69 5 2 Renaming and Coloring the Group 70 5 3 Using an Instrument Plug in for the Bass...

Page 6: ...um Up 100 7 Creating Beats with the Step Sequencer 102 7 1 Building Up a Beat in Step Mode 103 7 1 1 Using Step Mode 103 7 1 2 Adjusting the Pattern Length in Step Mode 104 7 2 Adjusting the Step Grid...

Page 7: ...Section Using the Controller 127 9 2 2 Duplicating and Removing Sections 128 9 3 Selecting a Loop Range 130 9 4 Saving Your Project 131 9 5 To Sum Up 132 10 Quick Reference 133 10 1 Using Your Control...

Page 8: ...2 Browser 155 10 4 3 Arranger 157 10 4 4 Control Area 160 10 4 5 Pattern Editor 161 11 Troubleshooting 163 11 1 Knowledge Base 163 11 2 Technical Support 163 11 3 Registration Support 164 11 4 User Fo...

Page 9: ...W that supports VST Audio Units or the AAX format with multiple instances you can profit from its abilities in almost any software setup or use it as a stand alone application You can sample your own...

Page 10: ...by the Controller Editor software an application that allows you to precisely define all MIDI assignments for your MASCHINE controller The Controller Editor was installed during the MASCHINE installa...

Page 11: ...SCHINE Even if you re already familiar with MASCHINE all tutorials are worth a read as every chapter may have little workflow hints of which you weren t aware Should you wish to revise a specific task...

Page 12: ...d the MASCHINE software It gives you a good overview of the main concepts and features of MASCHINE along with lists of hardware shortcuts for various tasks You can use it as a quick reminder before yo...

Page 13: ...controller is printed in gray Whenever you see this formatting applied you will find the same text on the controller s display s Important names and concepts are printed in bold References to keys on...

Page 14: ...ions in this document will only refer to the 2nd generation controller labels If you have a first generation MASCHINE MIKRO MK2 controller please use the table below to refer ence the equivalent label...

Page 15: ...ton or pad Label changes since first generation MASCHINE MIKRO MK2 If you have the original MASCHINE MIKRO MK1 controller please download the relevant documen tation for that controller from the Nativ...

Page 16: ...start MASCHINE via one of the usual ways on your operating system for exam ple by double clicking the alias placed on your desktop during the installation procedure A Project in MASCHINE In MASCHINE y...

Page 17: ...labeled A1 to H1 in the MASCHINE software and the second is labeled A2 to H2 the third A3 to H3 and so on So let s look for a nice kit and load it into Bank 1 Group A which is selected by default whe...

Page 18: ...kits in the Library 3 In the Content selector to the right click the world icon to select only Native Instruments factory content 4 In the TYPES filter select the Kits First Steps Loading a Drum Kit...

Page 19: ...r will then display only kits in the Result list 5 Select the Urban Kit sub type tag below to further refine your search First Steps Loading a Drum Kit from the Factory Library MASCHINE MIKRO Getting...

Page 20: ...ct the first Group slot This is where you are going to load our drum kit While you hold GROUP the pad 13 should be lit in blue to indicate that it is selected 2 Press the BROWSE button at the left of...

Page 21: ...roups only 5 Press Right Arrow until you see 2 3 PRODUCT at the bottom of the display 6 Turn the Control encoder until you see ALL This way you can browse all products 7 Press Right Arrow again until...

Page 22: ...you see 4 4 SUB TYPE at the bottom left of the display 10 Turn the Control encoder until you see URBAN KIT to further limit the result list to this type of kits 11 Now press F2 above the display to se...

Page 23: ...is now ready to be played from the pads as you will see in the next section The process of loading from the Browser is the same for all kinds of objects In the Browser after choosing the desired objec...

Page 24: ...pad 14 B are off indicating that they are not loaded with anything Pad 13 A is fully lit indicating that Group slot A is currently selected This means that the pads currently trigger the Sounds of thi...

Page 25: ...can also add audio loops to your Project For more information on how to add audio loops to your Project and to learn about the MASCHINE Audio plug in refer to the MASHINE Manual You can now use the t...

Page 26: ...equence using a few Sounds only e g the kick and the snare on pads 1 and 2 You will have the possibility to enrich your Pattern later To start the recording 1 With the sequencer playing press REC to e...

Page 27: ...a few powerful tools for playing your Pattern live 2 4 1 Using Solo and Mute Mute can be used to bypass a Sound or Group whereas Solo is the opposite Solo will mute all other Sounds in the Group or al...

Page 28: ...events for muted Sounds are not triggered but the audio coming from previous events might still be audible reverb tail etc You can also acti vate audio mute for Sounds to mute both events and audio Se...

Page 29: ...h sense yet 2 4 2 Using Note Repeat Note Repeat is a really handy way to play and program beats it plays the selected Sound or note repeatedly at a given rate You just need to hold a pad and its Sound...

Page 30: ...of a song All the instruments you re cord afterwards will be based on the feeling of that rhythm Before you get to adding new ele ments and editing your Pattern you should save your work right away Sa...

Page 31: ...your hard disk If you close MASCHINE or open another Project you will still be able to open this Project later 2 6 To Sum Up In this first tutorial you have learned to Load a Group using the Browser U...

Page 32: ...doubts about these tasks please refer to chapter 2 First Steps before pro ceeding 3 1 Opening Your Project If for any reason your tutorial Project is not currently open in MASCHINE e g you opened an o...

Page 33: ...Opening a Project in the Software In the MASCHINE software the Browser is found in the left part of the window If you cannot see the Browser in the MASCHINE software click the little magnifying glass...

Page 34: ...ect Using the Controller Now try operating MASCHINE via the controller wherever possible To open a Project via the controller you will follow the same process as above filtering MASCHINE objects to na...

Page 35: ...Knob 8 to select the desired Project from the list 3 Press the 4 D encoder or Button 8 to load the selected Project 4 Press FILE to leave the File mode You can continue to work on your Project The Fil...

Page 36: ...ECT appears at the bottom of the display 7 Press the Control encoder to load the Project 8 Press BROWSE to leave the Browser The BROWSE button turns off You can continue to work on your tutorial Proje...

Page 37: ...text search This powerful feature allows you to instantly find items by name 1 Click the Sound slot containing the Snare Ektl A 2 that you want to replace 2 Click the Browser button in the top row to...

Page 38: ...eft corner of the Browser to activate it you can deactivate the Prehear button next to it 2 Click any Sample in the result list The Sample will automatically load in the selected Sound slot replacing...

Page 39: ...Press Right Arrow again to select SUBTYPE 2 10 Now turn the Control encoder to select for example SIDE STICK In the middle of the display you now see that a few dozen of side stick samples are ready t...

Page 40: ...eady loaded in the Sound slot Use page left and page right button under the display to audition other Sounds in the MASCHINE library 3 2 2 Loading a Drumsynth In this section you will learn you how to...

Page 41: ...your drum kit you could replace one of the kick drums with another one for example coming from an internal instrument included with MASCHINE Drumsynth You can load Plug ins into the Plug in List via...

Page 42: ...ick the SOUND tab to select the Sound level since this is the only level at which Drumsynths can be loaded 3 At the far left of the Control area click the small Plug in icon to display the Plug ins Th...

Page 43: ...lug in menu opens and displays a list of all available effects 5 In this menu click the Drumsynth submenu to display the Drumsynths 6 Click the Kick entry to load it into the Plug in List Building You...

Page 44: ...hold the NAV button and press pad 1 to select the Plug in slot Release NAV 5 Press SHIFT BROWSE to select an effect If you would have pressed BROWSE alone here you would have accessed the Browser By...

Page 45: ...AL 9 Press F2 to view the filtered list 10 Turn the Control encoder to browse the available MASCHINE instruments When the dis play shows KICK press the Control encoder to load it 11 Press SHIFT BROWSE...

Page 46: ...g the Master Volume slider located on the right part of the Header at the top of the window Use the Master Volume slider in the Header to adjust the overall volume of MASCHINE You can also use Mix vie...

Page 47: ...the button lights up 2 Press F1 to select VOLUME 3 To adjust the overall volume simply turn the Control encoder Press and turn the Control encoder to adjust the value in finer increments 4 To adjust t...

Page 48: ...e swing of a particular Group press and hold the GROUP button press the pad corresponding to the desired Group the pad must be lit here the pad 1 for your drum kit and turn the Control encoder while h...

Page 49: ...o of your Project 1 Press the MAIN button to activate it the button lights up 2 Press F3 to select TEMPO 3 To adjust the tune of a particular Group press and hold the GROUP button press the pad 1 for...

Page 50: ...mmended you try this while your Pattern is playing you will immediately hear the effect of your changes 3 2 4 Changing the Color of Your Sounds MASCHINE allows you to change the color of each Group or...

Page 51: ...d color according to the type of percussion in that Sound slot Here is an example of how you could color Sounds Your drum kit full of colors This helps you see much quicker where the kicks the snares...

Page 52: ...r pads and create a Group that is easier to play from the pads Now exchange the positions of the Kick Ektl A 2 and the Snare Ektl A 1 in order to have both kicks on pads 1 and 2 and both snares on pad...

Page 53: ...another Project or close MASCHINE and take a break Your tutorial Project will be recalled as it was the next time you open it To save your Project in the software Press Ctrl S command S on macOS to s...

Page 54: ...ly of your Groups Patterns and Scenes more on Scenes later Move your Sounds across your Group to assign them to other pads on your controller Once you feel comfortable with these few tasks proceed to...

Page 55: ...um Kit In particular you already know how to Open a Project 3 1 Opening Your Project Use the pads to play the Sounds of the loaded Group 2 2 Playing with the Pads Record a simple Pattern with that Gro...

Page 56: ...Edi tor allows you to display the missing Sounds At any time the selected Sound slot is high lighted in the picture above the Clap Ektl A 1 triggered by the pad 1 At the right of the Group name you fi...

Page 57: ...urrently one bar long When played in a loop it might get a bit monotonous To solve this you will exclusively use the controller to double the pattern length and add some variation Double is only avail...

Page 58: ...points worth noting on quantization The use of quantization notably depends on the music style of your song In some cases the rhythm must be perfectly tight while in other cases half quantization or e...

Page 59: ...a Zoom tool The Zoom Tool in the Pattern Editor Click either end of the horizontal scroll bar hold the mouse button and then drag your mouse left or right to zoom in out Alternatively you can click an...

Page 60: ...the groove often comes from all these little imperfections in the rhythm Hence to avoid losing the Pattern s groove MASCHINE lets you half quantize your events Events are moved half way to ward the c...

Page 61: ...Ideas view of the Arranger at the top of the MASCHINE window double click the empty slot below Pattern 1 to create a new Pattern Double click the slot below slot 1 to create a new empty Pattern Patte...

Page 62: ...attern Length You have already learned how to change the Pattern Length by doubling the Pattern the Pat tern s length was doubled and its content reproduced in the second half see 4 1 2 Doubling the P...

Page 63: ...to change the Pattern Length 4 2 2 2 Adjusting the Pattern Length on the Controller 1 Press PATTERN and hold it At the bottom of the display you see that the LENGTH parameter is currently set to 1 0 0...

Page 64: ...stop the metronome press SHIFT PLAY To stop the recording press REC to disable it To stop the sequencer press PLAY to disable it The Count in allows you to prepare yourself and e g get the downbeat on...

Page 65: ...s on the Controller 1 Press PLAY to start the sequencer 2 Press and hold PATTERN 3 Press pad 1 and pad 2 alternatively and listen how both Patterns fit together 4 3 Editing Patterns in the Software In...

Page 66: ...create drag or stretch an event your action is automatically quantized according to the current quantization resolution You have Paint and Erase modes at your disposal for editing events in the Patter...

Page 67: ...half quantize a Pattern Select different Pattern slots Adjust the Pattern Length Use the Count in for recording Edit Patterns in the software Once you feel comfortable with these few tasks proceed wit...

Page 68: ...isites It is assumed here that you have followed the previous tutorials In particular you already know how to Open a Project 3 1 Opening Your Project Use the pads to play the loaded Sounds 2 2 Playing...

Page 69: ...roup bank 1 which contains the first eight Group slots Each Group bank can con tain another eight Groups The Groups in each bank will be labeled sequentially The Groups in Group bank 1 will be labeled...

Page 70: ...ept the first Group A which is selected 2 While holding GROUP press the pad 14 to select the second Group B1 Group B1 now is selected Have a look at the pads Pad 13 is half lit There is a Group inside...

Page 71: ...g Bass then press Enter on your computer keyboard to con firm The new name replaces the default name A new name for the Group B1 Now quickly give your Groups different colors Right click each Group s...

Page 72: ...just to mention a few Among other things MASSIVE is ideal for fat bass sounds exactly what you need here 5 3 1 Browsing the MASSIVE Presets Not only is MASSIVE included with MASCHINE but its factory l...

Page 73: ...ntly hidden reminder click the magnifying glass in the MASCHINE Header 4 At the very top of the Browser select the keyboard icon from the File Type selector The Browser now shows the Instrument preset...

Page 74: ...elector click the drop down arrow 7 and select Massive This will limit the list of presets displayed to the MASSIVE presets Adding a Bass Line Using an Instrument Plug in for the Bass MASCHINE MIKRO G...

Page 75: ...ck Bass in the TYPES section 11 Click Bass Line in the Sub Type section to further narrow your search You can now load a bass preset by double clicking its entry in the result list below 5 3 1 2 Brows...

Page 76: ...Control encoder to select BASS 10 Press Right Arrow to select 5 6 SUB TYPE then turn the Control encoder to select BASS LINE 11 Press F2 to display the result list You can now select the bass presets...

Page 77: ...not ideal for choosing a preset not to mention for recording a bass line Hence for melodic instruments like your bass MASCHINE provides another mode for the pads called Keyboard mode in which the pad...

Page 78: ...board view in the software 5 3 2 2 Switching to Keyboard Mode on the Controller Press SHIFT PAD MODE at the left of the pads From now on your 16 pads will not trigger the 16 Sound slots of your Group...

Page 79: ...emi tone by semi tone This setting is only relevant for your controller Indeed in the software the vertical keyboard already displays all notes use the vertical scroll bar on the right to display them...

Page 80: ...editing the recorded Pattern etc If you have any doubt about these tasks please refer to the previous tutorials notably in section 4 Creating Beats and chapter 2 3 Recording Your First Pattern 5 4 2 R...

Page 81: ...this do the following on your con troller 1 Press and hold SELECT 2 Check that QUIET is selected at the top of the display If not press F1 to select it 3 While still holding SELECT press pad 2 to sel...

Page 82: ...Parameters Once installed MASSIVE is fully integrated into MASCHINE Not only does this mean that its factory presets are available in the MASCHINE Browser but also that the MASSIVE parameters themselv...

Page 83: ...eft part of the Control area click the SOUND tab to select it it should be highlighted 3 In the Plug in List below click Massive to select it The Control area now displays the parameters of your bass...

Page 84: ...o pages that you can select for displaying by clicking the little labels at the top of the Control The pages allow you to display further parameters for your plug in On each page you can click and dra...

Page 85: ...ler 1 Press F3 to select SOUND This displays parameters for the selected Sound slot 2 If the Sound slot 1 containing the Analovue Sound is not currently selected select it by pressing SELECT pad 1 3 P...

Page 86: ...ameter in that page 3 Turn the Control encoder to adjust the value of the Amplification parameter You can fine adjust the parameter value by pressing and turning the Control encoder 5 6 Saving Your Pr...

Page 87: ...lay and record melodic instruments Adjust the Root Note when using Keyboard mode Adjust the Plug in parameters both from your controller and in the software using the Con trol area Once you feel comfo...

Page 88: ...ks will be covered in the Manual In this tutorial you will Apply effects to various Sounds and Groups of your tutorial Project Tweak the loaded effects Modulate the effect parameters Prerequisites It...

Page 89: ...g in slot of any channel Sounds Groups or Master For the rest you can apply to effect Plug ins what you have learned about instrument Plug ins see 3 2 2 Loading a Drumsynth and 5 3 Using an Instrument...

Page 90: ...one in focus Hence at the left of the Pattern Editor click the Sound slot s name Analovue to select that Sound slot 4 At the far left of the Control area click the small plug icon to display the Plug...

Page 91: ...o load it The Saturator plug in is now loaded and is ready to be tweaked If you have VST AU effect plug ins installed you may also load them from the menu by selecting the Native Instruments submenu f...

Page 92: ...ss lines 2 Press SELECT pad 1 to select the Sound Analovue 3 Press F3 to select the SOUND tab 4 Press NAV F3 to select PLUG IN 5 Continue to hold the NAV button and press pad 2 to select the next free...

Page 93: ...ol encoder to load it 11 Press SHIFT BROWSE again to leave the effect selection The Saturator Plug in is now loaded and ready to be tweaked To load a Plug in at the Group level please follow the same...

Page 94: ...effect parameters to your needs the method is basically the same as when you adjusted the parameters for the MASSIVE plug in in Accessing the Plug in Parameters Press PLAY on your controller or the Sp...

Page 95: ...ds 1 4 MODE at the bot tom of the display 4 Turn the Control encoder until the Parameter field reads TUBE This selects the Tube mode of the Saturator 5 Continue to scroll the various other parameters...

Page 96: ...ool when playing live 6 2 3 1 Bypassing Effects in the MASCHINE Software 1 At the top left of the Control area click the tab of the level either SOUND GROUP or MASTER where you want to bypass the effe...

Page 97: ...ect you want to bypass is located do the following Effect on Master Press F1 MASTER Effect on a Group Press F2 GROUP to select the Group level then press GROUP pad 9 16 to select the desired Group Eff...

Page 98: ...nge of values in other terms almost any parameter controlled by a knob in the Parameter area 6 3 1 Recording Modulation Now try to record some simple modulation for the effect parameter of your choice...

Page 99: ...effect you want to modulate 4 Press the Left Right Arrow buttons to put the focus on the parameter you want to modu late 5 Press and hold SHIFT and turn the Control encoder Your modulation gets record...

Page 100: ...Project Again it is recommended to regularly save your work You can then open another Project or close MASCHINE and take a break Your tutorial Project will be recalled as it was the next time you ope...

Page 101: ...enu How to adjust Plug in parameters How to bypass Plug in slots How to automate Plug in parameters Once you feel comfortable with these few tasks proceed with the next tutorial where you will discove...

Page 102: ...se Step mode to record modulation Prerequisites It is assumed here that you have followed the previous tutorials For this tutorial you will espe cially need to be acquainted with the following topics...

Page 103: ...enter Step mode Each pad now represents one step of a 16 step sequence you can activate each step by pressing a pad once lighting it up If you press the pad again the step is removed This way it s qu...

Page 104: ...h in Step Mode At any time you can adjust the Pattern Length directly from the Step mode 1 Press PATTERN and turn Knob 4 to adjust the Pattern Length Only 16 steps will be represented on your pads so...

Page 105: ...Patterns you will have to switch to the previous next 16 steps Press the Left Right Arrow button to switch to the previous next 16 steps of the Pattern or alternatively press F1 FOLLOW and MASCHINE wi...

Page 106: ...ll Pattern editing actions including quantization As mentioned above its default value is 1 16th However you may use another Step Grid resolution or disable the Step Grid complete ly Although Step Gri...

Page 107: ...nd in the Step menu Selecting another step size in the Step menu does not move any event in your Pattern Instead any edit position length that you make to your events will now snap to the new step siz...

Page 108: ...g 1 Press SHIFT FOLLOW Grid 2 Press Button 4 to select STEP and access the Step Grid s resolution setting Now the pads represent the various resolution values available The available resolutions are i...

Page 109: ...Your tutorial Project will be recalled as it was the next time you open it To save your Project in the software Press Ctrl S command S on macOS to save your Project To save your Project on the control...

Page 110: ...mfortable with these few tasks proceed with the next tutorial where you will discover how to build a full arrangement for your song Creating Beats with the Step Sequencer To Sum Up MASCHINE MIKRO Gett...

Page 111: ...als In particular you already know how to manipulate Groups 5 1 Selecting Another Group and Patterns 4 2 Adding a Sec ond Pattern If you have any doubts about these tasks please refer to the correspon...

Page 112: ...cene is created when a new Project is started and as soon as you select a Pattern slot an empty Pattern is created in the selected Scene Since you selected quite a few Pattern slots in both Groups whi...

Page 113: ...ll Patterns from different Groups fit together But you could also compose Scenes Group by Group by first selecting a particular Group for example the drum kit filling a few Scenes with Patterns from t...

Page 114: ...rom the Scene You will note that the corresponding Pattern has only been dimmed and not deleted You can click the Pattern again to reselect it for the Scene 8 2 2 Creating other Scenes using the Contr...

Page 115: ...cene 2 By repeating these two steps for all Groups you want to use in this Scene you progressively build up a new Scene You might also want to remove a Clip from the selected Scene To remove the Patte...

Page 116: ...o assign another color to a Scene slot right click the Scene slot s label select Color in the context menu and select the desired color in the palette You can also choose custom names and colors for y...

Page 117: ...ene in the Ideas view Right click for example the Scene slot 2 and select Delete in the context menu The content of Scene slot 2 is deleted and all other Scenes are moved one Scene to the left 8 3 2 2...

Page 118: ...tions refer to 9 Creating an Arrangement If you are preparing a track for a live performance you will probably want to trigger different Scenes using the pads To help with this MASCHINE provides some...

Page 119: ...ene or loop range it will start from the beginning 8 4 1 2 Jumping to Other Scenes using the Controller To adjust the Section Sync setting 1 Press and hold GRID to enter Grid mode or pin it by pressin...

Page 120: ...ler modes Rename color duplicate and delete Scenes slots Once you feel comfortable with these few tasks proceed with the next chapter where you can quickly assign your Scenes to Sections to create an...

Page 121: ...ecting Another Group Patterns 4 2 Adding a Second Pattern and that you have created a reasonable amount of Scenes 8 Creating Scenes If you have any doubts about these tasks please refer to the corresp...

Page 122: ...d to that Scene the other two instances of that Scene also play the newly assigned Patterns It s therefore very easy to make changes to individual Patterns and Scenes after the arrangement has been ma...

Page 123: ...ne with Scenes from the Ideas View There will be no Sections when you first enter the Arranger view Arranger view with no Sections To create a new Section In the Arranger click the button above the fi...

Page 124: ...ght click a Section slot and click Select in the context menu then for example select Scene 2 from the submenu The selected Scene is added to the Section To assign a Scene to a Section in the Arranger...

Page 125: ...ing a new Pattern that is longer than the Section automatically extends the Section Removing the longest Pattern from the Section automatically shrinks the Section Extending shrinking the longest Patt...

Page 126: ...particularly useful as it avoids the need to create a new version of a Scene when you only want to extend or truncate a Scene to make it fit an arrangement When the right end marker of a Section is e...

Page 127: ...for length increments When Shift is pressed while changing the length the value set in the Step Grid is used The minimum length a Section marker can be dragged without modifier is one Arrange Grid in...

Page 128: ...on turning it right will lengthen the Section 7 Press and turn the Control encoder to change the Section length in smaller increments The Section length is adjusted accordingly 9 2 2 Duplicating and R...

Page 129: ...rom the arrangement but has not been deleted 9 2 2 2 Duplicating and Removing Sections using the Controller To duplicate a Section in the Arranger 1 Press SHIFT SCENE to access Arranger view if you ar...

Page 130: ...E the desired pad on your controller see Adding other Sections A single selected Section is always looping automatically But MASCHINE also allows you to select several consecutive Sections and play th...

Page 131: ...hold SCENE to enter Section mode or pin it by pressing SCENE CONTROL 3 Press and hold the pad corresponding to the start Section The start and end Sections along with all Sections in between are play...

Page 132: ...Rename color move insert and delete Sections slots Select the desired loop range for playing Adjust the behavior of the sequencer when jumping between Sections or loop ranges Once you feel comfortable...

Page 133: ...10 4 MASCHINE Software Overview For a comprehensive description of every feature and setting please refer to the Manual 10 1 Using Your Controller This section provides useful information for your eve...

Page 134: ...in the middle column of your controller left of the pads along with the NOTE REPEAT button and the GRID button Each of these buttons needs to be pressed in order to use the corresponding mode Pinning...

Page 135: ...y The buttons above and below the display along with the Control encoder on the right have functions relating to what is shown on the display The control elements around the display Depending on what...

Page 136: ...also aid navigation e g in the Browser 10 1 2 Controlling the Software Views from Your Controller Your controller provides you with numerous shortcuts to modify the display in the MASCHINE software wi...

Page 137: ...Press F2 to select PAT for Pattern and use the pads in the table below to navigate the Pattern Editor view Action Shortcut Hide view Browser Press pad 13 Hide view Control Lane Press pad 14 Compact Fu...

Page 138: ...ins the arrangement of your song how Patterns are built from events which trigger Sounds and how they are arranged into a song structure using Scenes and Sections The following section will explain th...

Page 139: ...the Group channel and the Sound channel The relevant controls are situated in the Control area 3 which can be used for accessing Plug in parameters or Channel properties The Control area has three ta...

Page 140: ...roach To reflect this the Arrangement area is split into two views Ideas view and Arranger view which you can easily switch between using your controller The two views reflect the same content but in...

Page 141: ...und slots 7 of the selected Group 2 You record instances of your Sounds by playing the pads 1 16 A recorded instance of a Sound is called an event 6 Together the events add up to a Pattern 1 for the s...

Page 142: ...re assigned to Sections and placed on the Timeline of the Ar ranger where you can move them around to develop an arrangement 1 2 The Arranger view of a MASCHINE Project The workflow of creating an arr...

Page 143: ...ntroller 1 2 3 Overview of the MASCHINE MIKRO MK2 hardware controller 1 CONTROL section Use this multi purpose section to access to all parameters of the mode currently selected on your controller The...

Page 144: ...Section This section gives an overview of the CONTROL section 1 2 3 4 5 6 7 8 9 10 11 12 13 14 Overview of the CONTROL section 1 3 F1 F2 and F3 buttons The three buttons above the LCD display dynamica...

Page 145: ...eters press and turn the Control encoder to change the value in finer increments You can also use the Control encoder to browse lists shown on the display Turn the Control encoder to highlight an entr...

Page 146: ...splay Unlit pads indicate Groups that do not exist Press SHIFT GROUP to enter Step mode For more infor mation on Step mode please refer to chapter MISSING LINK Hold the GROUP button to select Groups w...

Page 147: ...ch of these buttons by turning the Control encoder Press SHIFT and repeatedly tap the NOTE REPEAT button to set the required tempo for your Project The Note Repeat mode can be pinned Press NOTE REPEAT...

Page 148: ...button to access Pattern Preset mode this allows you to select a preset for the Pattern Length before recording any events 7 ERASE button When creating music erasing needs to be as quick and simple as...

Page 149: ...Use Scene mode to access your Scenes and Section mode for arranging your song Use Scene mode to create select and manage Scenes to prepare them for assignment to Sections in the Arranger During playb...

Page 150: ...ly selected Sound ascending from the selected root note this way you can play the selected Sound like a melodic instrument You can also use F2 to transpose down or F3 to transpose up an oc tave at a t...

Page 151: ...its pad useful to tweak the Sound or for performing live The pad of the soloed Sound or Group is fully lit while all other pads rep resenting the muted Sounds Groups are dimmed 8 MUTE button Enters Mu...

Page 152: ...e this area to toggle the Browser toggle the Mixer view connect to your hardware controller and monitor the CPU usage of your computer 2 Browser The Browser is your tool for managing finding tagging a...

Page 153: ...r External parameters 10 4 1 Header 1 2 3 4 5 7 8 9 10 6 The Header 1 MASCHINE menu Click the MASCHINE menu to access the software menus This menu is particularly useful in Full screen mode and when M...

Page 154: ...udio output 8 CPU meter The CPU meter represents the current load on your computer s processor and is constantly measured it should not go above 70 to avoid clicks and interruptions You can save CPU p...

Page 155: ...LIBRARY tab Use the LIBRARY tab to access your computer s hard drives via MASCHINE s selectors and filters 2 FILES tab Use the FILES tab to access your computer s hard drives Quick Reference MASCHINE...

Page 156: ...file into the Search field to perform a search Results are displayed in the Re sults list below 8 Results list The Results list displays all files that match your query 9 Audition controls The Autolo...

Page 157: ...can show hide it by clicking the EDIT button at the bottom right 10 4 3 Arranger The Arranger is has two different views Ideas view and Arranger view Each view has a specific purpose in the workflow...

Page 158: ...a blank slot to create and new Pattern or click an existing Pattern to assign it to the selected Scene Once assigned a Pattern will become highlighted click it again to remove it from the selected Sce...

Page 159: ...ved freely by clicking the name of the Section and dragging and dropping it into place You can change the length of a Section by dragging the Section end marker to the left to shorten it or to the rig...

Page 160: ...cess to Plug ins and Channel properties of the Sound in the selected Sound slot 1 16 6 Parameter area Displays the parameters for the selected Plug in or Channel properties De pending on the number of...

Page 161: ...on to display the Keyboard view 3 Group view button Click this button to display the Group view 4 Audition button Click this button to audition a Sound when it is selected from the Sound slots 6 5 Sou...

Page 162: ...er icons allow you to conveniently drag and drop audio or MIDI from your Patterns to your desktop or host software 10 Pattern timeline The timeline at the top of the Step Grid 11 displays musical time...

Page 163: ...Support Form to contact the Technical Support team of Na tive Instruments The Online Support Form will ask you to enter information about your hard ware and software setup This information is essentia...

Page 164: ...Registration Support team www native instruments com regsuppfrm 11 4 User Forum In the Native Instruments User Forum you can discuss product features directly with other users and with experts moderat...

Page 165: ...ong Browser The Browser is the front end for accessing all MASCHINE objects Projects Groups Sounds Patterns presets for instrument and effect Plug ins and Samples Each of these can be stor ed tagged a...

Page 166: ...lected Sound Group or the Master level routing effects Mac ro Controls etc Control Lane Located at the bottom of the Pattern Editor in the MASCHINE window the Control Lane shows and lets you edit the...

Page 167: ...Sounds a Group can have insert effects loaded in its Plug in slots These affect all the Sounds in the Group A Group can also contain an unlimited amount of Patterns organized into Pattern Banks Group...

Page 168: ...to which you can assign almost any parameter from that level or the underlying one This way you can define for e g each Group or Sound a set of eight parameters that are quickly accessible Furthermore...

Page 169: ...ether If you enter Keyboard mode on the controller Keyboard view gets automatically enabled in the software and inversely Parameter Pages The Parameter pages constitute the biggest part of the Control...

Page 170: ...of the entire state of MASCHINE Quantization To quantize a Pattern is to make its events snap to a set of equally distributed locations known as steps This ensures that these events are on beat You ca...

Page 171: ...effect to proc ess them Send effects notably allow you to reuse the same effect on different Sounds and or Groups thereby limiting the overall CPU load Sequencer Generally speaking a sequencer is a h...

Page 172: ...the step size you can adjust the note values at which you can quantize your Pattern and the number of steps available in Step mode on your controller Step Mode In Step mode your controller can be used...

Page 173: ...dio Engine button 154 Audio plug in 25 68 Audition 38 Autoload definition 165 replacing Sounds with 37 B BROWSE button 20 147 Browser 17 152 PATTERNS button 156 ROUTING button 156 button 153 definitio...

Page 174: ...definition 166 editing modulation 99 Control Mode 145 definition 166 pads 23 CONTROL section 144 Controller Control mode 145 CONTROL section 144 Instance mode 145 Main mode 145 MIDI mode 144 overview...

Page 175: ...muting 96 send effect definition 171 ERASE button 148 Event definition 167 editing with the Pattern Editor 65 F F1 F2 F3 buttons 144 Factory library presets 17 FILE button 35 File mode load a recent P...

Page 176: ...160 Group view 161 definition 167 Groups 159 H Header 152 Audio Engine button 154 Browser button 153 CPU meter 154 definition 168 Display area 154 MASCHINE menu 153 Master Volume slider 154 NI logo 1...

Page 177: ...9 into a Plug in List 41 Locking controller modes 133 Loop range 130 M Macro Control definition 168 MAIN button 145 Main Mode 145 MASCHINE menu 153 MASSIVE 72 browsing presets 72 Master definition 168...

Page 178: ...ucture of a Project 138 P PAD MODE button 150 Pad modes definition 169 Pads 151 in Control mode 23 in Keyboard mode 77 in Step mode 103 velocity 24 PADS section 148 Parameter area 160 Parameter page d...

Page 179: ...mples 37 Pre listen 38 Product selector 156 Project definition 170 load a 32 load a recent 35 load from the controller 34 35 overview and structure 138 Q Quantization 60 definition 170 Query 0 Quick R...

Page 180: ...ld 156 Search results updating 0 Section definition 171 mode 150 SELECT button 151 Send effect definition 171 Sequencer definition 171 SHIFT button 148 SOLID BUS COMP 72 Solo definition 169 Sound or G...

Page 181: ...172 T Tag Filter 156 Text search 156 Transport controls 154 TRANSPORT section 144 147 Troubleshooting 163 V Velocity pads 24 VIEW button 150 Volume 154 Volume adjusting Sound Group and overall 46 VST...

Reviews: