


© National Instruments
|
3-5
6.
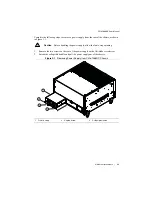
Place the drawer on a table surface to remove the power supply.
7.
Remove the two screws on the rear of the power supply with a flat-blade screwdriver.
(Refer to Figure 3-1.)
8.
Extend the collapsible handle and pull the power supply out of the chassis. (Refer to
Figure 3-1.)
Installation
Ensure there is no visible damage to the new power supply before installing it. Verify that there
is no foreign material inside the connector on the new power supply.
The power supplies for this chassis are redundant and hot swappable. If one power supply
already is installed and functional, you can install the second power supply without first
disconnecting main DC power from the system. If no power supplies are installed or functional
in the system, you must remove main power from the system by disconnecting the power cable
from the DC power connector on the chassis front panel.
Complete the following steps to install a power supply from the rear of the chassis:
1.
Slide the power supply into an empty slot with the connector facing toward the chassis until
it engages.
2.
Fold down the collapsible handle on the power supply.
3.
Tighten the two captive screws on the rear of the power supply to 11.5 lb · in. torque with
a flat-blade screwdriver.
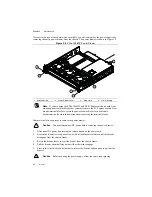
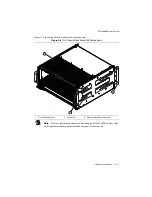
If access to the rear of the chassis is not available, you still can install power supplies by
removing the entire power drawer from the chassis. The power drawer is shown in Figure 3-2.
Note
If you are using the PXIe-1066DC and NI SC Express modules with front
mounting terminal blocks together, you must remove the SC Express module front
mount terminal blocks to access the power drawer. Refer to your module
documentation for more information about removing the terminal blocks.
Complete the following steps to remove the power drawer:
Caution
You must disconnect DC power before removing the power drawer.
1.
Disconnect DC power by pressing the release button on the power cord.
2.
Loosen the drawer lever captive screws with a flat-blade screwdriver until the threads
disengage from the chassis frame.
3.
Rotate the drawer levers to eject the drawer from the chassis frame.
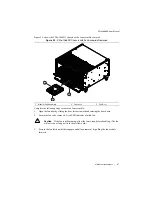
4.
Pull the drawer about halfway out until the side latches engage.
5.
Press in the side latches on both sides to release the drawer and continue to pull out the
drawer.