National Instruments PXI-4110 Calibration Procedure Download Page 25

NI PXI-4110 Calibration Procedure

|

© National Instruments

|

25

Considerations

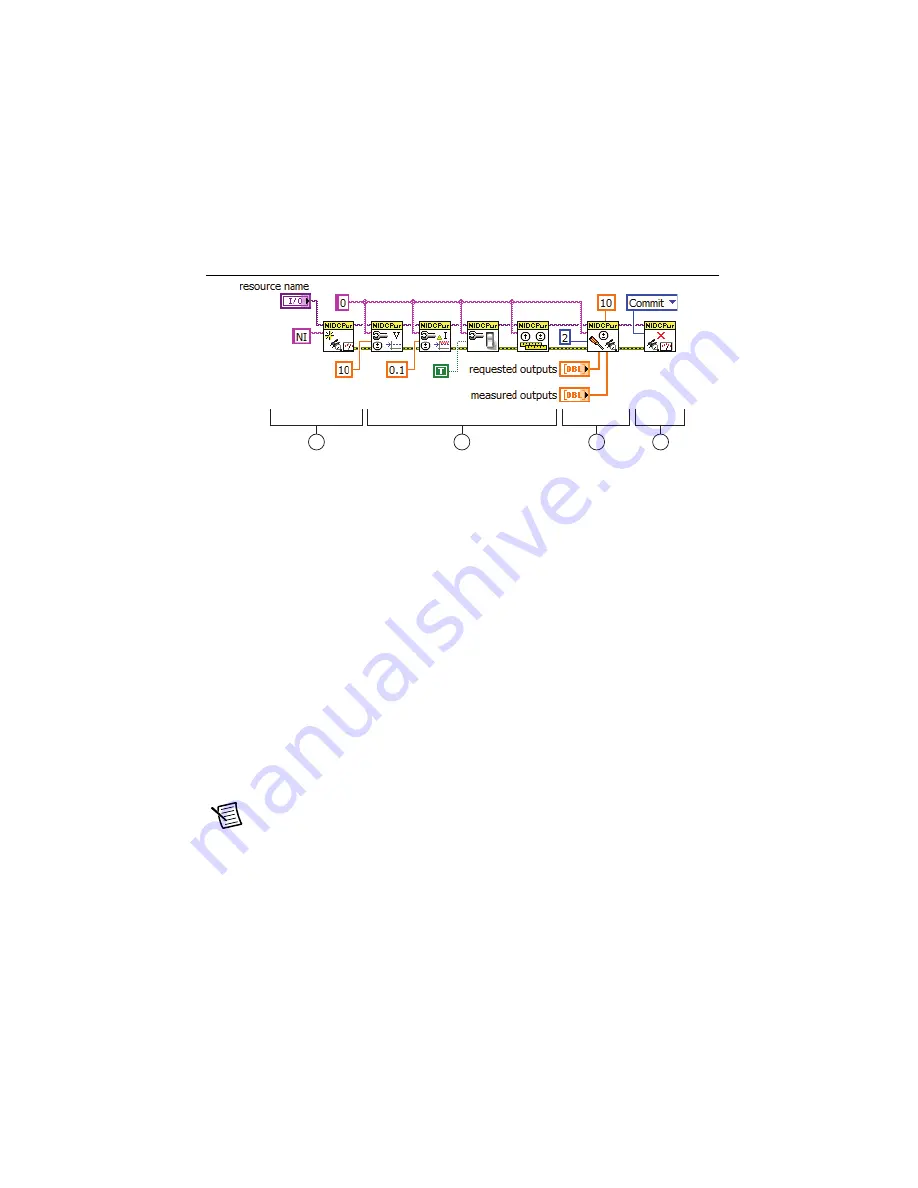
The figure below represents the general flow of an application used to adjust a range on a single 
channel of the NI 4110.

Figure 8.  

LabVIEW Block Diagram Illustrating Adjustment on the NI 4110

1.

Initialize external calibration session

:


To adjust the NI 4110, call the niDCPower 

Initialize External Calibration VI (

niDCPower_InitExtCal

 function) to initiate a 

special type of NI-DCPower session. The default calibration password is 

NI

.

2.

Configure the instrument

: Call a series of standard NI-DCPower VIs/functions specific 

to the adjustment of a particular range. These calls vary depending on the requirements of 
the range being adjusted. Typical operations in this step include configuring ranges, setting 
output levels, or taking measurements. Measurements made by external equipment 
required for adjustment also occur during this step. For more information about configuring 
the NI 4110 for a particular output or measurement mode, refer to the example programs 
installed with NI-DCPower.

3.

Call niDCPower Cal Adjust function(s)

: When the measurements required for 

adjustment of a range are complete, call one of the niDCPower Cal Adjust VIs or functions 
to calculate new calibration coefficients and store them in memory on the host. Calling 
these VIs/functions does 

not 

commit the new coefficients to hardware.

4.

Close session and commit new calibration coefficients

: To complete adjustment of the 

range, call the niDCPower Close External Calibration VI (

niDCPower_CloseExtCal


function) to close the session. To write new calibration coefficients to the hardware, specify 
an action of 

Commit

. At this time, the calibration date and temperature stored onboard are 

also updated.

Note

You can adjust any voltage or current range individually by opening a 

calibration session, adjusting, and then closing the session with an action of 

Commit

To adjust all voltage and current ranges simultaneously, open a single calibration 
session, execute multiple adjustment steps, and then close the session with an action 
of 

Commit

 to write coefficients for multiple ranges simultaneously.

1

2

3

4

Summary of Contents for PXI-4110

Page 1: ...st Equipment 4 Test Conditions 4 Calibration Procedures 5 Initial Setup 5 Verification 6 Verifying Voltage Programming Accuracy 7 Verifying Voltage Measurement Accuracy 8 Verifying Current Programming...

Page 2: ...Calibration File Locations NI DCPower 1 0 or Later File Name and Location Description IVI Bin nidcpower_32 dll NI DCPower driver containing the entire NI DCPower API including calibration functions I...

Page 3: ...You can shorten this calibration interval based on the accuracy demands of your application Refer to the Where to Go for Support section for more information NI PXI 4110 Getting Started Guide Contains...

Page 4: ...ween 10 and 90 noncondensing Maintain an ambient temperature of 23 C 10 C for verification procedures and an ambient temperature of 23 C 1 C for adjustment procedures Allow a warm up time of at least...

Page 5: ...date on the EEPROM to allow traceability 4 Reverification Repeat the verification procedure to ensure that the device is operating within its specifications after adjustment These steps are described...

Page 6: ...e following NI 4110 specifications Voltage programming accuracy Voltage measurement accuracy Current programming accuracy Current measurement accuracy Voltage load regulation Current load regulation V...

Page 7: ...cation Take voltage measurements using the DMM at each voltage test point and compare the reading with the value from the Output column of Table 5 Verify that the measurement error falls between the t...

Page 8: ...Take voltage measurements using the DMM at each test point and then take voltage measurements using the NI 4110 at each test point Compare the two values Verify that the measurement error falls betwee...

Page 9: ...6 are derived from the voltage measurement accuracy specifications plus an offset voltage Table 6 NI 4110 Output Parameters and Test Limits for Voltage Measurement Accuracy Verification Channel Itera...

Page 10: ...nel x in Table 4 Table 7 lists the voltage test points and external load settings that you must measure in DC Voltage mode for each current range to complete verification For example the 1 A range req...

Page 11: ...ication Channel s Output V Current Range Iteration Equivalent Resistance Output A Test Limit A 0 6 1 A 1 150 0 020000 0 004030 2 12 0 250000 0 004375 3 6 0 500000 0 004750 4 4 0 750000 0 006063 5 3 1...

Page 12: ...liary power supply for this verification procedure Refer to the following figure for the necessary connections Figure 3 Current Measurement Connection Diagram 2 16 20 mA 1 25 000 0 000400 0 000060 2 2...

Page 13: ...to settle wait three seconds after requesting a new current before taking a measurement with the DMM and the NI 4110 Verify that the measurement error falls between the absolute limits listed in the T...

Page 14: ...gulation Verification steps Connect the NI APS 4100 to the Aux Power Input connections for load regulation tests 1 2 20 mA 1 open 0 0 000012 0 000035 2 1 000 5 0 000020 0 000043 3 1 000 10 0 000027 0...

Page 15: ...e R1 to the specified channel of the NI 4110 2 While taking a current measurement with the NI 4110 I1 use the DMM to measure the voltage across the output of the NI 4110 V1 3 Change the load from R1 t...

Page 16: ...I 4110 Voltage Load Regulation Verification Points Channel VRange I Range ILimit V Level Load R1 Load R2 Measured Voltage Change Limit V Voltage Change V I1 mA V1 V I2 mA V2 V 0 6 V 1 A 1 A 6 V 620 7...

Page 17: ...oltage measurement with the NI 4110 V1 use the DMM in series to measure the output current I1 3 Change the load from R1 to R2 and repeat the previous step 4 For each test the units for all current mea...

Page 18: ...fication Points Channel VRange I Range VLimit I Level Load R1 Load R2 Measured Current Change Limit A Current Change A I1 A V1 V I2 A V2 V 0 6 V 1 A 6 V 500 mA 10 4 1 20 V 20 mA 20 V 10 mA 1 8 k 200 1...

Page 19: ...line regulation because the output voltage is fixed Run this test only after the Verifying Voltage Measurement Accuracy and Verifying Current Measurement Accuracy tests pass Voltage Line Regulation To...

Page 20: ...V1 4 Change the external variable power supply voltage from Vext1 to Vext2 and repeat the previous step 5 Record the NI 4110 output voltage measurements for both external voltages 6 Calculate the Volt...

Page 21: ...ents 21 Table 14 NI 4110 Voltage Line Regulation Verification Points Channel V Range I Range I Limit V Level Vext1 Vext2 Measured Voltage Change Limit V Voltage Change V V1 V V2 V 1 20 V 1 A 100 mA 10...

Page 22: ...the NI 4110 to output the current specified in Table 15 3 Use the DMM to measure the current across the output of the specified channel of the NI 4110 I1 4 Change the external variable power supply vo...

Page 23: ...ed specifications and adjustment is optional Table 16 NI 4110 Current Line Regulation Verification Points Channel V Range I Range V Limit I Level Vext1 Vext2 Measured Current Change Limit A Current Ch...

Page 24: ...components of the NI DCPower API require that you program the NI 4110 using the voltage output and current output functions You must adjust each range with a separate call to the appropriate niDCPower...

Page 25: ...lar output or measurement mode refer to the example programs installed with NI DCPower 3 Call niDCPower Cal Adjust function s When the measurements required for adjustment of a range are complete call...

Page 26: ...had adequate time to settle wait one second after requesting a new voltage before taking a measurement with the DMM Use the niDCPower Cal Adjust Voltage Level VI niDCPower_CalAdjustVoltageLevel functi...

Page 27: ...To ensure the system has had adequate time to settle wait one second after requesting a new voltage before taking a measurement with the DMM and the NI 4110 Use the niDCPower Cal Adjust Voltage Measu...

Page 28: ...second after requesting a new voltage before taking a measurement with the DMM Use the niDCPower Cal Adjust Current Limit VI niDCPower_CalAdjustCurrentLimit function to calculate the new calibration...

Page 29: ...ts Pass the current values reported by the NI 4110 to the Reported Outputs input of the VI and pass the voltage values measured by the DMM to the Measured Outputs input of the VI Call this VI or funct...

Page 30: ...e NI 4110 successfully passes all verification tests calibration is complete Where to Go for Support The National Instruments website is your complete resource for technical support At ni com support...

Reviews: