background image

Because of the danger of introducing additional hazards, do not install unauthorized parts or
modify the device. Use the device only with the chassis, modules, accessories, and cables
specified in the installation instructions. All covers and filler panels must be installed while
operating the device.

This is a Pollution Degree 2 device. Do not operate the device in an explosive atmosphere or
where flammable gases or fumes may be present. Operate the device only at or below the
pollution degree stated in the specifications. Pollution consists of any foreign matter—solid,
liquid, or gas—that may reduce dielectric strength or surface resistivity. The following is a
description of pollution degrees.

Pollution Degree 1—No pollution or only dry, nonconductive pollution occurs. The
pollution has no effect.

Pollution Degree 2—Normally only nonconductive pollution occurs. Occasionally,
nonconductive pollution becomes conductive because of condensation.

Pollution Degree 3—Conductive pollution or dry, nonconductive pollution occurs.
Nonconductive pollution becomes conductive because of condensation.

Clean the device and accessories by brushing off light dust with a soft, nonmetallic brush.
Remove other contaminants with a stiff, nonmetallic brush. The unit must be completely dry
and free from contaminants before returning it to service.

You must insulate signal connections for the maximum voltage for which the device is rated.
Do not exceed the maximum ratings for the device. Remove power from signal lines before
connection to or disconnection from the device.

Electromagnetic Compatibility Guidelines

This product was tested and complies with the regulatory requirements and limits for
electromagnetic compatibility (EMC) stated in the product specifications. These requirements
and limits provide reasonable protection against harmful interference when the product is
operated in the intended operational electromagnetic environment.

This product is intended for use in industrial locations. However, harmful interference may
occur in some installations, when the product is connected to a peripheral device or test object,
or if the product is used in residential or commercial areas. To minimize interference with
radio and television reception and prevent unacceptable performance degradation, install and
use this product in strict accordance with the instructions in the product documentation.

Furthermore, any changes or modifications to the product not expressly approved by National
Instruments could void your authority to operate it under your local regulatory rules.

Configuring the Hardware

Remove the IC-3120 from the package and inspect the system for damage. Notify National
Instruments if the system appears damaged in any way. Do not use a damaged system.

2

  | 

ni.com

  | 

IC-3120 Getting Started Guide

Summary of Contents for IC-3120

Page 1: ...9 Troubleshooting 10 Where to Go Next 13 Worldwide Support and Services 13 Safety Information Caution The following paragraphs contain important safety information you must follow when installing and...

Page 2: ...efore returning it to service You must insulate signal connections for the maximum voltage for which the device is rated Do not exceed the maximum ratings for the device Remove power from signal lines...

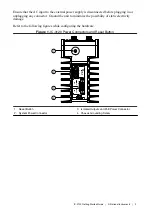
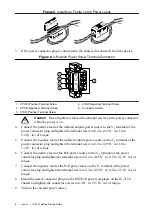
Page 3: ...ic electricity damage Refer to the following figures while configuring the hardware Figure 1 IC 3120 Power Connectors and Reset Button SYSTEM PoE 48 V ISO C ISO C PoE V PoE V ISO 5 24 V 12 24 V C V 2...

Page 4: ...ecommends the following power supply for the IC 3120 Power Supply Part Number NI PS 15 Industrial Power Supply 781093 01 Complete the following steps to supply power to the IC 3120 1 Verify the power...

Page 5: ...to 0 4 N m 3 5 lb in of torque 7 Turn on the external power source Connecting the Isolated Outputs Power Supply and PoE Power Supply NI recommends the following power supplies for the IC 3120 Power S...

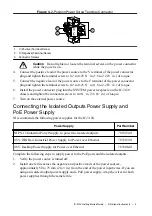
Page 6: ...N m 1 8 to 2 2 lb in of torque 5 Connect the negative lead of the isolated outputs power source to the C2 terminal of the power connector plug and tighten the terminal screw to 0 2 to 0 25 N m 1 8 to...

Page 7: ...ment computer is powered on and connected to the network 2 Connect one end of an Ethernet cable to the network port on the device 3 Connect the free end of the cable to an Ethernet switch or other net...

Page 8: ...k Finish 7 Install custom software You do not need to install custom software if you installed a recommended software set a Expand the IC 3120 under Remote Systems b Click the Software item below the...

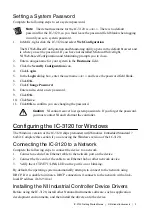
Page 9: ...ution NI cannot recover lost system passwords If you forget the password you must contact NI and reformat the controller Configuring the IC 3120 for Windows The Windows version of the IC 3120 ships pr...

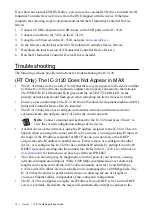
Page 10: ...gured on another network and then moved to the current network Reconfigure the IC 3120 for the current network Note Connect a monitor and keyboard to the IC 3120 and press Enter to view the current co...

Page 11: ...ed as nati vi server NATI VI Server Used by Vision Builder AI to configure a remote target If your firewall is controlled remotely or you are unsure about configuring the firewall contact your network...

Page 12: ...the exception state alerting you to resolve the problem Reinstall software on the IC 3120 or contact NI for assistance Refer to the IC 3120 Getting Started Guide for information about installing soft...

Page 13: ...Factory Installation Services repairs extended warranty and other services Visit ni com register to register your NI product Product registration facilitates technical support and ensures that you rec...

Page 14: ...party legal notices in the readme file for your NI product Refer to the Export Compliance Information at ni com legal export compliance for the NI global trade compliance policy and how to obtain rel...

Reviews: