NAMCO SOUL CALIBUR II, Manual
Discover the thrilling world of NAMCO SOUL CALIBUR II with our comprehensive user manual. Whether you're a seasoned player or new to the game, this manual provides detailed instructions, strategies, and tips to enhance your gaming experience. Download it for free from manualshive.com and master every aspect of this epic adventure.
Share
Download


Reviews:
No comments
Related manuals for SOUL CALIBUR II

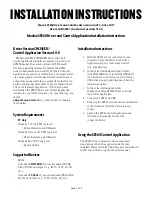
Express5800/E120d-M
Brand: NEC Pages: 2
SP260
Brand: Mackie Pages: 2

SP260
Brand: Mackie Pages: 5

N48M Series
Brand: Tripp Lite Pages: 20

JPM083A
Brand: Black Box Pages: 9

NN-EC2812-S1
Brand: SIIG Pages: 12

WHT-25LT
Brand: WHOOP Pages: 26

FS-BOX-V3
Brand: FS Pages: 19

4412A
Brand: Zoom Pages: 48

32K Bytesaver
Brand: Cromemco Pages: 46

PC 3220
Brand: Verizon Wireless Pages: 39

DAG 7.1S
Brand: Endace Pages: 51

Elite Controller
Brand: RANA Systems Pages: 328

RanaSystems 13-0010--001
Brand: RANA Systems Pages: 328

STA-UI-A0035
Brand: SYNTEK Pages: 41

crown PIP Series
Brand: Harman Pages: 16

PK5000Z
Brand: ZyXEL Communications Pages: 3

PCIe-USB381F
Brand: Neousys Technology Pages: 24


