background image

13

14

Ensure both turntable chassis and equipment support are both level 

and secure.

6.2 Arm installation

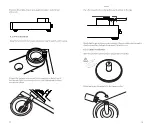
Bring the 5 pin end of the toneram interconnect up through the arm housing.

Connect the tonearm interconnect to the connector on the bottom of 

the tonearm. Note the connector is loose – this is intentional to reduce 

microphonic effects.


Add a few drops of bearing oil to the ceramic collar. 

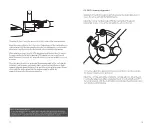
Gently tighten up the three screws using the 1.5mm hex driver just enough to 

stop the arm pillar rotating in the pedestal top plate in use. 


6.3  Platter installation


Take the sub platter and bearing housing and push together. 

Place the tonearm in the collar and line up the arrows on the tape.

Summary of Contents for Solstice

Page 1: ...1 User Manual English TURNTABLE PHONO STAGE POWER SUPPLY...

Page 2: ...stallation 2 4 Solstice Special Edition System Components 4 5 Solstice Special Edition Box Contents 9 6 Solstice Special Edition Assembly and Set Up 12 7 System Connections 19 8 Specifications 21 9 Di...

Page 3: ...2 2 Equipment Fuses Mains powered Naim Audio equipment is fitted with a mains fuse on the rear panel adjacent to the mains input socket Replace it if necessary only with the spare fuse supplied or wi...

Page 4: ...stallation so it is essential to make full use of your dealer s diagnostic skills Please contact your local distributor or Naim Audio directly if any difficulties cannot be resolved Some Naim equipmen...

Page 5: ...onnections Adjustable feet Cartridge azimuth adjuster Magnetic anti skate control ARO Tonearm counterweight VTA Control Optional additional ground connection Logo brightness setting Standby power sett...

Page 6: ...de after 20 minutes In this sleep mode the vinyl replay system consumes less than 0 5W of power The Instant On feature sets your vinyl replay system to a mode that leaves the sensitive audio circuitry...

Page 7: ...d excessive liveliness Switching between high and low gain may help match input levels across a system In this way the Solstice Special Edition vinyl replay system can be set up to perform to its best...

Page 8: ...just the three feet on the turntable to ensure the chassis is perfectly level Place the level near the arm housing for best results 5 3 Solstice Series Phono Stage Phono stage NVC TT 5 4 Solstice Seri...

Page 9: ...tom of the tonearm Note the connector is loose this is intentional to reduce microphonic effects Add a few drops of bearing oil to the ceramic collar Gently tighten up the three screws using the 1 5mm...

Page 10: ...this stage 6 4 Verify level once platter is fitted Using the large bubble level placed near the centre of the platter re adjust the three feet on the turntable to ensure the platter is perfectly leve...

Page 11: ...ight is within the suggested range after listening optimisation EQUINOX 6 6 ARO tonearm alignment Alignment of the ARO tonearm is performed using the small bubble level to ensure the arm is perfectly...

Page 12: ...r to User Manual Connect power cable 5 pin DIN connection to Naim amplifier USB update Brightness Reset WARNING Disconnect power before opening FUSE RATING ANTISURGE 11 2 0 120 V T AL 220 240 V T AL 1...

Page 13: ...ance 11 Recommended tracking force 2 2g 2 4g Recommended MC input resistance value 100 Recommended MC input capacitance 1000pF 1nF Recommended MC Gain setting High Weight 8 0g Parameter Solstice Serie...

Page 14: ...he Solstice logo during the measurement process to ensure an accurate measurement Measuring area 0 01g 9 2 Changing the batteries If the Digital Stylus Gauge cannot be switched on the batteries should...

Page 15: ...waste by products Contact your local authority for details of the nearest such facility Appropriate recycling and waste disposal helps conserve resources and protects the environment from contaminatio...

Page 16: ...Naim Audio Ltd Southampton Road Salisbury England SP1 2LN Call 44 0 1722 426600 Email info naimaudio com naimaudio com...

Page 17: ...Designed in the UK by Naim Audio...

Reviews: