MV Heating UK Ltd
Unit 6
Second Avenue Business Park
Millbrook
Southampton
SO15 0LP
MV Heating UK LTD +44 (0)2380 522345
MV Airo 2
W
ORKSHOP
M
ANUAL
E
D
1.01
Page 1: ...MV Heating UK Ltd Unit 6 Second Avenue Business Park Millbrook Southampton SO15 0LP MV Heating UK LTD 44 0 2380 522345 MV Airo 2 WORKSHOP MANUAL ED 1 01...
Page 2: ...d MV Heating will not be liable for any losses and damages in connection with the use of this information Under no circumstances shall MV Heating or its affiliates suppliers or installers be liable fo...
Page 3: ...art 2 The Overheat Sensor 9 Part 3 The E C U 10 Part 4 The Air Motor 11 Part 5 Burner Glow Pin and Combustion Chamber 12 Part 5 Cont d Burner Glow Pin and Combustion Chamber 13 Part 5 Cont d Burner Gl...
Page 4: ...m the bottom of the heater 8 Remove the four M6 nuts and washers from the base of the heater 9 Remove the heater and discard the mounting gasket Heater Installation To reinstall the heater back into p...
Page 5: ...44 0 23 8052 2345 4 MV Heating UK Ltd Heater Cases Diagram 6 1 3 4 2 5 Figure 1 1 Inlet Cap 2 Outlet Cap 3 E C U Cover 4 Top Cover 5 Bottom Cover 6 Grill...
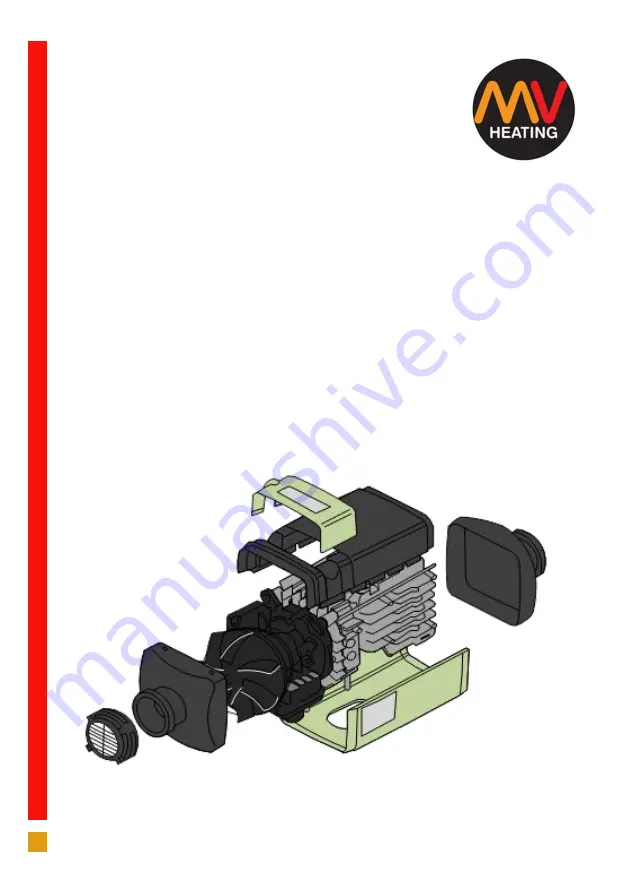
Page 6: ...UK Ltd Internal Structure Diagram Figure 2 1 Heat Exchanger 2 4 Hole Gasket 3 Combustion Tube 4 Burner Assembly 5 5 Hole Gasket 6 Air Motor 7 Insulation Bushes 8 E C U 9 Air Fan 10 Glow Pin 11 Overhea...
Page 7: ...44 0 23 8052 2345 6 MV Heating UK Ltd ECU Connections Diagram Figure 3 1 Fan Motor 2 Glow Pin 3 Overheat Sensor 4 Fuel Pump 5 Unused 6 Main Wiring Harness 6 1 2 3 4 5...
Page 8: ...d be cleaned with appropriate cleaning fluid and blown dry with pressurized air Any sealing compound on parts must be carefully and completely removed before attempting to refit All disassembled parts...
Page 9: ...ove the top case 1 4 by sliding away from the bottom case 5 Remove the bottom case 1 5 by pulling away from air motor lugs first Refitting the Cases 1 Make sure all 4 insulating bushes 4 7 are located...
Page 10: ...blue wires 3 Free the wires from around the E C U hook 4 Slide the overheat sensor off the heat exchanger 2 1 Using a small flat bladed screwdriver as necessary to lever it off Refitting the Overheat...
Page 11: ...ews holding the E C U in place 5 The E C U can now be removed inspected and replaced as necessary Refitting the E C U 1 Place the E C U back into position and tighten the 3 x Phillips head screws back...
Page 12: ...o that the combustion intake clears the gap on the heat exchanger 2 1 4 The air motor gasket 2 5 can be removed and discarded once the air motor is clear Refitting the Air Motor 1 Place a new air moto...
Page 13: ...r motor Part 4 2 Gently push the glow pin grommet fully through toward the burner 3 Using an Allen key remove the 4 x 3mm hex bolts from the burner 2 4 and place to one side 4 The burner and combustio...
Page 14: ...d screwdriver to loosen the screw holding the glow pin 2 10 in place 2 Gently remove the glow pin from out of its housing the glow pin can be tight to remove 3 The burner and glow pin can now be inspe...
Page 15: ...r the right way up inside the heat exchanger 3 Place the burner assembly inside the combustion chamber and reinsert the 3 x 5 5mm hex screws back into the burner and tighten to 0 6 0 06 Nm 4 Feed the...
Page 16: ...Z 004 5 5 Hole Gasket A2Z 005 6 Air Motor 12V 24V A2C 006 A2A 006 7 Insulation Bushes A25Z 007 8 E C U 12V 24V A2C 009 A2A 009 9 Air Fan A2Z 010 10 Glow Pin 12V 24V A2C 014 A2C 014 11 Overheat Sensor...
Page 17: ...44 0 23 8052 2345 16 MV Heating UK Ltd Notes...
Page 18: ...44 0 23 8052 2345 17 MV Heating UK Ltd...