background image

Setting the Timer     19

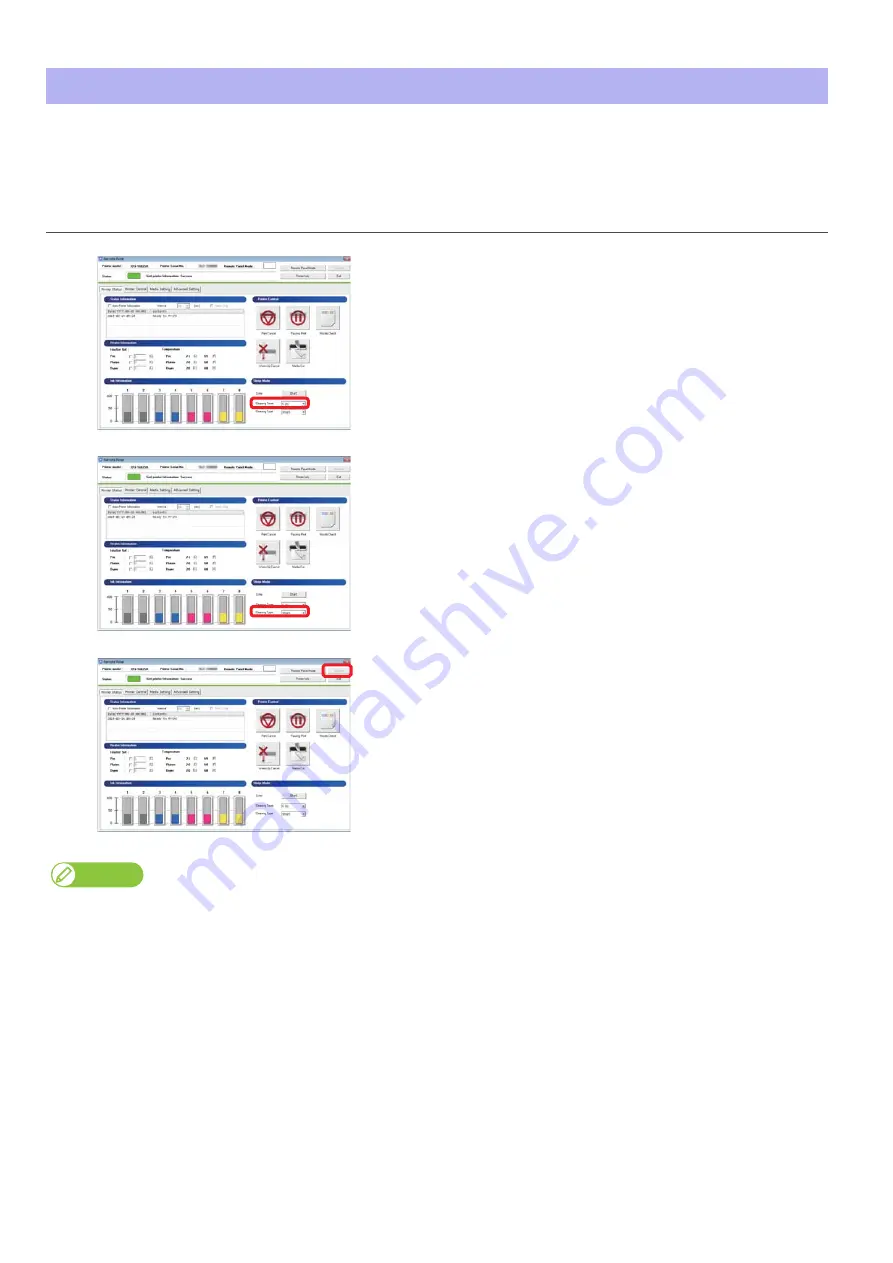
• [Cleaning Timer]: Set the interval for the automatic head cleaning during sleep mode.

• [Auto Timer]: You can set the interval for entering sleep mode automatically from standby condition.

This menu is displayed when using metallic ink or white ink on VJ-628X.

Setting the Timer 

Procedure

[1]

To change the cleaning intervals during sleep mode, click [Sleep 
Mode] - [Cleaning Timer], and then select the time.

[2]

To change the time before entering sleep mode, click [Sleep Mode] - 
[Auto Timer], and then select the time.

[3]

Click [Update].

• The timer has been set.

Note

You can change the strength of head cleaning from [Cleaning Mode] on the [Advanced Setting] tab of the MSM remote panel.

Summary of Contents for ValueJet VJ-628X

Page 1: ...MUTOH or the dealer you purchased the product from if you find any unclear erroneous or otherwise unsatisfactory content in the manual Please be aware that MUTOH will not be liable in any way for failures or accidents that result from handling or operating the printer according to any procedures other than those set forth in this manual Company names and product names that appear in this manual ar...

Page 2: ... which case the user will be required to correct the interference at his own expense Screens for the software used in this manual Screens displayed and functions for each software applications and printer drivers may differ depending on the printer model you are using Screens used here are for VJ 628 unless otherwise specified The CE marking is a mandatory European marking for certain product grou...

Page 3: ...ning the power OFF 16 Sleep Mode 17 Starting and Canceling Sleep Mode 17 Setting the Timer 19 Printing 20 Setting up media 20 Adjusting image quality 22 Correcting paper feed 27 Nozzle check and cleaning 32 Starting printing 35 Pausing Restarting printing 36 Canceling printing 36 Forwarding Rewinding media 37 Forwarding rewinding media from printer driver MSM 37 Cutting media 38 Cutting from the o...

Page 4: ...ng ink level and replacing ink cartridge 53 Checking ink level 53 When cartridge is nearly out of ink 54 Replacing ink cartridge 54 Emptying waste ink tank 56 Cleaning each part 58 Head cleaning 58 Cleaning of cleaning wiper 60 Cleaning of print head circumference 62 Inside cleaning 64 Replacing consumable parts 65 Replacing absorption material for the flushing box 65 Replacing cutter 67 Replacing...

Page 5: ...5 Chapter 4 Appendix Troubleshooting 80 Handling messages error messages 80 Clearing a media jam 84 Specifications of this product 85 Drawing area 85 List of specifications 86 ...

Page 6: ...6 ...

Page 7: ...the power OFF 16 Sleep Mode 17 Starting and Canceling Sleep Mode 17 Setting the Timer 19 Printing 20 Setting up media 20 Adjusting image quality 22 Correcting paper feed 27 Nozzle check and cleaning 32 Starting printing 35 Pausing Restarting printing 36 Canceling printing 36 Forwarding Rewinding media 37 Forwarding rewinding media from printer driver MSM 37 Cutting media 38 Cutting from the operat...

Page 8: ...ontrolled to some extent Carriage A print head and cutter are built in Power connector Error LED Red light or flashing displays errors or warnings Also lights up when the front cover is open or the media fixing handle is released Power button It lights ON in blue when the power is ON Operation key Used for various functions in different situations Printing Short press Pause Restart printing Long p...

Page 9: ...atus monitor Remote panel VSM Mobile Status check and remote control of ValueJet can be done from personal digital assistance like your iPhone and Android Main functions Status monitor Remote panel 1 MUTOH Club This Web service provides free useful contents to users Have user registration done to use various services Main functions Downloading the latest application and manual Downloading media pr...

Page 10: ...nd printers Windows 7 Click Start Devices and Printers 2 Right click the MUTOH VJ 628 icon and click Printing preferences The Printer Configuration dialog box opens only at the first time The Printing Preferences screen of printer driver opens from the second time 3 Select the ink color configuration and click OK After clicking the Printing Preferences screen of printer driver opens Note The scree...

Page 11: ...0 Windows 7 Double click the MSM icon on the Desktop Note Launching from the Start Menu of Windows Windows 8 Windows 8 1 Right click somewhere the Start screen tiles are not displayed to display the application bar and click All Apps Click MUTOH Status Monitor Windows 10 Windows 7 From the Start menu click All Programs or All apps MUTOH MUTOH Status Monitor Displaying MSM Double click the MSM icon...

Page 12: ...screen Click MUTOH Status Monitor Launching MUTOH LFP Finder Note If you have used the old version of setup wizard in your PC ValueJet Finder has been already installed In that case uninstall the ValueJet Finder Launching Layout and Print Tool 2 Windows 8 Window 8 1 Display the charm bar on the desktop and then click Search Enter Layout and Print Tool 2 and then click Click the Layout and Print To...

Page 13: ...u can use the Help for the printer driver and MUTOH LFP Finder Displaying Help Printer driver Display the Printing Preferences screen of printer driver and click Help MUTOH LFP Finder Launch MUTOH LFP Finder and click Help ...

Page 14: ...curl and weaving Do not leave a roll media set in this product for a long time The media can be curled becoming unsuitable for printing When not using for a long time remove a roll media and store in its original package box Conditions of usable media Usable size Maximum width 630 mm If paper tube media width then paper tube width Maximum thickness Head height when Low 0 3 mm Head height when High...

Page 15: ...commended to use this product once a week When left unused for a long time the print head nozzles can get clogged causing damage This product requires daily maintenance Check the nozzle before and after printing If nozzle clog is found conduct a head cleaning Clean the cleaning wiper once a week When this product is not used for a long time a week or more conduct a head cleaning once a week Clean ...

Page 16: ...oduct will start turning off 3 Turn the media fixing knob to release the lock Note When not using this product release the lock of the media fixing knob regardless of power being OFF Important When using metallic ink and white ink for VJ 628X make sure that the power is always turned on When you are not using the printer always leave the power on and put the printer into the sleep mode If you do n...

Page 17: ...t ink cartridge if Ink Low is displayed Agitate the metallic and white ink cartridges for VJ 628X Perform nozzle check If the nozzles are clogged perform cleaning Starting and Canceling Sleep Mode 1 Starting sleep mode 1 Check the following printer status The front cover is closed The remaining ink level is sufficient The waste ink bottle has enough space Important If you are going to use the slee...

Page 18: ...for VJ 628X Screens differ depending on the printer model you are using 2 Click Yes Sleep mode ends Note Depending on the elapsed time from the previous automatic maintenance the printer may automatically execute head cleaning and or ink charging etc when it exits the sleep mode Such operation does not depend on the sleep mode settings It is an automatic maintenance function of the printer ...

Page 19: ... metallic ink or white ink on VJ 628X Setting the Timer Procedure 1 To change the cleaning intervals during sleep mode click Sleep Mode Cleaning Timer and then select the time 2 To change the time before entering sleep mode click Sleep Mode Auto Timer and then select the time 3 Click Update The timer has been set Note You can change the strength of head cleaning from Cleaning Mode on the Advanced ...

Page 20: ...oller Note Attach the media in the rolling direction to be the same with the figure Push in the roll media so that there is no space with the media stopper fixed 3 Push in the media stopper movable until there is no space with the roll media 4 Attach the scroller to the scroller receivers Note Attach the media stopper movable to face to the right when this product is looked from its back 5 Turn th...

Page 21: ...he front cover Pull out the media roller from the front side of the product Note If the media gets loose rewind the scroller to correct the looseness 8 Turn the media fixing knob to lock 9 Set the paper guides to media Slide from both sides of platen and set 10 Close the front cover ...

Page 22: ...printing is done for both back and forth directions it is called bidirectional printing Though a printing speed gets faster with a bidirectional printing a slight misalignment can be generated in the print joints Image quality adjustment corrects such misalignment Setup method of bidirectional printing Adjusting image quality Bidirectional printing 1 Display the Printing Preferences screen of prin...

Page 23: ...river Displaying the Printing Preferences screen of printer driver on page 10 2 Click the Adjustment tab under the Utility tab 3 Click Adjust Print The remote panel of MUTOH Status Monitor MSM launches Note MSM can be launched directly Launching MSM on page 11 4 Click Start in Adjust Print of the Media Setting tab The Adjust Print window opens ...

Page 24: ...re misalignments proceed to Rough adjustment on page 25 In the example below there are misalignments in Pattern A Note The example is 4 colors setting When using 6 colors to 8 colors the pattern color is in Magenta red type color The pattern color of rough adjustment and micro adjustment is the same Bi dir Low H Height normal speed large drop family Bi dir Low H Height high speed small drop family...

Page 25: ...h edges of media Note Even in the same pattern the number that has no misalignment may be different between the center and both edges of media In such a case look for a number that has the least misalignment in average 3 Mark a number likewise from Pattern B to Pattern F 4 Enter marked values in A to F of 2 2 Adjust Change in 3 Rough Adjustment and click Setting Proceed to Micro adjustment on page...

Page 26: ...imilar to 3 Rough adjustment mark a number printed under the pattern that has the least misalignment Mark on Pattern A to Pattern F 3 Enter marked values in A to F of 4 2 Adjust Change in 4 Micro Adjustment and click Setting This completes the picture quality adjustment 1 2 3 4 5 6 7 A Bi dir Low H Height normal speed large drop family 5 6 7 ...

Page 27: ...r feed Note When the following defects are found in print results they may improve by conducting a paper feed correction Images are overlapping There are white lines in images Paper feed correction steps 1 Initial adjustment 1 Display the Printing Preferences screen of printer driver Displaying the Printing Preferences screen of printer driver on page 10 2 Click the Adjustment tab under the Utilit...

Page 28: ...with a prepared ruler When a pattern is longer a precision level improves A pattern is printed 6 Cut the media Press and hold the operation key on the operation panel for 2 seconds or more The built in cutter in this product cuts the media 7 With a ruler measure the length between in the pattern In the example below the measured place is shown in blue dotted lines and arrows the blue parts are not...

Page 29: ...ase proceed to Confirming adjustment on page 29 2 Confirming adjustment 1 In 2 Confirm Adjust select a length mm of 2 1 Pattern Print from the dropdown menu and click Start A pattern is printed 2 Cut the media Press and hold the operation key on the operation panel for 2 seconds or more The built in cutter in this product cuts the media Press ...

Page 30: ...roceed to Micro adjustment on page 26 If the measured length does not match the selected length re correct with Checking picture quality on page 24 3 Micro adjustment 1 Click Start in 3 1 Pattern Print of 3 Micro Adjust A pattern is printed 2 Observe the pattern and verify the micro change value In the pattern look for a place that has least white lines or overlapping in images The number printed ...

Page 31: ...saved This completes the paper feed correction Note The micro change value saved in Step 3 becomes the pattern s standard value For example if 0 50 is saved as the micro change value and a pattern is printed again the number below the center pattern changes from 0 00 to 0 50 and the left edge to 0 70 and right edge to 1 70 ...

Page 32: ...splay the Printing Preferences screen of printer driver Displaying the Printing Preferences screen of printer driver on page 10 2 Click Nozzle Check in the Utility tab under the Utility tab The confirmation window opens Note The same can be also done with the remote panel of MSM 3 Click OK A pattern is printed 4 Check the pattern When there is nozzle clog proceed to Cleaning steps on page 34 When ...

Page 33: ...ces screen for the printer driver Displaying the Printing Preferences screen of printer driver on page 10 2 Click Nozzle Check from the Utility tab on the Utility tab The selection window opens Note You can also do this for MSM remote panel 3 Select the nozzle check type and then click Start Normal Prints the standard nozzle check pattern Colored background Nozzle Check B Prints the nozzle check p...

Page 34: ... Cleaning window opens Note The same can be also done with the remote panel of MSM 2 Select Normal and click Start A cleaning starts 3 Conduct a nozzle check again Nozzle check steps on page 32 If there is still nozzle clog repeat Normal cleaning Refer to Head cleaning on page 58 for Short Long and Little Charge ...

Page 35: ...inting 1 Open printing data from application software to execute printing 2 Open the print setup screen of the VJ 628 printer driver from the application software 3 Conduct print setup Set Paper Size Orientation and Print Quality 4 Click OK 5 Printing is executed 6 Cut the media Cutting media on page 38 ...

Page 36: ...ion panel Press and hold the operation key on the operation panel for 2 seconds or more during printing The printing is canceled it cannot be restarted The printing data sent to the product are deleted Canceling printing from printer driver MSM 1 Display the Printing Preferences screen of printer driver during printing Displaying the Printing Preferences screen of printer driver on page 10 2 Click...

Page 37: ...ol under the Utility tab The remote panel of MSM launches Note MSM can be launched directly Launching MSM on page 11 3 Enter Feed Amount The unit of Feed Amount can be selected from mm and inch The media is forwarded rewound by the entered length in the Feed Amount 4 When Forward Feed Backward Feed is clicked the media is forwarded rewound Click Stop during forwarding rewinding to stop the operati...

Page 38: ...ng from printer driver MSM 1 Check printing is done 2 Display the Printing Preferences screen of printer driver Displaying the Printing Preferences screen of printer driver on page 10 3 Click Media Cut in the Utility tab under the Utility tab The remote panel of MSM launches The Confirmation window opens Note MSM can be launched directly Launching MSM on page 11 4 Click Yes The built in cutter in ...

Page 39: ...inting is done Refer to the setup methods described below Setting auto cut on page 44 Cutting by hand 1 Check printing is done 2 Feed the media to a position where print results can be cut Forwarding Rewinding media on page 37 3 Open the front cover and cut the media with a commercial available cutter Cut along the media cut groove 4 Close the front cover Cutting automatically Media cut groove ...

Page 40: ...M remote panel When using a high capacity ink pack adapter for the first time on the printer whose ink is filled When replacing a high capacity ink pack adapter that has been in use with a new one See the following for the procedure of the initial ink charging Initial charging on page 76 Once you have removed and inserted the high capacity ink pack adapter for a certain times the plug needs to be ...

Page 41: ...ter 2 Advanced Operations Changing head height 42 Releasing pressure arms individually 43 Advanced settings 44 Setting auto cut 44 Setting the vacuum fan 46 Setting the heater 47 White maintenance settings 48 ...

Page 42: ... Note If media is lifted the lifted part contacts the bottom part of the print head causing the media to become dirty If media containing a lot of ink becomes sodden and lifted it contacts the bottom part of the print head causing the media to become dirty Procedure 1 Open the front cover 2 Lift the lever and raise the head height 3 Close the front cover 4 Conduct image quality adjustment Adjustin...

Page 43: ...n both edges of the pressure arms of media are released it can prevent wrinkles When printing on thin media or media without stiffness wrinkles can be prevented by turning down the vacuum fan Setting the vacuum fan on page 46 Procedure 1 Open the front cover 2 Turn the media fixing knob to release the lock 3 Release the pressure arms on both edges of media Push in the release switch to release 4 C...

Page 44: ...set to cut media automatically when printing is done Setup is done to match the width thickness and material of media Setting auto cut Note Depending on media cutting cannot be done In such a case cut manually Procedure 1 Launch the remote panel of MSM Displaying remote panel on page 11 2 Select anything but Off in the Media Initial menu under the Media Setting tab 3 Select Auto Cut in the Output ...

Page 45: ... for media with narrow width Single Cut 3 steps By default this cut method is used Double Cut 2 steps Set when unable to cut with Single Cut 2 steps Suitable for media with narrow width Double Cut 3 steps Set when unable to cut with Single Cut 3 steps 5 Select High or Low for cut strength in the Cut Pressure menu Low is used for thin media 6 Click Update The setting is reflected on the product ...

Page 46: ...er driver Displaying the Printing Preferences screen of printer driver on page 10 2 Click Advanced in the Basic tab 3 From the Vacuum Fan menu select Middle or Low Note If the checkmark is removed from the checkbox the setting already registered in the printer s main body has priority The same can be also done with the remote panel of MSM Set in the Vacuum Fan menu of the Advanced tab 4 Click OK T...

Page 47: ...e Printing Preferences screen of printer driver on page 10 2 Click the Advanced in the Basic tab 3 In Heater menu of the Advanced tab enter a temperature It can be set to OFF or between 30 C and 45 C Since the most suitable temperature differs depending on media conduct test print Note If the checkmark is removed from the checkbox the setting already registered in the printer s main body has prior...

Page 48: ...ng MUTOH Status Monitor MSM on page 11 2 Select the maintenance operation from White Maintenance menu on the Advanced Setting tab Normal The printer performs metallic ink and white ink s maintenance operations at a regular frequency This is the default setting Little The printer performs fewer maintenance operations for the minimum metallic ink and white ink 3 Click Update The setting value is app...

Page 49: ...eplacing ink cartridge 54 Emptying waste ink tank 56 Cleaning each part 58 Head cleaning 58 Cleaning of cleaning wiper 60 Cleaning of print head circumference 62 Inside cleaning 64 Replacing consumable parts 65 Replacing absorption material for the flushing box 65 Replacing cutter 67 Replacing the plug for the high capacity ink pack adapter 68 Transporting and long term storage 71 Transporting 71 ...

Page 50: ...r the flushing box on page 65 Replacing cutter on page 67 Replacing the plug for the high capacity ink pack adapter on page 68 Weekly Cleaning of cleaning wiper on page 60 Cleaning of print head circumference on page 62 Monthly Inside cleaning on page 64 When not used for a week or more Weekly Head cleaning on page 58 Important Since a service technician has to handle following cases please contac...

Page 51: ... ink gets into your eye or make a contact with your skin wash with water immediately If left as it is it may cause red eye or light inflammation If it is necessary please see your doctor immediately How to check the message Procedure 1 Check that the error lamp on the operation panel is on 2 Launch MSM Launching MSM on page 11 3 Check the Status Information For instance if the message Shake Cartri...

Page 52: ...h the printer to wipe off the ink attached to the printer plug of Ink cartridge 3 While holding the printer plug with a paper towel agitate the ink cartridge horizontally 10 times 4 Insert the ink cartridges into the original cartridge slots Important Make sure you insert the ink cartridges into the original slots Even when you have the same color ink cartridges do not switch and insert them into ...

Page 53: ...ng the Printing Preferences screen of printer driver on page 10 2 Click the Utility tab under the Utility tab 3 Click Status Monitor The MSM remote panel opens Note MSM can be launched directly Launching MSM on page 11 4 Check Ink Information in the Printer Status tab As ink is used the colored scale becomes low Checking ink level and replacing ink cartridge ...

Page 54: ...e 1 Short press the operation key on the operation panel The buzzer stops Note Sleep mode continues after stopping the buzzer 2 Check the ink cartridge that needs to be replaced Check Status Information also 3 Prepare an ink cartridge to replace Replacing ink cartridge Leave ink cartridges away from fire or high temperature objects It may cause fire Important Do not replace ink cartridge when the ...

Page 55: ...the ink cartridge two or three times lightly Note Agitate the metallic and white ink cartridges 10 times horizontally 4 Remove the empty ink cartridge and insert the new one Make sure to match the ink cartridge color with the label of this product The arrow on the cartridge should face up Insert each cartridge to firmly seat it into each slot Note Sleep mode continues after stopping the buzzer Pre...

Page 56: ... it is necessary please see your doctor immediately Important When moving this product always empty the waste ink tank even moving short distance If ink splashes inside the waste ink tank while being moved it can cause damage Procedure 1 Check the error LED is flashing 2 Launch MSM and display the remote panel Launching Displaying Exiting MUTOH Status Monitor MSM on page 11 3 Check Status Informat...

Page 57: ...k return the hand valve to the original position You are obligated to properly dispose of waste fluid fromthe printer in compliance with Wastes Disposal and Public Cleansing Act and local ordinances Delegate disposal to an industrial waste disposal contractor 7 Click Reset Waste Ink The confirmation window opens Note Reset Waste Ink can be also done from Utility Maintenance of the printer driver 8...

Page 58: ... When nozzle clogging still occurs after Normal cleaning conduct Long cleaning Little Charge Though much better cleaning results can be expected than Long cleaning it consumes a large amount of ink Important Comply strictly with the following when you performing Little Charge If charging is interrupted ink will be lost when charging is resumed Do not open the Front cover Do not use ink cartridges ...

Page 59: ...eps for head cleaning on page 58 Note When nozzle clogging remains even after repeating normal cleaning several times conduct Long cleaning When nozzle clogging remains even after repeating Long cleaning several times conduct Cleaning of cleaning wiper on page 60 or Cleaning of print head circumference on page 62 Yet when nozzle clogging remains conduct Little Charge ...

Page 60: ...stick Cleaning of cleaning wiper Procedure 1 Display the Printing Preferences screen of printer driver Displaying the Printing Preferences screen of printer driver on page 10 2 Click the Utility tab under the Maintenance tab 3 Click CR Maintenance The MSM remote panel opens Note MSM can be launched directly Launching MSM on page 11 4 Click Start ...

Page 61: ...sts can adhere causing damage to the print head Standard cleaning time should be within 5 minutes If it takes longer the stick can dry causing damage to the print head 7 Wipe the cleaning wiper with a cleaning stick Wipe the left side surface of cleaning wiper going back and forth 8 Wipe the right side surface of cleaning wiper going back and forth 9 Wipe the right side surface of the base of clea...

Page 62: ... cleaning stick with fingers If sebum is adhered it can cause damage to the print head Do not reuse a cleaning stick Dusts can adhere causing damage to the print head Standard cleaning time should be within 5 minutes If it takes longer the stick can dry causing damage to the print head Procedure 1 Display the Printing Preferences screen of printer driver Displaying the Printing Preferences screen ...

Page 63: ... Print head guide part black plastic part 8 If dusts or ink lump are adhered clean with a cleaning stick Important Do not touch the print head surface with fingers or a cleaning stick It can cause damage to the print head Do not touch the platen or media guide The temperature may be high 9 Close the front cover 10 Short press the operation key on the operation panel The carriage returns to the ori...

Page 64: ... wait for a while before starting cleaning 3 Brush off dusts on the pressure arms with a soft brush Important Do not blow off dusts inside the product with a gas duster Dust can attach to moving parts causing abnormal sound or malfunctions 4 Using a soft cloth that is soaked in water and squeezed tightly wipe dirt on the platen and media guide 5 Using a soft cloth that is soaked in water and squee...

Page 65: ...s depending on usage frequency please check periodically Replacing absorption material for the flushing box 1 Checking steps 1 Open the front cover 2 Check the absorption material for the flushing box When there are lumps of ink rise from the frame of the flushing box it is time to replace 3 Close the front cover 2 Replacing steps 1 Display the Printing Preferences screen of printer driver Display...

Page 66: ... on the operation panel The carriage moves to the maintenance position inside the front cover 6 Open the front cover 7 Remove the absorption material for the flushing box Pull the tab up of the absorption material for the flushing box and release the hook Important When removing the absorption material for the flushing box be cautious of ink drops 8 Attach new absorption material for the flushing ...

Page 67: ...cutter or release suddenly Because there is a spring under the cutter the cutter can jump out Do not touch the cutter blade It may cause injury Procedure 1 Open the front cover 2 Move the cutter holder a little so that the cutter can be removed While pushing down the cutter knob lightly move the cutter holder to your side 3 Remove the cutter 4 Attach a new cutter Set the cutter for the cutter hold...

Page 68: ...city ink pack adapter 1 How to check the plug life 1 Launch the MSM remote panel Displaying remote panel on page 11 2 Click the Plug Lifetime tab The life is indicated by the number of the green stars 5 stars are displayed at the beginning As the plug life is running out the number of star decreases one by one 20 When a yellow star is displayed it means that the plug needs to be replaced soon Have...

Page 69: ...Displaying remote panel on page 11 2 Check the Status Information For instance if the message Change Plg No 28 is displayed replace the high capacity ink pack adapters from the slot number 2 and 8 3 See the operation manual for the high capacity ink pack adapter to replace the plug Operation manual for the high capacity ink pack adapter 3 3 Replacing Adapter s plug P 11 4 Initialize the plug life ...

Page 70: ...lizing the plug life 1 Start the MSM remote panel Displaying remote panel on page 11 2 On the Plug Lifetime tab check the slot for which the plug has been replaced 3 Click Reset Counter The confirmation window opens 4 Click Yes The plug life for the selected slot is initialized Important Do not initialize the plug life for the slot number that has not been replaced This may cause ink leakage ...

Page 71: ...ving this product always empty the waste ink tank even if it is for a short distance If ink splashes inside the waste ink tank while being moved it can cause damage Do not tilt set against something or place this product upside down Otherwise the ink may leak or the handling mentioned above may cause abnormality 1 Head cleaning and discharging waste ink 1 Display the Printing Preferences screen of...

Page 72: ...ollowing the screens After head cleaning is done do not conduct re launching and initial charging 5 Empty the waste ink tank Emptying waste ink tank on page 56 6 Turn the power button of this product OFF Blue light becomes OFF The product starts powering off operations Press ...

Page 73: ...t cover 3 Attach the head fixing plate with screws 4 Install the print head protective materials and secure them with tape 5 Secure the cutter with tape 6 Move the paper guides to the center and place taping 7 Install the steel bearer protective materials and secure them with tape ...

Page 74: ...e media fixing knob to release the lock 9 Attach the roller protective sheet 10 Turn the media fixing knob to lock The roller protective sheet is fixed 11 Close the front cover 12 Remove 2 media guides 13 Remove 2 tying bands 2 ...

Page 75: ...rt the printer into the packing box Note When moving this printer always hold the parts shown below 3 Reinstalling 1 Referring to Startup Guide unpack the product and assemble Conduct up to Starting Setup 2 Conduct initial charging Initial charging on page 76 ...

Page 76: ...Display the Printing Preferences screen of printer driver Displaying the Printing Preferences screen of printer driver on page 10 3 Click the Maintenance tab under the Utility tab 4 Click Initial Charge The MSM remote panel opens Note You can perform Initial Charge from the Printer Control tab on the MSM remote panel Launching MSM on page 11 Press ...

Page 77: ...he ink cartridge two or three times lightly Note Agitate the metallic and white ink cartridges 10 times horizontally 8 Insert ink cartridge to this product Match the label of this product to the color of ink cartridge The arrow on the cartridge should face up Insert each cartridge to firmly seat it into each slot Note After all ink cartridges are inserted this product starts ink charging ...

Page 78: ...nishes initial charging Storing for a long time 1 When not using for a long time conduct head washing and discharging of waste ink Transporting on page 71 in Head cleaning and discharging waste ink 2 When used again conduct initial charging Initial charging on page 76 ...

Page 79: ...79 Chapter 4 Appendix Troubleshooting 80 Handling messages error messages 80 Clearing a media jam 84 Specifications of this product 85 Drawing area 85 List of specifications 86 ...

Page 80: ...M Launching MSM on page 11 2 Check Status Info Message error warning contents are displayed When countermeasures are displayed follow them Note When the remote panel of MSM is launched it can be also checked in Printer Status Status Info Operations may be temporarily paused when an error occurs When an error is corrected it restarts the operation Message display of operation panel 1 Check message ...

Page 81: ...warning contents with MSM and handle the error warning Checking message error warning on page 80 Emergency mode 1 Short press the operation key on the operation panel when the buzzer continues sounding The buzzer stops 2 Check the serious error contents with MSM Checking failure contents of the emergency mode on page 82 After checking it proceed to step 5 When the status monitor cannot be viewed p...

Page 82: ...d time a long buzzer indicating the next digit sounds For LED there is a long flash only and it moves on to a long flash without having a short flash 5 Check the followings Open the front cover and if media is jammed remove it If there is a replaced part check it is installed correctly 6 Turn the power of this product OFF Wait for 10 seconds or more and turn the power ON If the same error occurs a...

Page 83: ...oad it If the printer is still unable to read it install a new ink cartridge If a message Check that correct color is correctly installed No appears after the ink cartridge is reloaded follow the message Check that correct color is correctly installed No to operate Check that correct color is correctly installed No An ink cartridge that needs smartchip recovery may have been installed Check that t...

Page 84: ... the front cover 3 Move the carriage from the top of the media to the right 4 Turn the media fixing knob to release the lock 5 Pull the media to your side and cut the media with a commercial available cutter 6 Lift both ends of the scroller and manually rewind the roll media 7 If foreign substances or pieces of media remain inside the printer remove them Press ...

Page 85: ...sible drawing area Media feed direction a 5 mm 1 2 b 5 mm to 25 mm 3 c 5 mm d 5 mm to 25 mm 3 1 After media initial and manual feedback and pasting prevention process printing starts at 15 mm 2 While the media initial tip and auto cut is ON printing starts at 40 mm 3 According to the remote panel settings ...

Page 86: ...ht when set to Low 0 3 mm Max Head height when set to High 1 3 mm Max Maximum print width 620 mm Media cut method Auto cut or manual cut Heater Installed under the media guide OFF 30 C to 45 C Head height adjustment 2 levels Low and High CPU 64 bit RISC CPU Memory 256 MB Interface Ethernet 10 100BASE TX Ink Color 4 colors Black Cyan Magenta Yellow 6 colors Black Cyan Magenta Yellow Light Cyan Ligh...

Page 87: ...Up to 4 days if the ambient temperature is 32 C or higher Temperature 10 to 40 C humidity 20 to 80 Non condensing Power supply specifications Voltage AC 100 V to 120 V 10 or 200 V to 240 V 10 Frequency 50 60 Hz 1 Hz Capacity No less than 6 5 A Power consumption Power off AC100 V to 120 V 1 W or below AC200 V to 240 V 1 1 W or below Operation 830 W or below Voltage switch Manual switching with 100 ...

Page 88: ...88 List of specifications ...

Page 89: ......

Page 90: ...VJ628E A 12 ...

Reviews: