background image

RJ900XE-I-00

1

RJ-911X series INSTALLATION MANUAL

Please read this manual 

before using

Thank you for purchasing a MUTOH product1

This manual explains the steps for unpacking, 
mounting and basic installation before using 
the MUTOH Full-color inkjet printer RJ-911X 
series1
This manual is intended for owners, installers, 
and users of this product1
Understand the contents and instructions in this 
manual before installing this product1

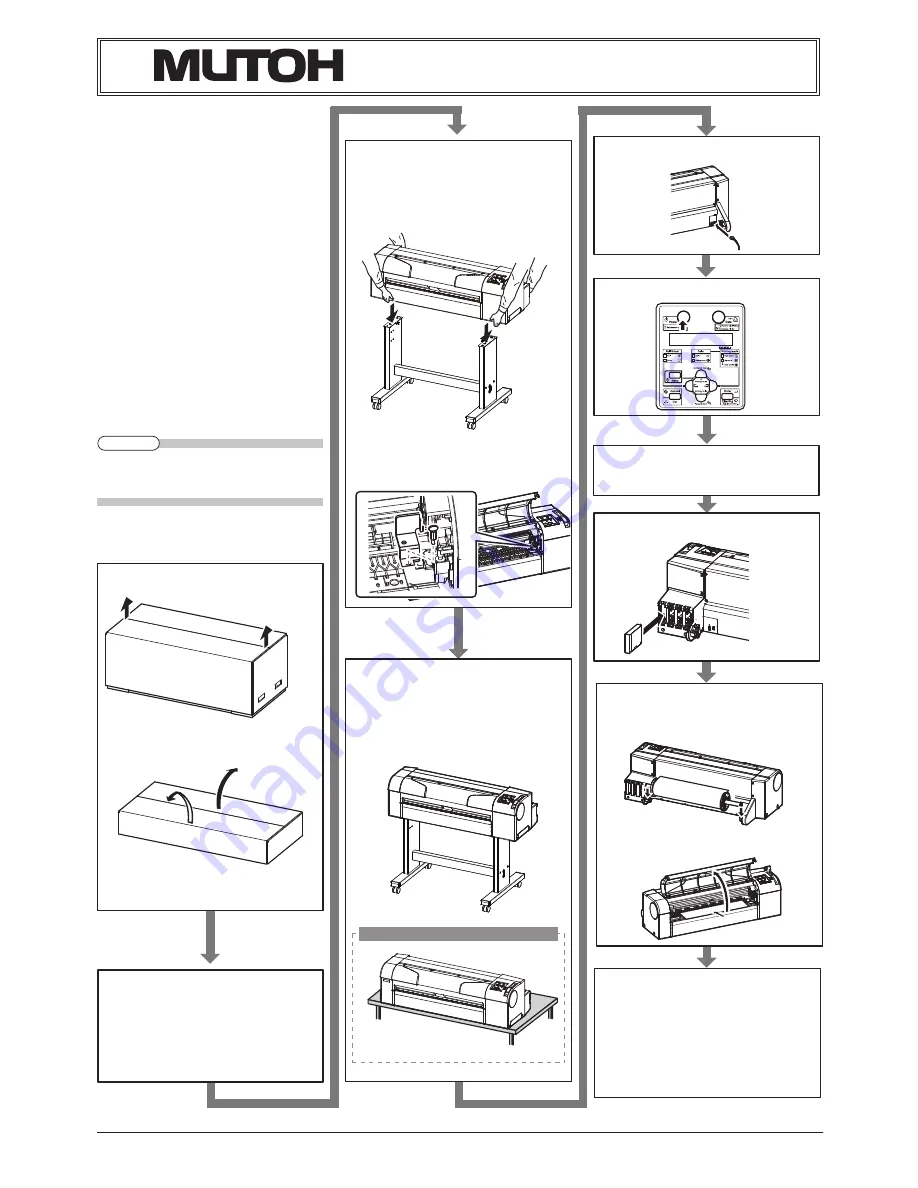
Installation flow chart

The broad steps for installation are shown below1
Follow the instructions beginning on the next 
page1


The stands are optional depending on the 

z

product and regions.

Unpacking boxes

Unpacking the printer box

111 

Unpacking the stand box

111 

Confirming bundled items

Items in the printer box

111 

Items in the attachment box

111 

Items in the stand box

112 

Assembling

The stand assembling procedure

211 

Assembling the stand

211 

Detaching protective materials

212 

Installation

Installation environment

411 

Installation procedure

411 

Connecting the power cable

Turning the power ON/OFF

Activating the printer

Setting the display language

Installing the ink cartridge

Loading the media

11 

Loading the roll media

1111 

Loading the sheet media

1111 

Check the printing condition

11 

Installing the printer driver

11 

About printer driver

12 

Manual composition

14 

NOTE

8IFOVTJOHUIFQSJOUFSPOMZ

Summary of Contents for RJ-900X series

Page 1: ...epending on the z product and regions Unpacking boxes 1 Unpacking the printer box 1111 Unpacking the stand box 1111 Confirming bundled items 1 Items in the printer box 2222 Items in the attachment box 2222 Items in the stand box 2222 Assembling 2 The stand assembling procedure 3333 Assembling the stand 3333 Detaching protective materials 3333 Installation 4 Installation environment 4444 Installati...

Page 2: ...box and take out the components1 222 Confirming bundled items 1 After unpacking please confirm that the product has not damaged and no components are miss ing1 If anyitems are damaged or missing con z tact MUTOH local dealer Items in the printer box 111 1 RJ 911X 2 RJ 911X Items in the attachment box 111 Items in the stand box 112 The stands are optional depending on the z product and regions No1 ...

Page 3: ...ket head cap screws bbb with the enclosed hexagonal wrench and fasten the central beam1 Attach two arm holders to the legs left 444 right 1 Confirm that each component is fastened 555 firmly by gently shaking the stand1 Assembling the stand 211 Attach the stand to the printer in accordance with the following steps1 Lock two casters on the front side1 111 Lift the printer main body and align the re...

Page 4: ... Places where temperature or humidity may rapidly change even though within the re quired conditions1 Place that receives direct sunlight or strong illumination light Place that receives direct wind from an air conditioner and so on To keep the temperature and humidity con z stant install this product in a location where the air condition is adjstable1 Installation space 4 1 2 When using the print...

Page 5: ...ays arrange as shown below1 There is a possibility that the printed sheets are affected or errors such as media jams oc cur1 Connecting the power cable 5 This section explains how to connect the power cable1 Follow the steps below to connect the power cable1 Be sure to use the specified power z cable1 Using a power cable other than the specified can cause an electric shock or fire1 Use the power c...

Page 6: ...Operation panel is in the following status z the power is ON1 The Power key is pressed in1 Power lamp is ON1 Press the key once again to turn the power OFF1 The printer turns the power OFF1 When the media is set Lift the lever is dis z played on Operation panel1Raise Media load ing lever1 Wait for a while111 is displayed on Operation panel1 All the lamps on Operation panel and the LCD monitor are ...

Page 7: ...he ink does not come into contact with your eyes or skin1 If the ink got into your eyes or attached to the skin immediately wash with water1 Failing to do so may cause irritation and light inflammation of the eyes1 In case of any abnormality consult a phy sician immediately1 Turn ON the product1 111 The product starts the initial operation1 222 The operation panel displays No ink cart didge Take o...

Page 8: ...t the roll media in the center of the printer1 Follow the steps to load the media1 When using roll media of three inch di 111 ameter media tube the optional three inch attachment should be used to the movable flange and fixed flange1 Load the roll media into the scroller so that 222 the roll media gets winded up in the anti clockwise direction in the view from the fixed flange side1 Push the roll ...

Page 9: ...ing lever backward1 444 The operation panel displays Lever Up 1 Open the front cover and insert the sheet 555 media in to the media feed slot1 Align the right end of media to the media 666 loading mark and align the front edge to the step of platen respectively1 If the sheet media right end shifts either to z the right or the left from the loading mark it would become as media loading error withou...

Page 10: ...mplete printing is not z fixed by one head cleaning perform strong cleaning1 If several head cleanings does not remove z print blur or incomplete printing refer to the following and perform required procedures1 Operation Manual 6 Troubleshooting Perform the nozzle check again and confirm 999 the print head condition1 Installing the printer driver 11 For network connection 1111 This section explain...

Page 11: ...ing Driver 1 Turn ON the power to the PC1 111 Ensure that your PC boots up correctly and 222 insert the CD ROM on which Windows printer driver is written into the CD ROM drive on your PC1 The language preference screen is displayed1 Click the language you want to use1 333 Click Install the printer driver on the next 444 screen1 The installer starts up1 555 For details about installing refer to 317...

Page 12: ... For the setup procedure of the printer driver z refer to 414 Setting Printer Driver in the Op eration manual or the attached help file1 The file will be displayed by clicking HELP on the printer driver setup screen1 Product Activation Guide 14 This product includes the following manuals1 Installation Manual this manual This manual explains the procedures of unpacking installing and basic set up1 ...

Reviews: