background image

88

89

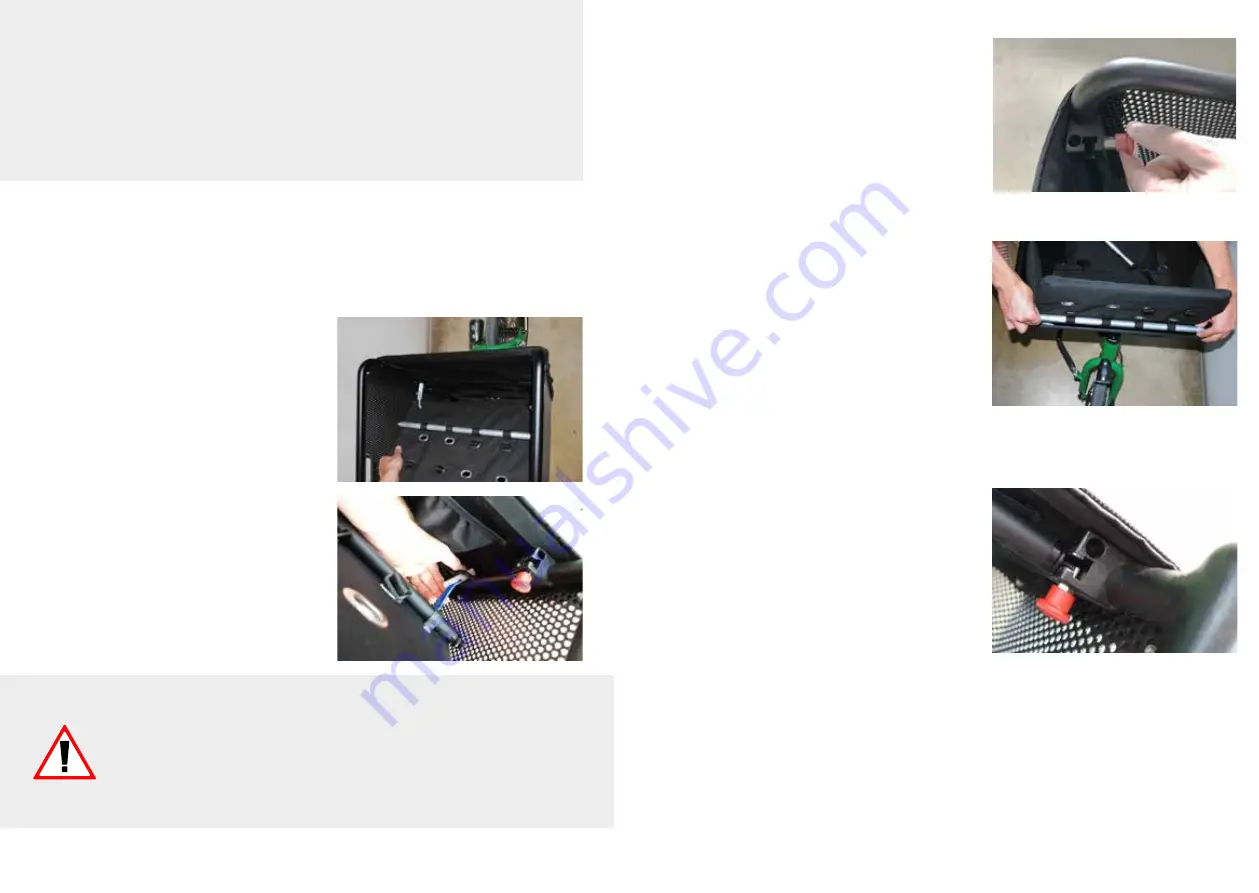
Proceed as follows to insert the child seat into the cargo basket:

Inserting the child seat into the basket

1. 

Place the basket in position

2.

 First push the plastic toggle at the 

back of the seat from bottom to top 

through the basket eyelets. 

3. 

Pull back the locking bolts on both 

sides and turn the red knob slightly 

so that the bolt locks in the retracted 

position.

4. 

Place the bar of the child seat 

evenly on both sides. To do this, take 

the first rod with both hands at each 

end. Insert the rod evenly and parallel 

into the child seat raincover holders 

on the left and right.

If necessary, use both hands to push 

the basket wings slightly apart so that 

the rod can engage in the profile.

5.

 Pull back the latch bolt, turn the 

knob slightly so that the bolt locks 

into the child seat raincover mount.

If a very high pressure on the wings is necessary to insert the rods, the rods are set 

too long and can be shortened by screwing in the end pieces. In this case, loosen 

the lock rings on the end pieces of the rod and screw in the end pieces slightly. 

Tighten the counter rings again.

This procedure applies to the installation of the seat both against and in the direc-

tion of travel. Always remember to fasten the plastic toggles to the basket eyelets. 

Otherwise, the backrest will not be sufficiently secured to the basket.

Always remember to fasten the plastic toggles to the basket eyeled. 

Otherwise, the backrest will not be sufficiently secured to the basket 

and consequently your child is also not safely strapped in.

Child seat and child transport in the muli

Summary of Contents for Muskel

Page 1: ...1 User Manual EN muli muskel ...

Page 2: ...2 3 muli muskel User Manual Nr BA LR MU 01 22 ...

Page 3: ...instructions carefully before use even if you are already an experienced cyclist and keep it for future reference The muli is a special bicycle and different in its construction and its riding characteristics from conventional bicycles Remind riding a bicycle is a potentially dangerous activity you should be aware of this Be sure to read the sections Before the first ride and Before each ride befo...

Page 4: ... 1 Basket Tire Rim Spokes Hub Valve Quick release axle Saddle Seatpost Seat post clamp Frame lock Brake discs Chainring Chain belt Crank Pedal Stem Handlebar Stem adapter Steering bearing Front headlight Brake lever Front brake Fork Steering bearing 2 3 4 5 6 7 8 9 10 11 12 13 14 15 16 17 18 19 20 21 22 23 24 25 26 5 6 7 14 8 9 10 11 12 13 15 16 17 19 18 20 21 22 23 24 26 25 h g i k j d m l f a c ...

Page 5: ...first ride 36 Before each ride 42 Driving the muli 46 Components 48 Handlebars and stem 50 Steering linkage 54 Brake system 56 Gear shift 60 Chain and chain guard 62 Belt drive and frame lock 64 Lighting system 70 Load basket 72 Child seat and transport 82 Rain cover 92 Double stand 100 Maintenance 102 Impacts and accidents 104 Care and maintenance intervals 106 Recommended bolt torques 108 EC Dec...

Page 6: ...10 11 Safety Instructions ...

Page 7: ...positions Please adhere to this usage recommendation otherwise you risk exceeding the load limits of the muli and causing damage to the frame basket and fork The information on maintenance and repair as well as the proper operation of the muli in this manual are part of the intended use In case you use the muli for commercial purposes keep in mind that you expose the muli to increased loads This i...

Page 8: ...o basket Safety instructions We recommend wearing a helmet both for the driver and for the children who may be transported in the cargo basket Keep in mind that like any other bicycle the muli requi res regular maintenance and care in order to ensure long term suitability for riding Check the brakes tire pressure steering rims and all parts subject to increased wear at regular intervals More infor...

Page 9: ...tely loaded onto the seat post e g in the form of a backpack or onto the luggage carrier Example 2 100kg rider 25kg own weight muli According to the maximum permissible total weight of 195kg a maximum of 62kg may be loaded here These 62kg may be loaded completely in the cargo basket or distributed between the cargo basket and the luggage carrier whereby the luggage carrier load may not exceed 18kg...

Page 10: ...the vibration load Exposure to whole body vibration can be prevented with a saddle suspension This component can be selected when ordering or retrofitted independently after purchase Note that the muli is not approved for the mounting of child seats on the seat tube or even the seat post The attach ment of such child seats can lead to deformation of the frame The permissible total weight of the mu...

Page 11: ...either in the form of reflective rings around the entire circumference of the wheel or two spoke reflectors per wheel V Two yellow reflectors per pedal facing front and rear 3 The bicycle must have a bright sounding bell In each country where you will be riding your muli on public roads find out about any nationally applicable legal require ments for riding a bicycle The German StVZO is continuous...

Page 12: ...22 23 Before Use ...

Page 13: ...ivel bearing head of the steering linkage over each other and put the individual parts on top of each other To do this simply loosen the nut at the bottom remove the nut and washer Then put the bolt through the extension arm and put the washer and nut back on the bolt The slide bearing for the boom is then pressed into the boom by tightening the screw by tightening the screw 2 When you have prepar...

Page 14: ...Then tighten the pedals with a 15 mm open end wrench if the pedal has external hex nuts or with a 6 mm Allen wrench if your pedal has an internal hex bolt The corre sponding torques can also be found listed in the Recommended screw torques section Mount the included bell at the desired position on the handlebar Mount the bell so that you can reach it very quickly with your thumb without having to ...

Page 15: ...ting the seat height You can find out the optimum seat height as follows sit on the saddle and place one leg with the heel on the pedal The pedal should be in the lowest position for this The saddle should be adjusted so that the leg is fully extended in this position Via the quick release on the saddle clamp the saddle can be very easily adjusted in height Open the quick release and set the desir...

Page 16: ...ckpack and other weights on the rider s body Consider all weights that you load in addition to their own weight on the seat tube The load limit of 100kg must not be exceeded The quick release must be firmly closed and fit tightly against the seat post before you start riding The tip of the lever must point forward when closed see also illustration on page 29 below Adjusting the handlebar height Th...

Page 17: ...in a horizontal line determine After adjustment make sure that the saddle cannot be twisted or tilted by pulling and pushing on the front and back of the saddle with your hands Under no circumstances should the saddle be fixed in a tilted back position Turning gear and brake levers You can adjust the shift and brake levers on the handlebars to suit your seating and hand position To do this loosen ...

Page 18: ... pull the brake lever through to the handlebar The brake must engage clearly before this Observe the torque specifications for handlebar stem and stem adapter Setting the lights The rear light is fixed to a rigid bracket and does not need to be adjusted The front light on the other hand can still be tilted up and down on its bracket Ad just the light so that the light cone hits the ground in the r...

Page 19: ...onal bicycles Be aware that this makes it more difficult to park push lift and carry the muli in everyday handling The muli is only available in one frame size So that you can optimally adjust the muli to your respective body size both the seat post and the handlebar stem are height adjustable Adjust the saddle and handlebars so that they correspond to your body size The correct saddle height is a...

Page 20: ...kes on the front and rear wheel which achieve a very high braking effect Therefore rehearse the braking with the muli in detail before you use it in public traffic Brake system Particular care should be taken when using the front wheel brake as braking too hard especially when cornering and even with a slight steering angle can cause the wheel to slip and lead to a fall It is best to always use th...

Page 21: ...ransport If you have also purchased a child seat and want to transport your children with the muli be sure to thoroughly rehearse driving with children in the basket in a traffic free safe location Install the child seat properly To do so please read the installation instructions in the Child seat section very carefully and follow these instructions Strap the children in using the seat belts provi...

Page 22: ... inspection of the connection between the frame and the cargo basket especially if you want to transport children Open the cargo basket and lift the rubber mat Now you can see the fastening screws of the cargo basket and check that they are tight 6 Check the correct function of the lighting system If battery lights are installed make sure that the batteries of the front and rear lights are charged...

Page 23: ...lls Check the secure fit of all quick releases thru axles and screw connections even if you have only parked your bike unattended for a short time You may only ride off when all quick releases are tightly closed A broken or loose spoke weakens the entire wheel struc ture and must be replaced or repaired immediately Before each trip ...

Page 24: ...g behavior changes depending on the load A high load increases the braking distance and makes short term steering and dri ving maneuvers more difficult Therefore be particularly careful when driving with a heavy load The braking distance is also longer when driving on sloping roads Driving characteristics Avoid shifting under high load on the pedals Therefore take pressure off the pedals before sh...

Page 25: ...48 49 Components ...

Page 26: ...Make sure that the quick release lever of the stem adapter is always firmly closed while riding and that the handlebars do not move in height Turning in the handlebar for transport and parking In addition to height adjustment the stem adapter also allows the handlebars to be turned in sideways making the muli even more compact for parking in a hallway for example To turn in the handlebars open the...

Page 27: ... specified 3 NM Information on this also on https www youtube com watch v GY9OG3ojvBIw Over tightening the stem bolts can damage the steering tube stem and cause it to break Observe the torque specifications on the component Only in the uppermost position the handlebars can be turned in and back again Forcibly turning the hand lebars when they are not in the highest position can cause the stem ada...

Page 28: ...rews screwed in or out ac cordingly Note that the lock nuts are glued in place with liquid threadlocker from the factory So when you open and retighten the nuts apply appropriate threadlocker as well Note that the lock nuts on the steering linkage are glued in place with liquid threadlocker from the factory So when you open and retighten the nuts apply appropriate threadlocker as well Steering res...

Page 29: ...ge depending on the load conditions and the slope of the road Braking distance increases when ri ding at high speeds and on sloping roads Check the screws on the brake caliper and the brake pads once a month The brake pads are wearing parts Replace the brake pads when they are less than 1mm thick Check the brake system regularly for leaks For more information on the installed Shimano hydraulic dis...

Page 30: ... en gage clearly before this Make sure that the brake pads never come into contact with oil If this does happen you must change the brake pads Note that the disc brakes may be heated after heavy use there is a risk of burns The distance between brake pad and brake disc should be between 0 25 and 0 75mm Brake System ...

Page 31: ...ese two markings can be moved against each other and should be exactly at the same height in fourth gear and sixth gear respectively If they are not on top of each other in fourth gear or sixth gear you can ad just the cable tension at the adjustment screw at the front of the shift lever You can see from the two yellow markings in which direction you have to turn the adjusting screw Turn so that t...

Page 32: ...e dropout mount with a 5 mm hexagon wrench Open the screws on the left and right side 2 Then you can turn the grub screw in the dropout with a 2 mm hexagonal wrench and push the dropout backwards until the cor rect chain tension is achieved 3 The line markings on the drop out help you to determine the same position of the dropouts for the right and left side The chain guard Chainrunner is installe...

Page 33: ...nfluences and environmental conditions Therefore check the condition of the belt regularly Tension of belt When tensioning the belt proceed in the same way as when tensioning the chain Take a look at the photos there for the following steps for a better un derstanding 1 To tension the belt loosen the two M6 Allen screws on the dropout mount with a 5 mm hex wrench Open the screws on the left and ri...

Page 34: ... damage to the threads in the frame can render the entire frame unfit for use You can determine the correct belt tension using the Gates Carbon Drive mobile app This app is available free of charge for Android devices and IPhones Without the app you can use the following guide values Press down on the belt midway between the front and rear pulley on its top side with a finger and a force of 20 45 ...

Page 35: ...not jam Careless handling of the frame lock can damage the threads of the frame lock and thus make the entire frame unsuitable When a new belt system is run in the blue layer on the inside of the belt quickly wears away This removal does not represent wear of the belt The blue layer is on the belt solely for produc tion reasons It is a separating agent to enable the belt to be released from its mo...

Page 36: ...uli It is best to switch on the light at the onset of dusk this will make you more visible to other road users and prevent accidents Make sure that the rear light is always clearly visible The front light is fixed but it can be tilted up and down which allows you to adjust the angle of light For optimum visibility adjust the light so that the light cone hits the ground in the range 5 8 meters in f...

Page 37: ... Generally keep the load s center of gravity as low as possible 2 The load must be stowed in such a way that the center of gravity of the entire load is as central as possible i e above the longitudinal center line of the vehicle 3 The muli must be loaded within the limits of the permissible total weight and the permissible axle loads 4 Even with partial loads an even weight distribution must be a...

Page 38: ...e both wings together and at the same time with a slight swing against the locking bow Do not knock basket sashes together with great force Exerting great force here can cause components to bend and break Make sure that the edge protector is always mounted in the recessed grip Otherwise you risk dangerous injuries at the exposed sheet metal edge Since the load basket of the muli is not a rigid con...

Page 39: ...pen the cargo basket is not locked in place so it can theoretically collapse at any time Children should therefore never be transported in the basket without the muli child seat When closed the basket locks to a spring loaded locking bar on the steering tube By gently pulling the locking bar the basket usually opens without further intervention Opening the basket is therefore very easy and can be ...

Page 40: ...high pressure and then turn it Otherwise you risk damaging the lens head screw Basket covers Furthermore make absolutely sure that you do not tension the covers too much It must be possible to open the basket wings fully and they must rest on the frame supports when open If the covers are too tight the basket will have play at the sides and will per manently tilt back and forth slightly thereby pl...

Page 41: ...g on the basket wings or blows and impacts on the basket wings e g due to a fall can cause components to bend and the basket can no longer be closed Especially when closing the basket make sure that the locking bow is completely engaged in the basket Give the bow a light tap to push the bow completely into the basket Be very careful when loosening the pan head screws on the basket Since these are ...

Page 42: ...kg and a height of 120cm Never use the seat for children who are not yet able to sit independently can The child seat has two 3 point safety belts which can be adjusted in length and height The child seat buckles snap magnetically into the holder Due to the han ging system and the textile material the seat also absorbs light road shocks and the children sit very comfortably Nevertheless when drivi...

Page 43: ...ot suitable for consumption Note that the child seat is subject to high loads and wears out over time and must be replaced in due course Make sure that the children you are transporting in the child seat never kick the locking bars with their feet The muli stands very securely on the folded out double leg stand However vertical pressure on the upper edge of the bas ket especially on the front uppe...

Page 44: ...he child seat s seams rivets plug in connections belts and screw connections for strength and freedom from damage Check that the lo cking bar is not damaged Make sure that your child never leans out to the side over the basket wings This weight shift can cause the muli to tip quickly both while riding and while stationary Damage to the bicycle and serious injuries to the child can result Children ...

Page 45: ... the profile 5 Pull back the latch bolt turn the knob slightly so that the bolt locks into the child seat raincover mount If a very high pressure on the wings is necessary to insert the rods the rods are set too long and can be shortened by screwing in the end pieces In this case loosen the lock rings on the end pieces of the rod and screw in the end pieces slightly Tighten the counter rings again...

Page 46: ... pressure is needed on the wings to insert the rods This is import ant so that the rods are locked well into the basket So do not adjust the rods so that they are very loose in the basket Insert both rods parallel and evenly into the profile angles on the right and left Always remove the rods from the profile angles in parallel If one end of the rod is initially inserted and removed on one side it...

Page 47: ...receptacles both when the rain top is already mounted and when it is not yet mounted To install the convertible top follow the instructions below The bow on the handlebar side is shorter than the bow on the front of the basket This creates more headroom for the children in the front area when the child seat is installed against the direction of travel This position is therefore also suitable for s...

Page 48: ...rod into the two front frame holders and the small rod into the two rear holders 3 Pull the rain cover from the front over the frame linkage and make sure that it is already correctly positioned at the front Only then can it be pulled over the basket plugs at the rear with slight force 4 Then tension the rain cover on the handlebar side with the tensioning rope and the hooks on the down tube of th...

Page 49: ...e read these folding instructions carefully and memorize the folding steps It is essential to fold the canopy according to these instructions otherwise the transparent windows may be damaged by incorrect folding and get cracks and holes 1 Lay the canopy on a flat surface In a first step lay it together as shown in this photo Pay close attention to the fact that the window material on the sides is ...

Page 50: ...s in the sup plied bag and get a very compact pa cking size Make sure that the folded canopy is not exposed to high loads People or children must not stand or step on the folded canopy It is essential to fold the canopy according to the above instruc tions otherwise the transparent windows may be damaged by incorrect folding and get cracks and holes Make sure that the folded soft top is not subjec...

Page 51: ...sh the muli backwards on one side over one stand leg Generally but especially with a heavy load it is helpful to lift the muli slightly upward by the saddle while you push it back ward onto the stand The muli is jacked up a bit when parked on the stand and must therefore be pulled backward with some force To get the muli back into driving position from the parking situation place one foot Loading ...

Page 52: ...102 103 Maintenance ...

Page 53: ...ely apparent after a violent impact or fall It is therefore essential to have your muli checked at a specialist workshop after a fall Accessories such as the child seat must also be checked for integrity if they are involved in a fall or impact Deformed parts can break abruptly They must also not be straightened i e not bent straight because there is an acute risk of breakage even after this Never...

Page 54: ...e the mule unsafe There is a risk of accidents The use of non ori ginal spare parts will void the CE marking and your warranty Do not use a high pressure cleaner to clean your e muli Never immerse the battery in water A bicycle is subject to high stress and wear When the load limit of a component is exceeded it can suddenly fail break or burst possibly causing serious harm to the rider and ot hers...

Page 55: ...n and concentricity Re center rim Wear check For function check Check correct fit of the rear light Check power cable and connections for damage Check bearing clearance Soak in oil S S S S S S S W W W W Gear cables Check and grease or renew Bottom bracket Bearing clearance controlled Regrease Crank Screws check tighten Chain Check and grease Check for wear replace Belt Check for wear Painting Clea...

Page 56: ... Seat clamp Fixing the seat post Seat post head Saddle mounting Mudguard Clamping screws Axle nut Mounting screw steering bar Axle clamp quick release Crank bolt Mounting screws Pedal axle Mounting screws Mounting screws Quick release on the seat tube Allen screw Mounting screws 6 8 Nm 10 12 Nm 9 10 Nm 30 45 Nm 5 Nm 6 8 Nm 35 50 Nm 8 11 Nm 35 Nm 6 8 Nm 10 13 Nm and screw lock 9 12 Nm 20 Nm 5 Nm Fo...

Page 57: ... i i o o n n s s a a l l s s o o a a p p p p l l i i c c a a b b l l e e t t o o t t h h e e p p r r o o d d u u c c t t i i s s d d e e c c l l a a r r e e d d RoHS Directive 2011 65 EU of 08 June 2011 EMC Directive 2014 30 EU of 26 February 2014 A A p p p p l l i i e e d d h h a a r r m m o o n n i i z z e e d d s s t t a a n n d d a a r r d d s s i i n n p p a a r r t t i i c c u u l l a a r r ...

Page 58: ...114 115 Published by muli cycles GmbH Widdersdorfer Str 190 50825 Cologne Germany Phone 0049 0 2775 2390210 E Mail info muli cycles de ...

Page 59: ...116 ...

Reviews: