24
25
Assembly instruction
Open the cardboard box on the side of the front wheel, remove the wheel triang-
le and carefully pull the e-muli out of the box. Hold the e-muli in the scales while
pulling it out and make sure that it does not tip over. To assemble the e-muli, first
unfold the double-leg stand. This ensures that the e-muli stands securely.
Assembly of the steering linkage
The e-muli is completely pre-assembled and adjusted except for a few parts.
You only need to carefully fasten one screw - the connection of the steering arm
to the steering linkage. It is important that you plug the individual elements onto
each other in the correct order. The screw is attached to the steering linkage and
prepared accordingly.
Attention! The steering linkage is a highly safety-relevant
component. Fasten this screw connection with the greatest
care and ensure that the connection is firmly seated.
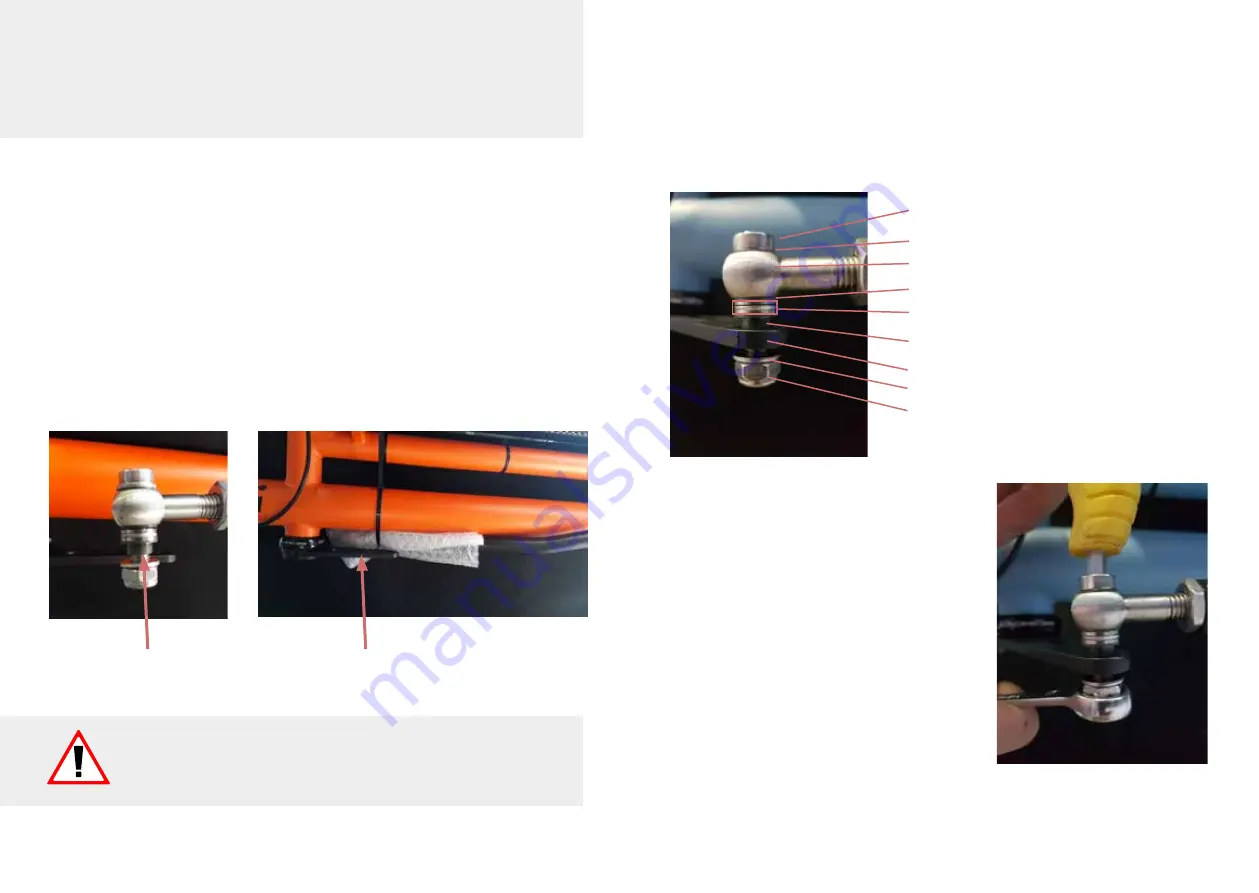
Outrigger
Prepared screw
1.
Guide the steering tube extension and the swivel bearing head of the steering
linkage over each other and put the individual parts on top of each other. To do
this, simply loosen the nut at the bottom, remove the nut and washer. Then put
the bolt through the extension arm and put the washer and nut back on the bolt.
The slide bearing for the boom is then pressed into the boom by tightening the
screw by tightening the screw.
2.
When you have prepared the con-
nection accordingly, tighten the screw
with a 6 mm Allen key and a 13 mm
open-end wrench. This presses the
plain bearing into the cantilever. Since
this is a self-locking nut, you can adjust
the heavy or light steering movement
via the contact pressure of the screw.
Adjust the screw pressure so that the
handlebar can be turned comfortably.
A very high contact pressure increases
wear, a very low pressure can cause
the steering linkage to rattle.
Check this screw connection at regu-
lar intervals!
3.
Then carry out all the instructions given in chapters 4 and 5 („Before the first
ride“ and „Before each ride“).
Plain bearing
Swivel bearing of the steering linkage
Plain bearing
Ball bearing
Plain bearing
Boom of the steering linkage
Washer
Self locking nut
Screw
Summary of Contents for Muskel
Page 1: ...1 User Manual EN muli muskel ...
Page 2: ...2 3 muli muskel User Manual Nr BA LR MU 01 22 ...
Page 6: ...10 11 Safety Instructions ...
Page 12: ...22 23 Before Use ...
Page 25: ...48 49 Components ...
Page 52: ...102 103 Maintenance ...
Page 59: ...116 ...


