background image

Operating Manual

English

9

The indicator light (2) comes on 

and indicates to the user that the 

unit can now mow in reverse and 

forward gear.

Stopping: 

Turn the key to the left, to  .

Note

Do not use the OCR function 

unless absolutely necessary, 

otherwise work with the key in the 

normal position. The OCR function 

switches off automatically as soon 

as the key is turned to the normal 

position or the engine is switched 

off (stop position or disconnection 

of the engine by the safety interlock 

system).

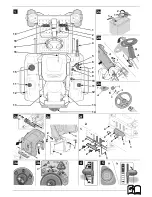
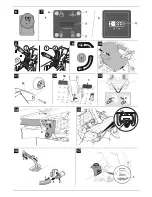
Fuel tap (10)

Fig. 9

For opening the fuel supply on the 

left or right fuel tank or for closing 

the complete fuel supply.

= Fuel supply of both tanks 

closed.

= Fuel supply of right tank 

opened.

= Fuel supply of left tank 

opened.

Fuel tank (11)

Fig. 1

There is a fuel tank on each side of 

the unit.

Tank contents display (12)

Fig. 1

The inspection window indicates 

the level of fuel in the fuel tank.

Gear release lever (12)

Fig. 13

To push the unit when the 

engine is switched off. 

Pull out both levers (near 

each back wheel) and then press 

them to the right.

To drive the unit, push the 

lever to the left and press in.

Trailer coupling (14)

Fig. 1

Is used to hitch accessories, e.g. 

garden roller, transport trailer, etc.

Can holder (15)

Fig. 1

Adjustable seat (16, optional)

Fig. 10 

Press lever to the side and adjust 

seat.

Steering wheel (17)

Fig. 1

Parking brake/

Speed control (18)

Fig. 12

This pedal has a dual function:
Actuate the parking brake 

.

Depress brake pedal (16) all the 

way and press pedal.

Release the parking brake.

Depress brake pedal (16) all the 

way, pedal is released.
Switching on Tempomat 

:

When driving, press the pedal.

The forward speed selected 

at this point (but not top speed) 

is maintained, and the drive pedal 

can be released. 

When the forwards accelerator 

pedal or brake pedal is depressed, 

the cruise control is automatically 

switched off.

Brake pedal (19)

Fig. 12 

The brake pedal can be used to 

brake quickly, to engage and 

disengage the locking brake, 

and to switch OFF speed control.

Note

The forwards and reverse 

accelerator pedal must not be used 

if the brake pedal is depressed. 

This may damage the gears.

Operating procedure

Follow the instructions in the 

engine handbook!

Danger

Risk of injury

No person, especially children, 

and/or animals should be allowed 

to stand close to the mower while it 

is in use. They could be injured by 

stones or similar objects that might 

be thrown out. Children must never 

be allowed to operate the mower.

Be particularly careful when 

mowing in reverse gear (units with 

OCR switch). There must be 

nobody in the working area of the 

unit. Never empty the grass catcher 

attachment while the cutter deck is 

running. While emptying the grass 

catcher attachment, you or other 

persons may be injured by ejected 

clippings. 

If you are mowing on steep slopes, 

the unit may overturn and you may 

be injured. Never ride straight up or 

down an incline, but always across 

it. The mower should not be driven 

on slopes with a maximum incline 

greater than 20 %. Do not turn the 

mower round while you are still on 

the slope.

If the ground is wet the mower 

could slip due to reduced traction 

and overturn. Only cut the grass 

when the ground is dry.

Excessive speed can increase the 

risk of an accident.

Maintain a safe distance at all times 

from particularly steep slopes, 

trees, bushes and hedges.

Pay particular attention when you 

are travelling in reverse while 

mowing at the same time.

Inspect the ground on which the 

mower is going to be used and 

remove any loose objects that 

could be picked up and thrown out 

again by the mower.

If the cutter hits a foreign object 

(e.g. stone) or if the unit starts 

vibrating unusually: Immediately 

switch off the engine. Before 

continuing to use the unit, have it 

checked for damage by a service 

centre.

When rotary mowing, never stand 

in front of the grass discharge 

openings. Never place hands or 

feet on or under rotating parts.

Switch off the engine and remove 

the ignition key and the spark-plug 

terminal before loosening obstruc-

tions or removing blockages from 

the discharge channel.

Do not use the unit in adverse 

weather conditions, e.g. if there is a 

risk of rain or a storm.

Summary of Contents for Cub Cadet

Page 1: ...MTD Products Aktiengesellschaft Saarbrücken Germany E 15 FORM NO 769 10224A ...

Page 2: ......

Page 3: ...16 17 18 15 11 12 13 19 4 5 6 7 8 9 10 11 12 13 14 3 2 1 1 4 3 1 1 1 2 1 2 3 3 4 2 2 1 1 2 3 3 4 2 2 1 1 2a 2b 2c 2d 2e 2f 3a 3b 4 5 ...

Page 4: ... 1 4 2 1 1 4 2 1 1 4 2 1 1 4 2 1 1 4 2 1 1 4 2 1 1 4 2 1 1 4 2 1 1 4 2 1 1 4 2 1 1 4 2 1 1 4 2 1 1 4 2 1 1 4 2 1 1 4 2 1 1 4 2 1 1 4 2 1 1 4 2 1 1 4 2 1 1 4 2 1 1 4 2 1 1 4 2 1 1 4 2 1 1 4 2 1 1 4 2 1 1 4 2 1 1 4 2 1 1 4 2 1 1 4 2 1 1 4 2 1 1 4 2 1 1 4 2 1 1 4 2 1 1 4 2 1 1 4 2 1 1 4 2 1 1 4 2 1 1 4 2 1 1 4 2 1 1 4 2 1 6 9 10 1 2 2 1 2 1 2 3 4 1 2 3 4 1 6 9 10 11 12 13 14 16 17 15 7 19 1 1 2 18 2 ...

Page 5: ...1 2 18 19 21 20 22 ...

Page 6: ...ions d origine Deutsch 30 Originalbetriebsanleitung Italiano 43 Istruzioni per l uso originali Svenska 57 Originalbruksanvisning Dansk 69 Originale driftsvejledning Norsk 81 Originale driftsanvisningen Suomi 93 Alkuperäinen käyttöohjekirja Eesti 106 Originaalkasutusjuhend ...

Page 7: ...has been provided and delivered by the manufacturer Keep this guide in a safe place where it is readily available whenever the machine is used If ownership of the mower changes hand this guide to the new owner Spare parts and accessories must satisfy the requirements specified by the manufacturer Therefore use original spare parts and original accessories only or spare parts and accessories author...

Page 8: ...nst possible injuries resulting from the cutting blade or objects that are propelled by it The unit may only be operated with the grass flap attached Safety interlock system The safety interlock system will only allow the engine to start when the driver is sitting on the seat the brake pedal has been depressed or the parking brake is in the park position the PTO switch is at the Off position The s...

Page 9: ... Risk of poisoning and injury from battery acid Wear safety goggles and protective gloves Do not allow battery acid to come into contact with skin If you get battery acid on your face or in your eyes wash off immedia tely with cold water and consult a doctor If you accidentally swallow battery acid drink plenty of water and consult a doctor immediately Store batteries out of the reach of children ...

Page 10: ...e 7 Combination indicator 8 PTO switch 9 Ignition lock 10 Fuel tap 11 Fuel tank 12 Tank contents display 13 Gear release lever 14 Trailer coupling 15 Can holder 16 Seat adjustment lever 17 Steering wheel 18 Pedal for parking brake cruise control 19 Brake pedal depending on model Forward pedal 1 Fig 12 The pedal controls the speed in a forward direction Reverse pedal 2 Fig 12 The pedal controls the...

Page 11: ...the air filter and outputs warning signals for oil level and battery voltage Changing the oil Every 50 operating hours oil change interval the letters CHG OIL SOON TIME appear in succession on the display for 7 minutes Change the engine oil immediately see engine operating manual Oil level If the letters LO OIL TIMEappear in succession on the display the engine oil level is too low Switch off the ...

Page 12: ... control Note The forwards and reverse accelerator pedal must not be used if the brake pedal is depressed This may damage the gears Operating procedure Follow the instructions in the engine handbook Danger Risk of injury No person especially children and or animals should be allowed to stand close to the mower while it is in use They could be injured by stones or similar objects that might be thro...

Page 13: ... is secure Check the oil level The oil level must be between the Full Max and Add Min marks see also engine handbook Check tyre pressure Check the tyre pressure see tyre walls on all wheels Correct if necessary Preparing for operation Park the appliance on a firm level surface and lock the parking brake Conduct all work with the engine switched off Remove the ignition key For all work on moving pa...

Page 14: ...he grass too low Drive in a straight line Never mow at high speed particularly when a mulching kit or grass catcher is installed Mulching Various appliances can also mulch when fitted with the corresponding accessories Ask your specialised dealer for details Note This appliance is designed to mow lawns Do not mow scrub weeds or overlong grass Switching off the machine Stopping the unit Release the...

Page 15: ...on firm level ground Lock the parking brake Cleaning the cutting mechanism Danger Injury hazard due to sharp cutting blades Wear protective gloves If the unit has more than one cutting mechanism moving one cutting mechanism may cause the other cutting mechanisms to move as well Caution when cleaning the cutters Warning Damage to engine The mower must not be tilted to an angle greater than 30 This ...

Page 16: ...hs during storage and before starting up the unit again Check the battery s charged state with a voltmeter When the charged state is less than 12 6 V DC recharge the battery max 12 V at 6 A with a battery charger in accordance with the table Note Follow the instructions in the operating manual for your battery charger Replacing fuses Replace defective fuses only with fuses of the same amperage Hyd...

Page 17: ...d set the correct level on the setting segment 1 on the cutter deck side Lifting Loosen nut 2 anti clockwise and turn nut 3 clockwise until the level is correct Retighten nut 2 Lowering Turn nut 3 anti clockwise until the level is correct Tighten nut 2 clockwise Set the level from front to back Fig 15 Note Set check the side level before this adjustment Move the cutter deck to a medium height posi...

Page 18: ...itch off PTO Battery not connected correctly Connect red cable to battery terminal and black cable to battery terminal Discharged or low battery Check the battery charge it or exchange it Fuse has tripped Replace fuse If the fuse trips repeatedly look for the cause usually short circuit Loose earth cable between engine and frame Connect earth cable Starter turns but engine does not start Choke and...

Reviews: