34
Overview of Components
⚠
Important
∙
The JRGB connector supports up to 2 meters continuous 5050 RGB LED strips
(12V/G/R/B) with the maximum power rating of 3A (12V).
∙
Always turn off the power supply and unplug the power cord from the power outlet
before installing or removing the RGB LED strip.
∙
Please use MSI’s software to control the extended LED strip.
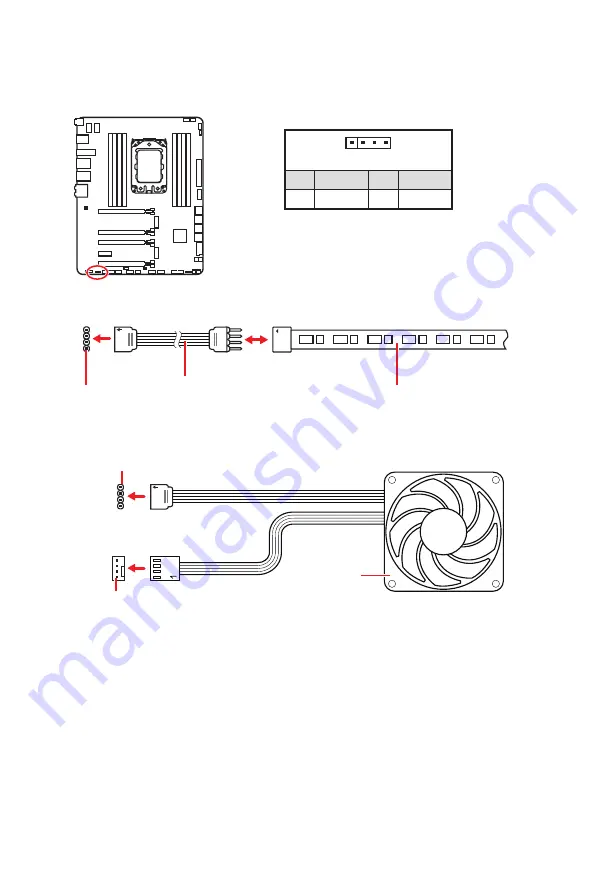
JRGB1: RGB LED connector
The JRGB connector allows you to connect the 5050 RGB LED strips 12V.
1
G
R
B
JRGB
connector
RGB extension
cable
5050 RGB LED strips 12V
1
1
+12V
2
G
3
R
4
B
RGB LED Strip Connection
1
1
G
R
B
JRGB connector
System Fan connector
RGB LED Fan Connection
RGB LED Fan
Summary of Contents for TRX40 PRO 10G
Page 5: ...V Quick Start Installing the Motherboard マザーボードの取り付け 메인보드 설치하기 安裝主機板 安装主板 2 3 1 ...
Page 9: ...IX Quick Start Connecting Peripheral Devices 周辺機器の接続 주변 장치 연결하기 連接周邊設備 连接外围设备 Optional ...
Page 10: ...X Quick Start Power On 通電 전원 켜기 啟動電源 开机 4 3 1 2 ...
Page 75: ...13 リアI Oパネル アンテナの取り付け TRX40 PRO WIFI 1 下図のようにアンテナをしっかりとアンテナコネクターに固定します 2 アンテナを正しい位置に置きます 1 2 ...
Page 179: ...13 背板 I O 安裝天線 TRX40 PRO WIFI 1 將天線鎖緊至 WiFi 天線接頭上 如圖所示 2 調整天線角度 1 2 ...
Page 231: ...13 后置 I O 面板 安装天线 TRX40 PRO WIFI 1 将天线拧紧到天线接口上 如下图所示 2 定向天线 1 2 ...


