background image

3-24

3-25

How to Get Started

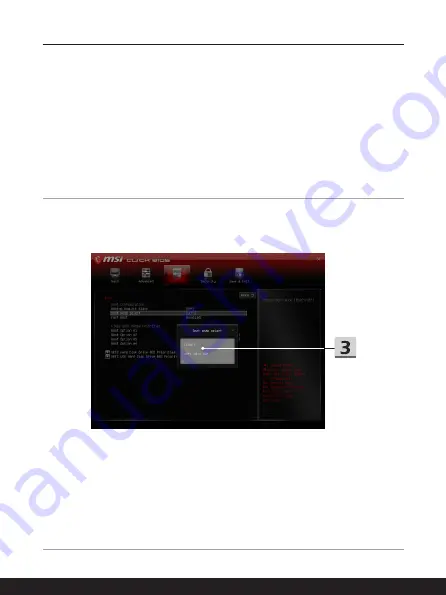
How to Select Boot Mode in BIOS

1.  Power on the system. As soon as the first logo screen appears, press the DEL key 

immediately and enter the BIOS menu. 

2.  Move the cursor to [Boot] tab, and select [Boot mode select] in Boot Configuration. 
3.  For operating system supports UEFI-based BIOS (Windows 10), it is suggested to 

select [UEFI].

4.  Refer to MSI FAQ for further information about installing Windows operating 

system on the notebook at https://www.msi.com/support/technical_details/

NB_OS_Installation

Summary of Contents for GF63 Thin 10SC

Page 1: ......

Page 2: ...1 2 USER GUIDE NOTEBOOK...

Page 3: ...EE regulation 1 9 Ukraine restriction of hazardous substances 1 9 Vietnam RoHS 1 9 Upgrade and Warranty 1 10 Acquisition of Replaceable Parts 1 10 Safety Instructions 1 11 MSI Highlights 1 14 Introduc...

Page 4: ...Create Your Own Power Plan 3 8 How to Use the Touchpad 3 10 About HDD and SSD 3 11 About M 2 SSD Slot 3 11 How to Connect the Internet 3 12 Wireless LAN 3 12 Wired LAN 3 14 How to Set Up Bluetooth Con...

Page 5: ...egistered trademark of Micro Star Int l Co Ltd All other marks and names mentioned may be trademarks of their respective owners No warranty as to accuracy or completeness is expressed or implied MSI r...

Page 6: ...user is encouraged to try to correct the interference by one or more of the following measures Reorient or relocate the receiving antenna Increase the separation between the equipment and receiver Con...

Page 7: ...n For better environmental protection waste batteries should be collected separately for recycling or special disposal California USA The button cell battery may contain perchlorate material and requi...

Page 8: ...icipal waste anymore and manufacturers of covered electronic equipment will be obligated to take back such products at the end of their useful life Chemical Substances Information In compliance with c...

Page 9: ...concentrations exceeding 0 1 weight and 0 01 weight for cadmium except for the exemptions set in Schedule 2 of the Rule Turkey EEE regulation Conforms to the EEE Regulations of the Republic Of Turkey...

Page 10: ...tion or how to assembly disassembly since it may cause the product to be damaged It is recommended that you contact the authorized dealer or service center for product service information Acquisition...

Page 11: ...power cord into an AC outlet that is easily accessible at all times Disconnect power from the notebook by unplugging the power cord from the AC outlet If a power cord with 3 prong plug came with the...

Page 12: ...This notebook should be operated under maximum ambient temperature of 35 C 95 F Never pour liquid into the opening that could damage the equipment or cause an electrical shock Never use any chemical s...

Page 13: ...ough take back policy Environmental Policy The product has been designed to enable proper reuse of parts and recycling and should not be thrown away at its end of life Users should contact the local a...

Page 14: ...le devices management Sound by Dynaudio on MSI Gaming Notebooks MSI partners with Dynaudio the Danish sound specialists in its gaming notebooks to present you an authentic fidelity audio performance C...

Page 15: ...Introductions...

Page 16: ...certified by our reputation for unsurpassed dependability and customer satisfaction Unpacking First unpack the shipping carton and check all items carefully If any item contained is damaged or missin...

Page 17: ...ction provides the description of basic aspects of the notebook It will help you to know more about the appearance of this notebook before using it Please be aware that the figures shown here are for...

Page 18: ...yboard provides all the functions of a notebook keyboard Refer to How to Use the Keyboard for details 3 Touchpad This is the pointing device of the notebook 4 Status LED Caps Lock Glows when the Caps...

Page 19: ...2 5 Front Side View...

Page 20: ...arging power when AC power is connected However the maximum portable charging power limitation may up to 5V 1 5A while battery DC power is connected 3 USB 3 2 Gen 1 Port USB 3 2 Gen 1 the SuperSpeed U...

Page 21: ...or video cameras 3 Power Connector This connector is to connect the AC DC adapter and supply power for the notebook 4 Status LED Battery Status LED glows when the battery is being charged LED turns am...

Page 22: ...on Multimedia Interface technology is the industry leading interface and de facto standard connecting high definition HD and ultra high definition UHD equipment 2 Ventilator The ventilator is designed...

Page 23: ...he AC power 3 use a straightened paperclip and insert it to this hole for 10 secs 4 connect the AC power 5 power on the notebook 3 Stereo Speakers This notebook may be equipped with built in stereo sp...

Page 24: ...ary applications before using the keyboard function keys Use the Fn keys on the keyboard to activate the specific applications or tools With the help of these keys users will be able to work more effi...

Page 25: ...vated LED goes out when this function is turned off Webcam is turned off under default settings Dragon Center This notebook may be pre installed with a gaming utility Dragon Center providing users an...

Page 26: ...ase the brightness level of the keyboard backlight LEDs Use Multiple Monitors If users connect an additional monitor to the notebook the system will automatically detect the external monitor connected...

Page 27: ...2 13 Video How to Use Fn Buttons Watch the instruction video at https www youtube com watch v u2EGE1rzfrQ YouTube Youku...

Page 28: ...duct you purchased Physical Characteristic Dimension 359 W x 254 D x 21 7 H mm Weight 1 86 kg CPU Package BGA Mobile Processor The latest Intel CoreTM Processor Family Memory Technology DDR4 3200 Memo...

Page 29: ...graphics Graphics Supports UMA graphics VRAM GDDR6 based on GPU structure Webcam Resolution HD Audio Internal Speakers 2 x stereo speakers Security Trusted Platform Module optional TPM 2 0 is a hardw...

Page 30: ...2 16 Introductions...

Page 31: ...How to Get Started...

Page 32: ...3 2 How to Get Started Begin to Use the Notebook For a new user of this notebook we would like to suggest you follow the illustrations below to begin to use the notebook 3 4 2 1...

Page 33: ...ea Choose a chair and desk with good ergonomics and adjust their heights according to your posture Adjust the backrest to support your lower back comfortably when you are sitting upright Place your fe...

Page 34: ...g the AC power cord before disassembly the notebook Don ts Cover an in use adapter since it can generate heat Have the AC power cord plugged after powering off the system when the notebook is going to...

Page 35: ...Connect an AC DC adapter to the system whenever possible How to charge the battery properly Please pay attention to the following tips before recharging the battery If a charged battery pack is not av...

Page 36: ...within the selection menu and click on it to bring out Settings 3 Find System and click on it in Settings Find Power Sleep within the System selection menu 4 Select Additional power settings under Rel...

Page 37: ...3 7...

Page 38: ...equirements 1 Click Create a power plan in Power Options 2 Select an existing plan that meets your needs most and give the new power plan a name Click Next to continue 3 Change the settings for the pl...

Page 39: ...3 9...

Page 40: ...moving speed and other advanced features of the cursor on the screen To configure the touchpad you can use the standard Microsoft or IBM PS 2 driver in your Windows operating system The Mouse Properti...

Page 41: ...er from the touchpad to drop the item into place Alternately you can press and hold the left button when you select an item and then move your finger to the desired location finally release the left b...

Page 42: ...find and click Network Internet 2 Select Wi Fi within the Network Internet selection menu 3 Switch ON the Wi Fi function if it is set to Off 4 Select Show available networks to open up the network se...

Page 43: ...3 13...

Page 44: ...dapter options to bring out Network Connections window 4 Right click on Ethernet to select Properties from the drop down menu 5 Open up Ethernet Properties window find and select Internet Protocol Ver...

Page 45: ...3 15...

Page 46: ...3 16 How to Get Started...

Page 47: ...Select Network and Sharing Center to bring out Network and Sharing Center window 4 Select Set up a new connection or network under Change your networking settings 5 Select Connect to the Internet und...

Page 48: ...3 18 How to Get Started...

Page 49: ...that Airplane mode is turned off 1 Open up Settings find and click Devices 2 Select Bluetooth other devices within the Devices selection menu 3 Switch ON the Bluebooth function if it is set to Off Pa...

Page 50: ...3 20 How to Get Started...

Page 51: ...3 21...

Page 52: ...diverse peripheral devices to the notebook To connect these devices refer to the instruction manuals of each device first and then connect the device to the notebook This notebook is capable to auto d...

Page 53: ...D allows users to store data on multiple hard disk drives or solid state drives Contact the local dealer for further and correct information and be noted that the supported RAID functions may vary dep...

Page 54: ...ter the BIOS menu 2 Move the cursor to Boot tab and select Boot mode select in Boot Configuration 3 For operating system supports UEFI based BIOS Windows 10 it is suggested to select UEFI 4 Refer to M...

Page 55: ...s 10 Operating System on MSI Notebooks Watch the instruction video at https www youtube com watch v hSrK6xAQooU to restore the Windows 10 operating system by using F3 Recovery and Windows 10 Settings...

Page 56: ......

Reviews: