242
Appendix B
Copying The QCMC “Snapshot” Image to a Second Printer
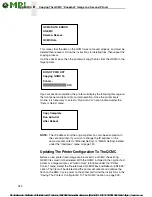
This means that the data on the QCMC was not saved properly, and must be
deleted then resaved. Follow the instructions for deleting files, then repeat the
copying process.
If all the checks pass, then the printer will copy the files from the QCMC to the
target printer.
Upon successful completion, the printer will display the following message on
the front panel and reboot into normal operation. Once the printer boots
Online, it is necessary to select a “Run Auto-Cal” option located under the
“Sensor Setup” menu.
NOTE:
The IP address from the original printer has also been copied onto
the second printer. If you wish to change the IP address on the
second printer, refer to “Ethernet Setting” or “WLAN Setting” located
under the “Interfaces” menu on page 120.
Updating The Printer Configuration To The QCMC
Before a new printer flash image can be saved to a QCMC, the existing
QCMC files must first be deleted. With the QCMC installed in the original host
printer or a target printer, set “Admin User” to Enable under the “Printer
Control” menu. Select the “Delete Saved QCMC/Files And Reboot <ENTER>”
option. The files will be deleted and the printer will reboot and optimize the
flash on the EMC. Cycle power on the printer and follow the instructions in the
“Saving The Printer’s Configuration To The QCMC” section on page 239.
QCMC DATA ERROR
ON EMC
Delete & Resave
QCMC Data
DO NOT PWR OFF
Copying QCMC To
Printer...
XX%
Copy Complete
Run Auto-Cal
After Reboot

