186
6
Restore The Printer To Operation
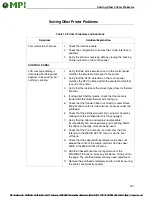
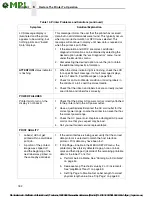
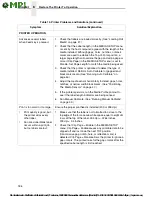
PRINTER OPERATION
Advances several labels
when Feed key is pressed.
1.
Check that labels are loaded correctly. (See “Loading Roll
Media” on page 27.)
2.
Check that the Label Length (in the MEDIA SETUP menu,
or sent by the host computer) agrees with the length of the
media installed. Although gaps, holes, notches, or black
marks are used to establish the Top-of-Form position, a
larger page length will override the gap and skip a page or
more if Clip Page (in the MEDIA SETUP menu) is set to
Disable. Set Page Length to match the media being used.
3.
Check that the printer is optimized to detect the type of
media installed. Perform Auto Calibrate for gapped and
black mark media. (See “Running Auto Calibrate” on
page 50.)
4.
Adjust the media sensor horizontally to detect gaps, holes,
notches, or narrow width black marks. (See “Positioning
The Media Sensors” on page 47.)
5.
If the problem persists, run the Media Profile printout to
see if the label length indicators are being sensed.
6.
Run Manual Calibrate. (See “Running Manual Calibrate”
on page 53.)
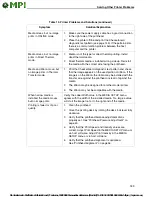
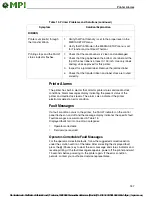
Print is too small or too large.
Ensure the proper printhead is installed (203 or 305 dpi).
•
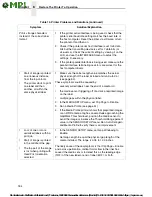
Print quality is good, but
the printer skips every
other label.
•
An occasional blank label
occurs within a print job,
but no labels are lost.
1.
Make sure that the label is not formatted too close to the
top edge of the form. Leave white space equal to eight dot
rows at the top of the label. 305 dpi = .0264 inches.
203 dpi = .04 inches.
2.
Check that Clip Page = Enable in the MEDIA SETUP
menu. Clip Page = Enable causes any printable data to be
clipped off and lost once the next TOF position
(transmissive gap, notch, hole, or reflective mark) is
detected. Clip Page = Disable allows the printer to ignore a
gap or mark. The printer looks for the gap or mark after the
specified Label Length is first reached.
Table 14. Printer Problems and Solutions (continued)
Symptom
Solution/Explanation

