background image


- 5 - 

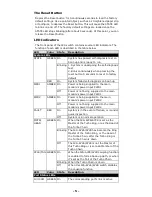
The Reset Button 

Depress the Reset button for 5 continuous seconds to load the factory 
default settings. Use a pointed object, such as a straightened paper clip 
or toothpick, to depress the Reset button. This will cause the STATE LED 
to blink on and off. The factory default settings are loaded once the 
STATE LED stops blinking (after about 5 seconds). At this point, you can 
release the Reset button.   

LED Indicators 

The front panel of the IKS switch contains several LED indicators. The 
function of each LED is described in the table below. 

LED 

Color  State 

Description 

System LEDs 

STATE 

GREEN  On 

System has passed self-diagnosis test on 
boot-up and is ready to run 

Blinking  1. System is undergoing the self-diagnosis 

test 
2. Blink continuously when pressing the 
reset button 5 seconds to reset to factory 
default 

RED 

On 

System failed self-diagnosis on boot-up. 

PWR1 

AMBER  On 

Power is being supplied to the main 
module’s power input PWR1 

Off 

Power is not being supplied to the main 
module’s power input PWR1 

PWR2 

AMBER  On 

Power is being supplied to the main 
module’s power input PWR2 

Off 

Power is not being supplied to the main 
module’s power input PWR2 

FAULT 

RED 

On 

System is in the event of failure, or is under 
quick inspection 

Off 

System is in normal operation 

MSTR/ 
HEAD 

GREEN  On 

When the IKS-6726/6728 is set as the 
Master of the Turbo Ring, or as the Head of 
the Turbo Chain 

Blinking  The IKS-6726/6728 has become the Ring 

Master of the Turbo Ring, or the Head of 
the Turbo Chain, after the Turbo Ring or 
the Turbo Chain is down 

Off 

The IKS-6726/6728 is not the Master of 
this Turbo Ring or is set as a Member of the 
Turbo Chain 

CPLR/TAIL  GREEN  On 

When the IKS-6726/6728 coupling function 
is enabled to form a back-up path, or when 
it’s set as the Tail of the Turbo Chain 

Blinking  When the Turbo Chain is down 
Off 

When this IKS-6726/6728 switch disables 
the coupling function 

LED 

Color  State 

Description 

Port Status LEDs 

10/100M  GREEN  On 

The corresponding port’s link is active 

Summary of Contents for IKS-6728 Series

Page 1: ... 2012 Moxa Inc All rights reserved P N 1802067280011 IKS 6728 IKS 6726 Series Hardware Installation Guide Second Edition May 2012 ...

Page 2: ... rackmount ears Documentation and software CD Hardware Installation Guide CD ROM with User s Manual and SNMP MIB file Moxa Product Warranty Statement Panel Layouts 1 Model name 2 System status LEDs 3 Reset button 4 Serial console port 5 Terminal block for relay output 6 USB storage port 7 100 1000Base SFP port status LEDs 8 10 100 1000BaseT X or 100 1000Base SFP combo ports 9 10 100BaseT X ports 1...

Page 3: ...h Grounding and wire routing help limit the effects of noise due to electromagnetic interference EMI Run the ground connection from the ground screw to the grounding surface prior to connecting devices Connecting the Power Inputs The IKS 6726 6728 series of switches supports both 110 220 VAC and 24 48 VDC power supplies ...

Page 4: ...to the terminal block receptor Wiring the Relay Contact Each IKS 6726 6728 switch has one relay output FAULT The relay contact of the 2 pin terminal block connector is used to detect user configured events The two wires attached to the fault contacts form an open circuit when a user configured event is triggered If a user configured event does not occur the fault circuit remains closed RS 232 Conn...

Page 5: ...pplied to the main module s power input PWR1 Off Power is not being supplied to the main module s power input PWR1 PWR2 AMBER On Power is being supplied to the main module s power input PWR2 Off Power is not being supplied to the main module s power input PWR2 FAULT RED On System is in the event of failure or is under quick inspection Off System is in normal operation MSTR HEAD GREEN On When the I...

Page 6: ...802 3z for 1000BaseX IEEE 802 3x for Flow Control IEEE 802 1D 2004 for Spanning Tree Protocol IEEE 802 1w for Rapid STP IEEE 802 1s for Multiple Spanning Tree Protocol IEEE 802 1Q for VLAN Tagging IEEE 802 1p for Class of Service IEEE 802 1X for Authentication IEEE 802 3ad for Port Trunk with LACP Protocols IGMP v1 v2 GMRP GVRP SNMPv1 v2c v3 DHCP Server Client BootP TFTP SNTP SMTP RARP RMON HTTP H...

Page 7: ...ssembly the operating ambient temperature of the rack environment may be greater than room ambient Therefore consideration should be given to installing the equipment in an environment compatible with the maximum ambient temperature Tma specified by the manufacturer 2 Reduced Air Flow Installation of the equipment in a rack should be such that the amount of air flow required for safe operation of ...

Page 8: ...th a key or through a security identity system External metal parts of this equipment are extremely hot Before touching the equipment you must take special precautions to protect your hands and body from serious injury Technical Support Contact Information www moxa com support Moxa Americas Toll free 1 888 669 2872 Tel 1 714 528 6777 Fax 1 714 528 6778 Moxa China Shanghai office Toll free 800 820 ...

Reviews: