background image

EN

25

Mounting the pedals

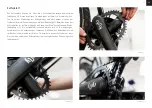
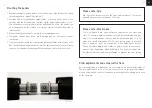
1.   When mounting the pedals, please note the direction of the threads [left-hand 

thread/right-hand thread] [Illustration 7].

2.   Combine the left cyfly® pedal spindle [label is located on the back of the 

spindle] with the left pedal and the right cyfly® pedal spindle [label is loca-
ted on the back of the spindle] with the right pedal. As a rule, the pedals can 
be distinguished by their labels or markings, similar to what is depicted in  
[Illustration 7].

3.   When screwing in the pedals, ensure that no jamming occurs.
4.   The pedal threads have been pre-lubricated and do not require further  

lubrication.

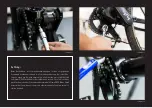
5.   Tighten the pedals using the corresponding Allen key [6mm] with a torque of 35 

Nm. Check the pedals again after the first 100 km to ensure that they are firmly 
in place. Loose pedals can damage the threads and cause the bike to stall.

Illustration 7

Please note: Tyre

N.B.: Check the tyre pressure on the front and rear wheels. The recom-
mended tyre pressure is between 1.5 to 4 bar.

Please note: Disk brakes

The disk brakes have been optimally adjusted by our specialist 
staff. To ensure maximum brake effect and prevent brake pad gla-
zing, it is recommendable to brake with both brakes approx. 10 to 20 
times at a speed of between 15 to 20 km/h before going on your first 
ride. In doing so, don’t be overcautious when applying the brakes. 
Please avoid bedding-in the brakes on public roads to prevent ac-
cidents from happening. When bedding-in the brakes, always bra-
ke with both brakes and lean backwards to prevent you from falling.  

Other adjustments and setup instructions

No other adjustments or measures are necessary, as we have already made all 
the fine adjustments to all of the components such as the gearshift, brakes, 
wheels and electrical contacts, and have pre-lubricated the moving parts such 
as the chain etc.

L

R

Summary of Contents for franklin

Page 1: ...DE 1 HANDBUCH MANUAL franklin ...

Page 2: ...DE 3 SPRACHEN LANGUAGES DE EN 4 19 20 35 ...

Page 3: ...DE 4 TURN THE PAGE DE 4 ...

Page 4: ...ten Sprössling in Stadt und Land MÖVE franklin wurde von uns unter der Maßgabe konzipiert Ihnen ein robustes sehr wartungsarmes und gleichzeitig sportliches Fahrrad zur Verfü gung zu stellen Der von uns entwickelte mechanische cyfly Antrieb und der speziell für diesen Antrieb optimierte minimalistische sowie handgemachte Fahrradrahmen bilden dabei das Herzstück des MÖVE franklin Eine sorgfäl tige ...

Page 5: ... 8 Bremsscheibe 9 Schaltkassette 10 Schaltwerk 11 Kette 12 Kettenblatt m Schutz 13 Pedal 14 Vorbau 15 Lenker 16 Bremshebel 17 Schalthebel 18 Steuersatz 19 Felge 20 Speichen 21 Reifen 22 Ventil 23 Nabe 24 Rücklicht 25 Vorderlicht 26 Schutzblech 8 3 1 4 5 6 7 9 10 11 12 13 14 15 16 17 17 25 18 19 20 21 22 23 24 26 2 ...

Page 6: ...erenden Schäden haften Hersteller und Händler nicht Für Schäden die bei einem Einsatz unter Wettkampfbedingungen entstehen haften Hersteller und Händler nicht Bei Schäden die auf eine mangelnde Wartung und Pflege zurückzuführen sind haften Hersteller und Händler nicht 3 SACHGEMÄSSES AUSPACKEN Die Verpackung wurde speziell für MÖVE franklin entwickelt Es wurde dabei auf eine hohe Stabilität für die...

Page 7: ...m mitgelieferten Hexlox Sicherheitsschlüssel Abbildung 4 Sattelhöhe justieren und Sattelstange fixieren 1 Entnehmen Sie die Schraubensicherung an der Sattelklemme mit dem mitgelieferten Hexlox Sicherheitsschlüssel Abbildung 4 2 Lösen Sie die Schraube mit einem entsprechenden Inbus 5mm Schlüssel weite 3 Schieben Sie den Sattel in die gewünschte Sitzposition gesonderte Hinweise hierzu unter Punkt 8 ...

Page 8: ...zerstören und zum Sturz führen Abbildung 7 Hinweis Reifen Achtung Überprüfung des Luftdruckes am Vorder bzw Hinterrad Jeweils 1 5 bis maximal 4 bar Hinweis Scheibenbremsen Die Scheibenbremsen wurden von unseren Fachleuten bereits feinjus tiert Um die maximale Bremswirkung zu gewährleisten und ein Vergla sen der Bremsbeläge zu vermeiden empfiehlt es sich vor der ersten Ausfahrt ca 10 bis 20 mal aus...

Page 9: ...in Aluminium 7020 Gabel Kinesis Alumiunium Steuersatz FSA No 42 Spacer Syntace Vorbau Syntace F149 Lenker Syntace Vector High 20 12 Sattelstütze Syntace P6 30 9 x 400 mm Sattel MÖVE mit Bezug aus Nappaleder Sattelklemme Chromag NQR Griffe MÖVE Bremsen Shimano Deore XT BR T8000 Bremscheiben Shimano Deore SM RT54 180 mm 160 mm Schaltgriff Shimano Deore XT SL M8000 Schaltwerk Shimano Deore XT RD M800...

Page 10: ...DE 11 pro Schutzblech Büchel Aluminium Coll Air Gepäckträger MÖVE Licht vorn Trelock LS 905 schwarz Licht hinten Busch Müller Toplight mini plus Hinterbauständer Pletscher Comp 40 Flex ...

Page 11: ...mmen können Sie sich jederzeit an Ihren MÖVE Fachhändler bzw an MÖVE direkt wenden a Träger b Tretkurbel c Pendel d Kettenblatt mit Kettenblattschutz Kettenschutz Den Kettenschutz können Sie über die 4 Kettenschutzschrauben demontieren Hierzu benötigen Sie einen Inbus mit 3mm Schlüsselweite Abbildung 8 Ach ten Sie bei der Demontage des Kettenschutzes möglichst darauf nicht an der Tretkurbel bzw am...

Page 12: ...n zu bleiben Abbildung 11 Beim Montieren des Kettenblattes ist auf die richtige Ausrichtung zu achten Aussparung am Pendel Abbildung 11 Die Kettenblattschrauben werden mit 10 Nm angezogen Vermeiden Sie ein überdrehen der Schrauben Die Zähne des Kettenblattes sind im Wechsel schmal und breit Achten Sie beim Auflegen der Kette darauf dass die schmalen und breiten Kettenglieder in die entsprechenden ...

Page 13: ...rüft werden Drehen Sie die jeweilige Tretkurbel in eine Linie mit dem Sattelrohr des Rahmens Drücken Sie das Pedal abwechselnd in Richtung Sattelrohr und davon weg Sollten Sie ungewöhnliches Spiel in radiale Richtung oder Umfangsrichtung fest stellen fahren Sie nicht weiter und wenden Sie sich bitte an Ihren Händler bzw direkt an MÖVE Sie können folgende Verbindungen prüfen Interface cyfly Rahmen ...

Page 14: ...eder Mon tage zu erneuern Es wird empfohlen alle Arbeiten am cyfly Antrieb von ihrem MÖVE Fachhändler durchführen zu lassen Für ein nichtüber wachtes Anziehen der Schrauben übernimmt die Firma MÖVE Bikes GmbH keinerlei Haftung da es sich um sicherheitsrelevante Funktionsschnitt stellen handelt Abbildung 14 Abbildung 15 Abbildung 16 ...

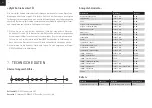
Page 15: ...7 TECHNISCHE DATEN Reifen Komponente Werkzeug Moment Achsenschraube VA HA Inbus 5 mm 8 Nm Sattelklemme Inbus 5 mm 8 Nm Sattel Inbus 5 mm 8 Nm Vorbau Gabelschaftklemmung Inbus 5 mm 8 Nm Vorbau Lenkerklemmung Inbus 5 mm 8 Nm Bremshebel Lenker Inbus 4 mm 4 Nm Bremssattel Inbus 5 mm 8 Nm Schalthebel Lenker Inbus 3 mm 3 Nm Lenkergriffe Inbus 5 mm 3 Nm Klingel Inbus 2 5 mm 2 Nm Schutzblech Gabel Inbus 5...

Page 16: ...osition nach hinten vorn geschoben bzw verlagert werden bis das Lot durch die Achse läuft Sitzhöhe Sie setzen sich auf den Sattel und mit der Ferse auf das Pedal welches auf der tiefsten Kurbelposition steht Jetzt sollten Sie das Knie ohne Bewegung der Hüfte durchdrücken können Es gibt noch weitere Methoden der Sitzhöhenbestimmung über die Schnittlänge und die Vermessung mittels Goniometer Hierfür...

Page 17: ... moeve bikes de Geschäftsführer Tobias Spröte Handelsregister Amtsgericht Jena HRB 510778 Finanzamt Mühlhausen Steuernummer 157 114 09057 Umsatzsteuer Identifikationsnummer DE 297428694 9 PFLEGE SERVICE WARTUNG Pflegehinweise Befreien Sie Ihr Fahrrad angepasst an die jeweiligen Witterungsbedingungen von Schmutz Verwenden Sie zum Reinigen einen feuchten Lappen oder Schwamm warmes Wasser und Fettlös...

Page 18: ...Gabel Austauschen 3 Jahre nach Sturz Lenkungslager Spiel prüfen Lenkungslager fetten Vorbau Klemmung prüfen Vorbau auf Beschädigungen untersuchen Lenker Klemmung prüfen Lenker auf Beschädigungen untersuchen Griffe Klemmung prüfen Bremsen Funktion prüfen Bremsbeläge Belagstärke messen Bremsleitungen auf Beschädigungen untersuchen Bremsflüssigkeit wechseln Schaltung einstellen bei Bedarf Schaltzug S...

Page 19: ...EN 20 TURN THE PAGE EN 20 ...

Page 20: ...erience and wish you fun and enjoyment with our first offspring in both city and countryside MÖVE franklin was designed to be a robust low maintenance tool as well as a sporty bicycle Both the mechanical cyfly drive and the minimalistic bicycle frame designed and handmade especially for this bike make up the centrepiece of the MÖVE franklin The meticulous selection of the remaining components ensu...

Page 21: ... brake 8 Brake disk 9 Speed cassette 10 Derailleur 11 Chain 12 Chainring with guard 13 Pedal 14 Stem 15 Handlebar 16 Brake lever 17 Shift lever 18 Headset 19 Rim 20 Spoke 21 Tyre 22 Valve 23 Hub 24 Tail light 25 Front light 26 Fender 8 3 1 4 5 6 7 9 10 11 12 13 14 15 16 17 17 25 18 19 20 21 22 23 24 26 2 ...

Page 22: ...contained in this manual Neither the manufacturer nor the dealer can be held liable for damages resulting from use under competitive con ditions Neither the manufacturer nor the dealer can be held liable for damages arising from lack of service and maintenance 3 PROPER UNPACKING The packaging was developed especially for MÖVE franklin It has been desi gned with an eye on stability and safety durin...

Page 23: ...w lock into the hex socket of the seat post clamp Illustration 4 Adjusting the saddle height and fastening the seat post 1 Remove the screw lock at the seat post clamp using the supplied Hexlox safety key Illustration 4 2 Remove the screw using a corresponding Allen key 5mm 3 Move the saddle into the desired position for more information on this topic see Item 8 Bike fitting and ensure that the se...

Page 24: ...eads and cause the bike to stall Illustration 7 Please note Tyre N B Check the tyre pressure on the front and rear wheels The recom mended tyre pressure is between 1 5 to 4 bar Please note Disk brakes The disk brakes have been optimally adjusted by our specialist staff To ensure maximum brake effect and prevent brake pad gla zing it is recommendable to brake with both brakes approx 10 to 20 times ...

Page 25: ...VE franklin Aluminium 7020 Fork Kinesis Aluminium Headset FSA No 42 Spacer Syntace Stem Syntace F149 Handlebar Syntace Vector High 20 12 Seatpost Syntace P6 30 9 x 400 mm Saddle MÖVE with nappa leather cover Seatpost clamp Chromag NQR Grips MÖVE Brakes Shimano Deore XT BR T8000 Brake discs Shimano Deore SM RT54 180 mm 160 mm Shifter Shimano Deore XT SL M8000 Rear derailleur Shimano Deore XT RD M80...

Page 26: ...EN 27 ...

Page 27: ...s occur no netheless please turn to your MÖVE specialist dealer or contact Möve directly at any time a Carrier b Pedal crank c Offset d Chainring with guar Chainguard The chainguard can be removed by unscrewing the four chainguard screws This requires a 3mm Allen key Illustration 8 When removing the chainguard be ca reful not to get caught in the pedal crank or pedal When mounting the chaingu ard ...

Page 28: ... or pedal Illustration 11 When mounting the chainring please ensure correct alignment Illustration 11 The chainring screws are tightened with a torque of 10 Nm Avoid over tightening the screws The chainring cogs are alternatingly narrow and wide When fitting the chain please ensure that narrow and wide chain links rest on the corresponding cogs Illustration 12 Illustration 10 Illustration 12 Illus...

Page 29: ...on can be checked in the following way Turn the respective pedal crank until it is aligned with the saddle tube of the bicycle frame Alternatingly push the pedal towards the saddle tube and then away from it Should you notice an unusual bearing play in radial direction or peripheral directi on please discontinue your ride and turn to your dealer or contact MÖVE directly You can check the following...

Page 30: ... screw lock during each assembly We highly recommend to let your specialist MÖVE dealer handle all work on the cyfly drive Möve Bikes GmbH assumes no liability for the unmonitored tightening of screws as this concerns safety relevant function inter faces Illustration 14 Illustration 15 Illustration 16 ...

Page 31: ...clamp Allen key 5 mm 8 Nm Saddle Allen key 5 mm 8 Nm Stem head tube clamping Allen key 5 mm 8 Nm Stem handlebar clamping Allen key 5 mm 8 Nm Brake lever handlebar Allen key 4 mm 4 Nm Brake caliper Allen key 5 mm 8 Nm Shift lever handlebar Allen key 3 mm 3 Nm Handlebar grips Allen key 3 mm 3 Nm Bicycle bell Allen key 2 5 mm 2 Nm Fender fork Allen key 5 mm 8 Nm Fender stays F R Allen key 4 mm 5 Nm F...

Page 32: ...ive it weight If the knee plumb line bisects the pedal spindle in front behind then the saddle or the seating position should be adjusted to the rear the front Sitting height Sit on the saddle and place your heel onto a pedal with the pedal being at its longest stroke You should now be able to flex your knee without moving your hip There are further methods to determine the sitting height like ove...

Page 33: ...net www moeve bikes de CEO Tobias Spröte Commercial register District Court of Jena HRB 510778 Tax Office Mühlhausen Tax number 157 114 09057 VAT ID DE 297428694 9 SERVICE AND MAINTENANCE Maintenance tips Keep your bicycle as clean as possible under the respective circumstances To clean your bicycle use a damp cloth or sponge warm water and degreaser detergent or special cleaner Do not use a high ...

Page 34: ... damages Fork Replace Three years after a fall Headset Check the play Headset Lubricate Stem Check clamping Stem Check for damages Handlebar Check clamping Handlebar Check for damages Handles Check clamping Brakes Check Function Brake pads Measure brake pad thickness Brake lines Check for damages Brake fluid Replace Gearshift Adjust As required Gearshift derailleur Check lubricate Hubs Check the p...

Page 35: ...WWW MOEVE BIKES COM ...

Reviews: