background image

THANK YOU for your purchase of the M80 GameSpy Digital Camera. Please 

read this booklet before using the unit. If you should have any questions about this 

product or any other Moultrie product, please contact us using the information on 

the back of this booklet. Please register your camera at www.moultriefeeders.com 

to activate your warranty. 

Instructions for M80

GameSpy Digital Camera

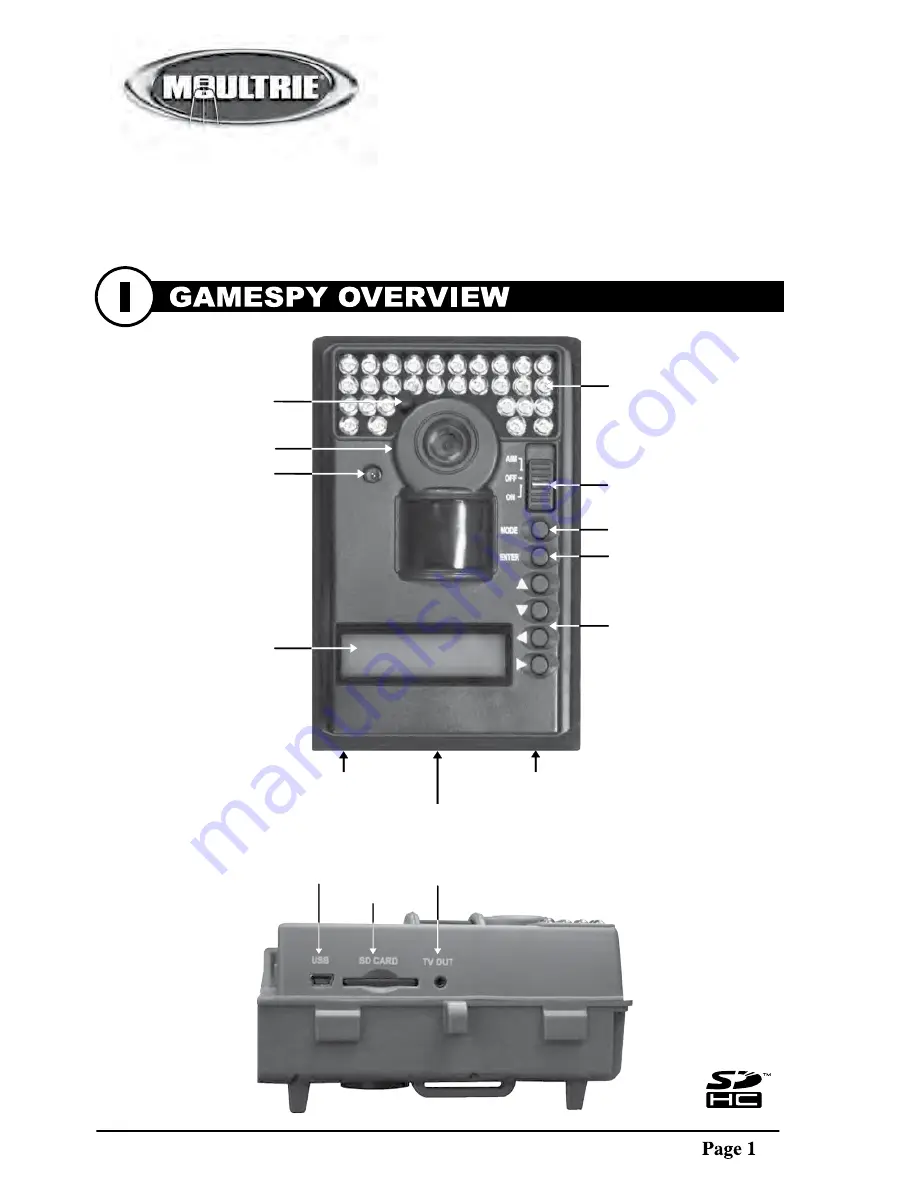
ON/OFF/AIM

LCD Display

Navigation Buttons

Camera Lens

Aim LED

LED Flash

TV Out

USB Port

SD Card Slot

Power Panel Port

M80 GameSpy Digital Camera

Enter Button

Mode Button

Light Sensor

FRONT VIEW

SIDE VIEW

Unlock for slide-out battery compartment

Microphone

12222010R1/ MFH-DGS-M80

Summary of Contents for GAMESPY DIGITAL CAMERA M80

Page 1: ...information on the back of this booklet Please register your camera at www moultriefeeders com to activate your warranty Instructions for M80 GameSpy Digital Camera ON OFF AIM LCD Display Navigation Buttons Camera Lens Aim LED LED Flash TV Out USB Port SD Card Slot Power Panel Port M80 GameSpy Digital Camera Enter Button Mode Button Light Sensor FRONT VIEW SIDE VIEW Unlock for slide out battery co...

Page 2: ...TER button again selects the option indicated on the display The ENTER button is also used to manually take a picture BATTERY COMPARTMENT The Camera is powered by four 4 or eight 8 AA size alkaline or lithium batteries Slide the Unlock switch to the right and grab the small handle under the switch to slide out the battery compartment tray NOTE It is recommended to use lithium batteries for best pe...

Page 3: ...DOWN to adjust selected field LEFT RIGHT to move to the next field and ENTER when done Press MODE button until MENU SELECTION screen is displayed Use the UP DOWN buttons until the MAIN SCREEN option is highlighted yellow Press ENTER Your Camera will now automatically take pictures whenever an animal is detected in range based on the default settings below Eyelet Mounting Strap M80 GameSpy Digital ...

Page 4: ...he camera 24hrs to properly adjust to the correct sunrise and sunset times As a default the camera will start the morning Plot Video at 5 30am and end the evening video at 6 30pm To reset the sunrise and sunset times back to the default times use the Default Settings option in the menu The GameSpy offers four capture modes as described below The default capture mode is Trail Cam HYBRID CAM MODE Ca...

Page 5: ...the UP DOWN buttons to highlight the desired mode Press the ENTER button to save the mode and return to the Camera Setup Menu There are four capture mode settings TRAIL CAM PLOT CAM HYBRID CAM or VIDEO Refer to the CAPTURE MODE section of this manual for details Photo Quality default High The higher the quality of the photo image the more memory it consumes However higher quality images have highe...

Page 6: ...5 seconds When the Game Spy Camera is configured for VIDEO in the Capture Mode screen the camera will record video for a designated amount of time each time an animal is detected To change the amount of time recorded press the UP DOWN buttons to highlight the desired setting Press the ENTER button to save the setting and return to the Camera Setup Menu The maximum video length for a nighttime IR v...

Page 7: ...the Camera Setup Menu IR Test default On When IR Test is ON the red AIM LED light on the front of the camera will illuminate To help find the center field of view for the camera stand out in front of the camera and move left or right as you observe the AIM LED as you walk away from direct center the LED light will be less bright As you walk towards center the LED will appear brighter M80 GameSpy D...

Page 8: ...CY 15 SECONDS INFO STRIP ON Info Strip default On When the Info Strip is turned ON the information strip as described in the Advanced Setup section of this manual is imprinted on the photos The Barometer Temperature Moon phase Date Time Camera Name Moultrie logo are imprinted on the bottom of each picture When the Info Strip is turned OFF the photo contains no information strip To change the Info ...

Page 9: ... recommended to use lithium batteries for best performance Default Settings default No To restore all the settings back to the factory default press the LEFT RIGHT buttons to highlight the YES setting Press the ENTER button to restore the default settings and return to the Camera Setup Menu M80 GameSpy Digital Camera Page 9 Delete All Photos default No To remove all content on the SD card press th...

Page 10: ...ode follow Windows instructions for properly disconnecting a removable drive and then unplug VIEWING PICTURES TV OUT 1 To enter TV Out Mode turn on the camera and place in the SETUP mode 2 Plug RCA jack on provided TV Adapter Cable into a VIDEO IN port on a TV or VCR 3 Plug other end of TV Adapter Cable into the TV Out Jack Pictures are now presented on the TV 4 To view pictures use the RIGHT or L...

Page 11: ...ra Page 11 ADVANCED INFORMATION cont VI INFORMATION ON PICTURE The info strip below will appear at the bottom of the photo video Temp Moon Date Time Camera Name Moon Phase The icons for the moon phase are as follows 75o F 01 01 11 12 00 AM MYCAMERA ...

Page 12: ... 0 MP ENHANCED 3248 x 1824 6 0 MP Video Quality HIGH 720 x 400 24fps LOW 352 x 192 24fps Approximate photos stored 1GB SD card LOW 3779 MEDIUM 1784 HIGH 890 ENHANCED 578 Approximate video time stored 1GB SD card HIGH 20min LOW 60min Optional SD Memory Card 32 GB Max Optical Field of View 55 degrees Batteries Alkaline AA cells Approximate Detection Range 45 5 feet ...

Page 13: ...otFiles extension is MLT from the PLOT directory on the SD card to the hard disk drive in your computer Note the location stored on the hard disk drive Open the PlotStalker software application from the Windows Start Button menu Once in the PlotStalker software click on the File Button Browse to the location in which you have saved the Plot file s MLT in step 1 above select the file of interest an...

Page 14: ...rch 1 2 3 Click on the Set Motion Search Area Button Use the mouse to select and drag the red outline around the area you want to search for movement This allows you to focus on a very precise area if required Click OK button on the Settings Popup window to confirm your settings and exit the menu Set to High Medium or Low This sets the level of pixel change the program will detect Note a pixel cha...

Page 15: ... This will create a MLT format file from the starting frame plus the next 50 100 or 200 frames Select the Change button to select the desired location to save the export file Enter the directory and filename to save the file Select the Export button to save the file These files are viewable with Plot Stalker Software EXPORTING MLT FILE 5 EXPORTING WMV FILE 1 2 3 4 1 2 3 4 Select the appropriate 50...

Page 16: ...TH rea pro the to a F S 12222010R1 MFH DGS M80 ...

Reviews: