background image

-

Touch sounds

 - Check to play a sound when making screen selections.

-

Screen lock sounds 

- Check to play a sound when locking and unlocking the screen.

-

Vibrate on touch 

- Check to have the device vibrate when touching soft keys and on certain screen

interactions.

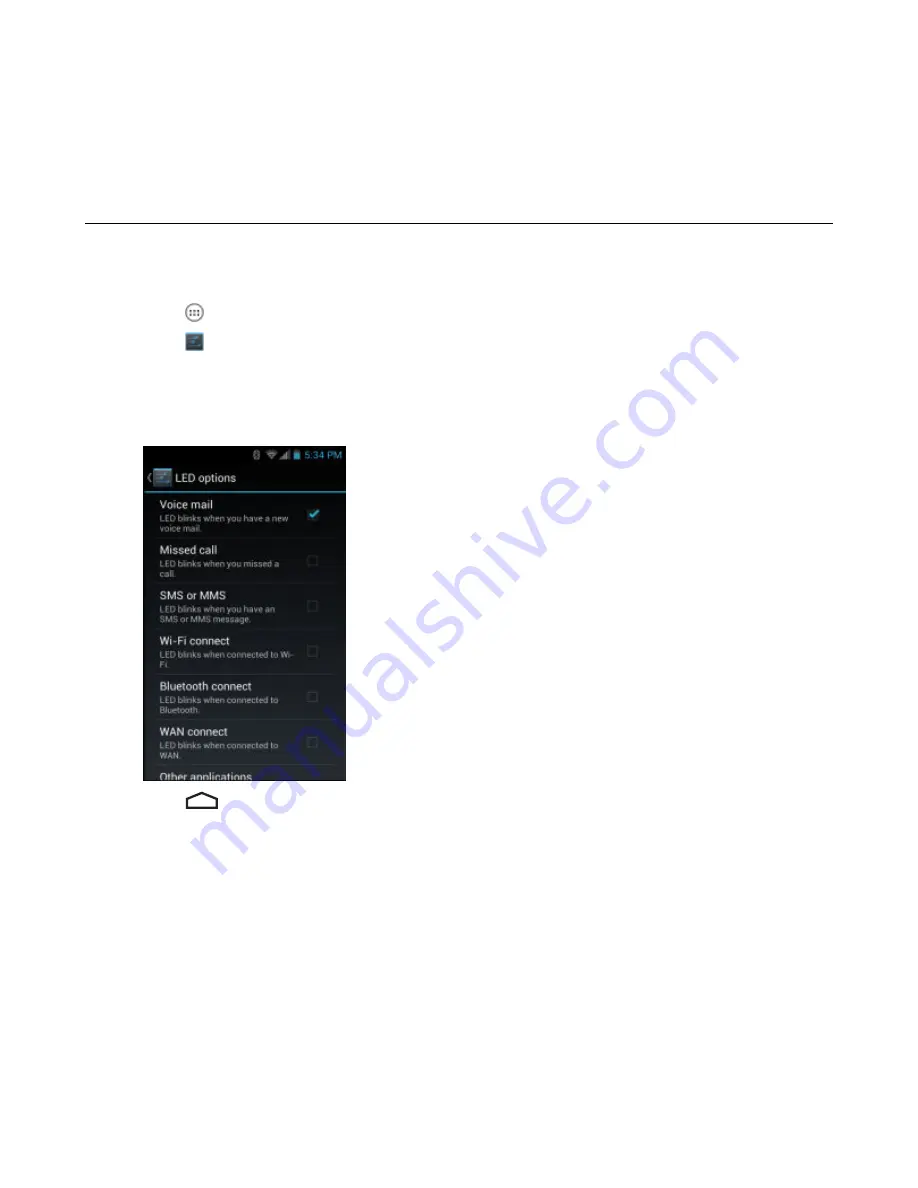
Setting LED Notifications

The TC55 LED can be configured to blink blue when an system or application notification occurs. 

Procedure:

1

Touch 

.

2

Touch 

.

3

Touch 

LED options

.

4

Touch the check box next to an option to enable.

Figure 37: LED Options Dialog Box

5

Touch 

.

Getting Started | 

49

MN000015A01 | September 2013

Summary of Contents for TC55

Page 1: ...TC55 USER GUIDE ...

Page 2: ......

Page 3: ...ct Disclaimer Please note that certain features facilities and capabilities described in this document may not be applicable to or licensed for use on a particular system or may be dependent upon the characteristics of a particular mobile subscriber unit or configuration of certain parameters Please refer to your Motorola contact for further information Trademarks MOTOROLA MOTO MOTOROLA SOLUTIONS ...

Page 4: ......

Page 5: ...Revision History Changes to the original guide are listed below Change Date Description Rev A 10 1 2013 Initial release MN000015A01 September 2013 ...

Page 6: ......

Page 7: ...Charging the Main Battery 34 Charging LED Status 35 Charging Temperature 35 Powering On the TC55 36 Replacing the 2 940 mAh Battery 36 Replacing the 4 410 mAh Battery 38 Replacing the microSD Card 40 Battery Management 42 Monitor Battery Usage 42 Low Battery Notification 43 Battery Optimization 44 Turning Off the Radios 44 Setting the Date and Time 44 Display Setting 45 Setting the Screen Brightne...

Page 8: ...er Mode 64 MultiUser Login 64 MultiUser Logout 65 Resetting the Device 65 Performing a Soft Reset 65 Performing a Hard Reset 65 Suspend Mode 66 Chapter 3 Calls 67 Making a Call Using the Dialer 68 Dialer Dialing Options 69 Making a Call Using Contacts 70 Making a Call Using Call History 70 Making a Conference Call 71 Making a Call Using a Bluetooth Headset 73 Answering Calls 73 Answering Calls wit...

Page 9: ...Elemez Data Collection 95 Enabling Elemez Data Collection 96 MLog Manager 96 Chapter 5 Data Capture 99 Linear Imager 99 Digital Camera 99 CS3070 Bluetooth Scanner 99 RS507 Hands Free Imager 100 Scanning Considerations 100 Bar Code Capture with Linear Imager 101 Bar Code Capture with Integrated Camera 102 Bar Code Capture with CS3070 Bluetooth Scanner 102 Bar Code Capture with RS507 Hands Free Imag...

Page 10: ...g Profiles on the Bluetooth Device 122 Unpairing a Bluetooth Device 122 Pairing with the CS3070 122 CS3070 Numeric Bar Codes for PIN Entry 123 Pairing the RS507 Hands Fee Imager 124 Near Field Communications 125 Sharing Information Using NFC 125 Communication Using NFC 125 Pairing with NFC Enabled Bluetooth Devices 126 Chapter 7 Accessories 129 TC55 Accessories 129 Micro USB Cable 130 Rugged Charg...

Page 11: ...Troubleshooting the TC55 152 Chapter 9 Technical Specifications 155 TC55 Technical Specifications 155 Contents 11 ...

Page 12: ...12 Contents ...

Page 13: ...ng LED Status 35 Table 4 Home Screen Items 52 Table 5 Home Screen Items 52 Table 6 Status Icons 52 Table 7 Notification Icons 54 Table 8 Applications 59 Table 9 94 Table 10 TC55 Accessories 129 Table 11 Troubleshooting the TC55 152 Table 12 TC55 Technical Specifications 155 List of Tables 13 ...

Page 14: ...14 List of Tables ...

Page 15: ...tery 32 Figure 12 Inserting the 4 410 mAh Battery 33 Figure 13 Install the Battery Cover 33 Figure 14 Secure Cover 34 Figure 15 Connect the Rugged Charge Cable 35 Figure 16 Remove the Battery Cover 36 Figure 17 Remove 2 940 mAh Battery 37 Figure 18 Inserting the 2 940 mAh Battery 37 Figure 19 Align the Battery Cover 37 Figure 20 Secure the Battery Cover 38 Figure 21 Remove the Battery Door 38 Figu...

Page 16: ...lumes Dialog Box 48 Figure 37 LED Options Dialog Box 49 Figure 38 Home Screen 51 Figure 39 Notification and Status Icons 52 Figure 40 Notification Panel 55 Figure 41 Open Folder 57 Figure 42 Renamed Folder 57 Figure 43 APPS Window 61 Figure 44 Recently Used Applications 62 Figure 45 Lock Screen 63 Figure 46 PIN Screen 63 Figure 47 Pattern Screen 64 Figure 48 Password Screen 64 Figure 49 Multiple U...

Page 17: ...Multimedia Message Screen 79 Figure 66 Voice Dialer Window 81 Figure 67 Camera Mode 82 Figure 68 Panoramic Mode 83 Figure 69 Video Mode 84 Figure 70 Gallery Albums 87 Figure 71 Photos Inside an Album 87 Figure 72 Photo Example 89 Figure 73 Cropping Tool 90 Figure 74 Video Example 92 Figure 75 Movie Studio Application 93 Figure 76 DataWedge Demonstration Window 94 Figure 77 Sound Recorder Applicati...

Page 18: ...Fi Screen 113 Figure 95 WLAN Network Security Dialog Boxes 114 Figure 96 Proxy Settings 116 Figure 97 Static IP Settings 116 Figure 98 Bluetooth Pairing Enter PIN 121 Figure 99 Bluetooth Pairing Smart Pairing 121 Figure 100 Bluetooth Keyboard Emulation HID Bar Code 123 Figure 101 RS507 Bluetooth HID Bar Code 124 Figure 102 Sharing Data Using NFC 125 Figure 103 Communication with NFC Chip Tag or Ca...

Page 19: ...en 140 Figure 120 Dock Settings Screen 141 Figure 121 Protective Boot 142 Figure 122 Insert Top of TC55 into Boot 142 Figure 123 Insert Bottom of TC55 into Boot 142 Figure 124 Insert Tether into Stylus 143 Figure 125 Feed Stylus through Tether Loop 143 Figure 126 Insert Stylus Point into Mounting Hole 144 Figure 127 Lock Stylus into Place 144 Figure 128 Style in Protective Boot 145 Figure 129 Hols...

Page 20: ...20 List of Figures ...

Page 21: ...adios Display Memory Data Capture Options Operating System TC55AH WLAN 802 11a b g n WPAN Bluetooth v4 0 and NFC WWAN LTE 4 3 color WVGA 1 GB RAM 8 GB Flash Linear imager and camera or camera Android based Android Open Source Project 4 1 2 TC55BH WLAN 802 11a b g n WPAN Bluetooth v4 0 and NFC WWAN HSPA 4 3 color WVGA 1 GB RAM 8 GB Flash Linear imager and camera or camera Android based Android Open...

Page 22: ...the following Dialog box window and screen names Drop down list and list box names Check box and radio button names Button names on a screen Bullets indicate Action items Lists of alternatives Lists of required steps that are not necessarily sequential Sequential lists for example lists that describe step by step procedures appear as numbered lists Icon Conventions The documentation set is designe...

Page 23: ...s guide and all guides go to http supportcentral motorolasolutions com Service Information If you have a problem with your equipment contact Motorola Solutions Global Customer Support Center for your region Contact information is available at http www motorolasolutions com support When contacting Motorola Solutions Global Customer Support Center please have the following information available Seri...

Page 24: ...to return your equipment for servicing and will be given specific directions Motorola is not responsible for any damages incurred during shipment if the approved shipping container is not used Shipping the units improperly can possibly void the warranty If you purchased your product from a Motorola business partner contact that business partner for support 24 About This Guide September 2013 MN0000...

Page 25: ...me TC55 Features Figure 2 Front View 1 2 3 4 5 6 7 8 9 10 11 12 13 Table 1 Front View Features Number Item Function 1 Receiver Provides audio in handset mode 2 LED Indicates decode functionality Lights red when scanning is in process Lights green indicating a successful decode Table continued MN000015A01 September 2013 ...

Page 26: ...Speakers Provides audio output for video and music playback Provides audio in speakerphone mode 9 Back Button Displays the previous screen Closes the keyboard if the on screen keyboard is open 10 Home Button Displays the Home screen with a single touch Displays recently used applications when held for a short period of time 11 Volume Up Down Buttons Increase and decrease audio volume 12 Programmab...

Page 27: ...C55 Press to turn the screen on or off Press and hold to select one of these options Power off Turn off the TC55 Reset Reboot the TC55 if software stops responding Airplane mode Disable all wireless connections 19 Flash Provides illumination for the camera 20 Headset Jack Connects to headsets 3 5 mm plug Note Do not use 2 5 mm to 3 5 mm adapters Use only headsets with straight plugs 21 Secondary M...

Page 28: ...tely See Service Information on page 23 for contact information Setup To start using the TC55 for the first time Install the SIM Card Install microSD card optional Install the battery Charge the TC55 Power on the TC55 Installing the SIM Card Caution For proper electrostatic discharge ESD precautions to avoid damaging the SIM card Proper ESD precautions include but not limited to working on an ESD ...

Page 29: ... Unlock SIM Card Holder 2 Lift the SIM door 3 Insert the SIM card with the cut edge and the contacts facing up Figure 5 Install SIM Card 4 Close the SIM card holder Getting Started 29 MN000015A01 September 2013 ...

Page 30: ... Caution For proper electrostatic discharge ESD precautions to avoid damaging the SD card Proper ESD precautions include but not limited to working on an ESD mat and ensuring that the user is properly grounded Changing the microSD card can change the functionality of the TC55 Note The TC55 supports microSD cards up to 32 GB 30 Getting Started September 2013 MN000015A01 ...

Page 31: ...or 3 Align the microSD card with the card holder Ensure that the contacts on the card are facing down and toward the card holder 4 Insert the microSD card into the card holder Figure 9 Insert microSD Card 5 Close the SD card door 6 Slide the SD card door toward the bottom of the TC55 to lock into place Getting Started 31 MN000015A01 September 2013 ...

Page 32: ...he TC55 a 2 940 mAh battery and a 4 410 mAh battery Procedure 1 Align the three tabs on the bottom of the battery with the three slots in the battery compartment 2 Press the battery down and then rotate until it locks into place Figure 11 Inserting the 2 940 mAh Battery 32 Getting Started September 2013 MN000015A01 ...

Page 33: ...y door with the back of the device and press the battery door down until it snaps into place Figure 13 Install the Battery Cover 4 Press around the edge of the cover to ensure that the battery door is seated properly Getting Started 33 MN000015A01 September 2013 ...

Page 34: ...first time charge the main battery until the light emitting diode LED turns solid green see Charging LED Status on page 35 for charge status indications To charge the TC55 use the Rugged Charge Cable with the optional power supply Note Only connect the Rugged Charge Cable to the optional power supply Do not connect the Rugged Charge Cable to a host computer for charging 34 Getting Started Septembe...

Page 35: ...Slow blinking green 1 blink every two seconds TC55 is charging Solid green Charging complete Slow blinking red 1 blink every two seconds Battery is in an extremely low power state normal slow charging mode Fast blinking red 2 blinks per second Charging error Temperature is too low or too high Charging has gone on too long without completion typically eight hours Charging Temperature Charge batteri...

Page 36: ... was installed press the Power button The LED flashes green and the device vibrates The splash screen displays for about a minute as the TC55 boots Replacing the 2 940 mAh Battery Procedure 1 Press the Power button until the menu displays 2 Touch Power off 3 Touch OK 4 Place thumbnail at notch and lift the battery cover Figure 16 Remove the Battery Cover 5 Note Do not pull the battery tab straight...

Page 37: ...ree slots in the battery compartment 8 Press the battery down and rotate until it locks into place Figure 18 Inserting the 2 940 mAh Battery 9 Align the battery door with the back of the device Figure 19 Align the Battery Cover 10 Press around the edge of the cover to ensure that the battery door is seated properly Getting Started 37 MN000015A01 September 2013 ...

Page 38: ...ing the 4 410 mAh Battery Procedure 1 Press the Power button until the menu displays 2 Touch Power off 3 Touch OK 4 Place thumbnail at notch and lift the battery cover Figure 21 Remove the Battery Door 5 With two fingers press the battery down 38 Getting Started September 2013 MN000015A01 ...

Page 39: ... slots in the battery compartment 8 Press the battery down and rotate until it locks into place Figure 23 Inserting the 4 410 mAh Battery 9 Align the battery door with the back of the device Figure 24 Align the Battery Cover 10 Press around the edge of the cover to ensure that the battery door is seated properly Getting Started 39 MN000015A01 September 2013 ...

Page 40: ...e functionality of the TC55 Ensure that you follow the procedures to shut down the TC55 before replacing the microSD card Data corruption can occur if reading or writing to the microSD card and power is removed Note The TC55 supports microSD cards up to 32 GB To replace the microSD card Procedure 1 Press the Power button until the menu displays 2 Touch Power off 3 Touch OK 4 Wait for the device to...

Page 41: ...he replacement microSD card with the card holder Ensure that the contacts on the card are facing down and toward the card holder 11 Insert the microSD card into the card holder Figure 27 Insert microSD Card 12 Close the microSD card door 13 Slide the microSD card door down to lock into place Getting Started 41 MN000015A01 September 2013 ...

Page 42: ... the TC55 from any AC power source cradle or cable To check the charge status of the main battery touch About phone Status Battery status indicates that the battery is discharging and Battery level lists the battery charge as a percentage of fully charged Monitor Battery Usage The Battery screen lists which applications consume the most battery power Also use it to turn off applications that were ...

Page 43: ...attery Notification When the battery charge level drops below 20 2 940 mAh battery or 13 4 410 mAh battery the TC55 displays a notice to connect the TC55 to power The user should charge the battery using one of the charging accessories Figure 30 Low Battery Notification When the battery charge drops below 10 2 940 mAh battery or 7 4 410 mAh battery the TC55 displays a notice to connect the TC55 to...

Page 44: ...e GPS radio Turn off automatic syncing for Email Calendar Contacts and other applications Use the Power Control widget to check and control the status of radios the screen brightness and syncing Minimize use of applications that keep the TC55 from suspending for example music GPS and video applications Turning Off the Radios To turn off all the radios Procedure 1 Press the Power button until the m...

Page 45: ...play Setting Use Display settings to change the screen brightness change the background image enable screen rotation set sleep time and change font size Setting the Screen Brightness To set the screen brightness Procedure 1 Touch 2 Touch 3 Touch Display 4 Touch Brightness Figure 32 Brightness Dialog Box 5 Check the Automatic brightness checkbox to set the device to automatically adjust the brightn...

Page 46: ...leep values 15 seconds 30 seconds 1 minute default 2 minutes 5 minutes 10 minutes 30 minutes 6 Touch Setting Font Size To set the size of the font is system applications Procedure 1 Touch 2 Touch 3 Touch Display 4 Touch Font size 5 Select one of the font size values Small Normal default Large Huge 6 Touch Setting Touch Key Light The four touch keys under the screen are backlit Configure the touch ...

Page 47: ... on The touch key light is on when the screen is on Figure 33 Touch Key Light Dialog Box 6 Touch Touch Mode The TC55 display is able to detect touches using a finger a conductive tip stylus or gloved finger Note A glove can be made of medical latex leather cotton or wool For optimal performance use Motorola certified stylus Procedure 1 Touch 2 Touch 3 Touch Display 4 Touch Touch Mode Figure 34 Tou...

Page 48: ...ure 36 Volumes Dialog Box Call Ringtone and Vibrate Phone ringtone touch to select a ringtone to sound when an incoming call is received Vibrate when ringing Check to make the device vibrate when a call is received System Dial pad touch tones Check to play a sound when a phone key is touched Default notification Touch to select a sound to play for all system notifications 48 Getting Started Septem...

Page 49: ...e device vibrate when touching soft keys and on certain screen interactions Setting LED Notifications The TC55 LED can be configured to blink blue when an system or application notification occurs Procedure 1 Touch 2 Touch 3 Touch LED options 4 Touch the check box next to an option to enable Figure 37 LED Options Dialog Box 5 Touch Getting Started 49 MN000015A01 September 2013 ...

Page 50: ......

Page 51: ...ending upon the configuration the Home screen might appear different Contact your system administrator for more information After a suspend or screen time out the Home screen displays with the lock sliders Slide to the right toward to unlock the screen For screen locking information see Un Locking the Screen on page 62 Alternately to the left toward to open the Camera application Figure 38 Home Sc...

Page 52: ...ation Shortcuts and Widgets on page 56 for more information The Home screen provides four additional screens for placement of widgets and shortcuts Swipe the screen left or right to view the additional screens Status Bar The Status bar displays the time notification icons left side and status icons right side Figure 39 Notification and Status Icons Table 5 Home Screen Items Item Description 1 Noti...

Page 53: ...Indicates that the battery charge is low Indicates that the battery charge is very low Indicates that the battery is charging Indicates that the Airplane Mode is active All radios are turned off Indicates that Bluetooth is on Indicates that the TC55 is connected to a Bluetooth device Connected to a Wi Fi network No Wi Fi signal Mobile network signal strength No mobile network signal Connected to a...

Page 54: ...es that a problem with sign in or sync has occurred Indicates that the TC55 is uploading data Indicates that the microSD card is almost full Indicates that the TC55 is downloading data when animated and download is complete when static Indicates that the TC55 is connected via USB cable Indicates that the TC55 is connected to or disconnected from virtual private network VPN Preparing SD card Indica...

Page 55: ...otification Icons on page 54 for a list of possible notification icons and their description Open the Notifications panel to view a list of all the notifications To open the Notification panel drag the Status bar down from the top of the screen Figure 40 Notification Panel To respond to a notification open the Notifications Panel and then touch a notification The Notifications Panel closes and the...

Page 56: ... new location Pause at the edge of the screen to drag the item onto an adjacent Home screen 3 Lift finger to place the item on the Home screen Removing an App or Widget from the Home Screen Procedure 1 Go to the desired Home screen 2 Touch and hold the application shortcut or widget icon until it floats on the screen 3 Drag the icon to on the top of the screen and then release Folders Use Folders ...

Page 57: ...paper 3 From the Choose wallpaper from menu touch Gallery Live wallpapers or Wallpapers Gallery Select to use an image stored on the device Live wallpapers Select to use an animated wallpaper image Wallpapers Select to use a wallpaper image 4 Touch Save or Set wallpaper Using the Touchscreen Use the multi touch sensitive screen to operate the device Touch Touch to select items on the screen type l...

Page 58: ...ations do not support editing some or all of the text they display others may offer their own way to select text Entering Numbers Symbols and Special Characters To enter numbers and symbols Touch and hold one of the top row keys until a menu appears then select a number Keys with alternate characters display an ellipsis below the character Touch and hold the Shift key with one finger touch one or ...

Page 59: ... the camera or optional scanner Downloads lists all downloads files DWDemo Provides a way to demonstrate the data capture features using the Linear Imager or Camera See DataWedge Demonstration on page 93 for more information elemez Use to provide diagnostic information to Motorola See Elemez on page 95 for more information Email Use to send and receive email File Browser Organize and manage files ...

Page 60: ... Play music stored on the microSD card People Use to manage contact information People on page 80 for more information Phone Use to make phone calls Calls on page 67 for more information Rapid Deployment Allows the TC55 to stage a device for initial use by initiating the deployment of settings firmware and software Requires the purchase of an MSP client license per device Search Use the Google sea...

Page 61: ... optional applications is installed Accessing Applications All applications installed on the device are accessed using the APPS window Procedure 1 Touch Figure 43 APPS Window 2 Slide the APPS window left or right to view more application icons Touch an icon to open the application Note See Application Shortcuts and Widgets on page 56 for information on creating a shortcut on the Home screen Switch...

Page 62: ...locking feature The Locking feature functions differently in Single User mode or Multiple User mode Single User Mode When locked a pattern PIN or password is required to unlock the device Press the Power button to lock the screen The device also locks after a pre defined time out Press and release the Power button to wake the device The Lock screen displays Slide to the right toward to unlock the ...

Page 63: ...Figure 45 Lock Screen Figure 46 PIN Screen Using the TC55 63 MN000015A01 September 2013 ...

Page 64: ...g on to the device with each user having access to various applications and features When enabled the Login screen appears after powering on resetting or after the device wakes from suspend mode MultiUser Login Procedure 1 In the Login text field enter the username 64 Using the TC55 September 2013 MN000015A01 ...

Page 65: ...unctions soft reset and hard reset Performing a Soft Reset Perform a soft reset if applications stop responding Procedure 1 Press and hold the Power button until the menu appears 2 Touch Reset 3 The device shuts down and then reboots Performing a Hard Reset Caution Performing a hard reset with a SIM card installed in the TC55 may cause damage or data corruption to the SIM card Perform a hard reset...

Page 66: ...tton The Lock screen displays Slide to the right toward to unlock the screen If the Pattern screen unlock feature is enabled the Pattern screen appears instead of the Lock screen See Un Locking the Screen Note If the user enters the PIN password or pattern incorrectly five times they must wait 30 seconds before trying again If the user forgets the PIN password or pattern contact the system adminis...

Page 67: ...udio modes for use during phone calls Handset Mode Switches audio to the receiver at the top front of the device so the user can use the device as a handset This is the default mode Speaker Mode Use the device as if on speaker phone Headset Mode Connect a Bluetooth or wired headset to automatically switch audio to the headset Using a Bluetooth Headset Use a Bluetooth headset for audio communicatio...

Page 68: ...just the conversation phone volume during a call Adjusting the volume while not in a call affects the ring and notification sound levels Making a Call Using the Dialer Use the dialer tab to dial phone numbers Procedure 1 On the Home screen touch Figure 53 Dialer Screen 2 Touch the tab above the dialer 3 Touch the keys to enter the phone number 68 Calls September 2013 MN000015A01 ...

Page 69: ...aler provides options to save the dialed number to contacts insert pauses and wait into the dial string and options for setting the Call settings Enter at least one digit to access these options Touch to access the following Add to contacts add the dialed number to the People application Add 2 sec pause pause the dialing of the next number for two seconds Multiple pauses can be added sequentially ...

Page 70: ... History Call History is a list of all the calls placed received or missed It provides a convenient way to redial a number return a call or add a number to Contacts Arrow icons beside a call indicate the type of call Multiple arrows indicate multiple calls Missed incoming call Received incoming call Outgoing call Procedure 1 On the Home screen touch 2 Touch the tab 70 Calls September 2013 MN000015...

Page 71: ...ith the service provider for Conference Calling availability Procedure 1 On the Home screen touch 2 Touch the tab above the dialer 3 Touch the keys to enter the phone number 4 Touch below the dialer to initiate the call 5 When the call connects touch The first call is placed on hold 6 Touch the keys to enter the second phone number 7 Touch below the dialer to initiate the call 8 When the call conn...

Page 72: ...lls 10 Touch to add another call The conference is placed on hold 11 Touch the keys to enter the second phone number 12 Touch below the dialer to initiate the call 13 Touch icon to add the third call to the conference 14 Touch Manage Conference to view all callers 72 Calls September 2013 MN000015A01 ...

Page 73: ...Speak now is heard from the Bluetooth headset and the Voice Dialer screen appears 3 Say a command If Then You want to call a contact by name Say Call name You want to call a number Say Dial number If you want to call your voicemail Say Call voicemail If you want to call the previous caller Say Redial 4 Press the Call button on the Bluetooth headset to end the call Answering Calls When you receive ...

Page 74: ...s the volume down button on the side of device When a call arrives touch the white phone icon and slide over one of these icons Figure 61 Select Answer Options Answer call Start talking to the caller Send to voice mail Direct the caller to leave a voice mail message Send a message Opens a list of quick text responses Touch one to send it to the caller immediately 74 Calls September 2013 MN000015A0...

Page 75: ... Touch to select a ringtone to sound when an incoming call is received Vibrate when ringing Check to make the TC55 vibrate when a call is received Other Call Settings RingPath Settings When using a Bucktooth headset select the path that the ring is heard Options Bluetooth or Speaker and Bluetooth default Note Bluetooth headset connection is required to set this option Voicemail Touch to configure ...

Page 76: ...tions Normal default or Long GSM call settings Call forwarding Use call forwarding to forward incoming calls to a different phone number Note Call Forwarding may not be available on all networks Check with the service provider for availability Always forward set to forward all calls to a different phone number Forward when busy enter the phone number to forward calls only when the line is busy For...

Page 77: ...e Browser touch Figure 63 File Browser Screen The address bar 1 indicates the current folder path Touch the current folder path to manually enter a path and folder name Use 2 to select multiple files folder Use 3 to view the internal storage root folder Use 4 to view the microSD card root folder Use 5 to view the previous folder or to exit the application MN000015A01 September 2013 ...

Page 78: ...current folder Touch Search to search for a file or folder Touch Sort to sort the list by name by type by size or by date Touch Refresh to re display the contents of the current folder Touch List View to change the folder view from tile to list format Touch Change Size to change the size of the icons Large Normal or Small Touch About File Browser to view the application version information Messagi...

Page 79: ...timedia Message Screen 2 In the To field enter a name or a mobile phone number 3 Touch to attach the media file of your choice Pictures Select a picture to attach Capture picture Camera opens to take a picture and attach it Videos Select a video to attach Capture video Camcorder opens to record a video and attach it to the message Audio Choose a sound file to attach Record audio Sound Recorder ope...

Page 80: ...new for that field To open a menu with preset labels such as Home or Work for an email address touch the label to the right of the item of contact information Or to create your own label touch Custom in the menu 5 Touch Done Editing People Procedure 1 In the People application touch tab 2 Touch a person to edit 3 Touch 4 Touch Edit 5 Edit the contact information 6 Touch Done Deleting People Proced...

Page 81: ...nch Voice Dialer 2 Say Redial 3 In the Voice Dialer dialog box touch Redial The call is initiated Dialing By Number Procedure 1 Launch Voice Dialer 2 Say Dial phone number Note Be careful not to say the number too fast or the application might not recognize what you are saying 3 In the Voice Dialer dialog box touch the number that appears The call is initiated Opening an Application Procedure 1 La...

Page 82: ... not installed the TC55 saved photos and videos on the internal storage Taking Photos Note Camera settings are described in Camera Settings on page 84 To take a photo Procedure 1 Touch 2 Touch Figure 67 Camera Mode 3 If necessary touch the options bar and touch 4 Touch to adjust exposure flash and other settings using the camera settings See Camera Settings on page 84 for more information 5 Touch ...

Page 83: ...ew the photo in Gallery See Gallery on page 86 for more information Taking a Panoramic Photo Panorama mode lets the user create a single wide image by panning slowly across a scene Procedure 1 Touch 2 Touch 3 Touch the options bar and touch Figure 68 Panoramic Mode 4 Frame one side of the scene to capture 5 Touch and slowly start panning across the area to capture A small white square appears insi...

Page 84: ...ording The device starts recording the video The video time remaining appears in the top left of the screen 7 Touch to end recording Note Previously recorded video displays in the thumbnail at the top right 8 Touch the thumbnail to access the Gallery application See Gallery on page 86 Camera Settings When in Camera mode Camera settings are displayed on screen Touch for the settings to change Touch...

Page 85: ...0 default 1 2 or 3 White balance Touch to select how Camera adjusts colors in different kinds of light to achieve the most natural looking colors Auto Adjust the white balance automatically default Incandescent Adjust the white balance for incandescent lighting Daylight Adjust the white balance for daylight Fluorescent Adjust the white balance for florescent lighting Cloudy Adjust the white balanc...

Page 86: ...oudy environment Flash mode Touch to set whether Rear facing Camera relies on its light meter to decide whether a flash is necessary or to turn it on or off for all shots On Enable flash upon taking a photo Off Disable flash default Gallery Note The device supports the following image formats jpeg gif png and bmp The device supports the following video formats H 263 H 264 and MPEG4 Simple Profile ...

Page 87: ... top left corner to return to the main Gallery screen Working with Albums Albums are groups of images and videos in folders Touch an album to open it The photos and videos are listed in a chronologically ordered grid The name of the album displays at the top of the screen Figure 71 Photos Inside an Album Swipe left or right to scroll images across the screen Applications 87 MN000015A01 September 2...

Page 88: ... Touch 5 Touch Details Deleting an Album To delete an album and its contents from the microSD card Procedure 1 Touch 2 Touch 3 Touch and hold an album until it highlights 4 Check other albums to delete Ensure that other albums are selected 5 Touch 6 In the Delete selected item menu touch OK to delete the album Working with Photos Use Gallery to view photos on the microSD card and edit and share ph...

Page 89: ...rts that are not in view Rotating a Photo Procedure 1 Touch a photo to view the controls 2 Touch 3 Touch Rotate Left or Rotate Right The photo is automatically saved with the new orientation Cropping a Photo Procedure 1 In Gallery touch a photo to view the controls 2 Touch 3 Touch Crop The blue cropping tool appears 4 Use the cropping tool to select the portion of the photo to crop Drag from the i...

Page 90: ... open it 4 Touch the photo to open it 5 Touch 6 Touch Set picture as 7 Touch Contact photo 8 In the People application touch a contact 9 Touch the blue box and crop the photo accordingly 10 Touch OK Get Photo Information Procedure 1 Touch 2 Touch 3 Touch an album to open it 4 Touch the photo to open it 5 Touch 6 Touch Details 7 Touch Close 90 Applications September 2013 MN000015A01 ...

Page 91: ...s with the photo attached to a new message Deleting a Photo Procedure 1 Touch 2 Touch 3 Touch an album to open it 4 Touch a photo to open it 5 Touch 6 Touch OK to delete the photo Working with Videos Use Gallery to view videos on the microSD card and share videos Watching Videos Procedure 1 Touch 2 Touch 3 Touch an album to open it 4 Touch a video Applications 91 MN000015A01 September 2013 ...

Page 92: ...bum to open it 4 Touch a video to open it 5 Touch The Share menu appears 6 Touch the application to use to share the selected video The application selected opens with the video attached to a new message Deleting a Video Procedure 1 Touch 2 Touch 3 Touch an album to open it 4 Touch a video to open it 5 Touch 6 Touch OK 92 Applications September 2013 MN000015A01 ...

Page 93: ...rom the device Trim and edit video clips Delete the middle part from a video Split a video file into several separate clips Adding video effects fade in fade out gray tone negative slow motion Add and edit the background music for the movie Add multiple pictures as slide show movies Figure 75 Movie Studio Application DataWedge Demonstration Use DataWedge Demonstration to demonstrate data capture f...

Page 94: ... code data Opens a menu to view the application information or to set the application DataWedge profile Note See the TC55 Integrator Guide for information on DataWedge configuration Either press the programmable button or touch the yellow scan button to enable data capture The captured data appears in the text field below the yellow button Sound Recorder Use Sound Recorder to record audio messages...

Page 95: ...onality This feature can be disabled See Use Elemez to provide diagnostics information to Motorola Solutions Touch Submit Diagnostics button to send the data Figure 78 Elemez Application Disabling Elemez Data Collection The user can disable the Elemez application from collection specific data in the background and sending it to Motorola Solutions Applications 95 MN000015A01 September 2013 ...

Page 96: ...ox touch OK 12 Touch Enabling Elemez Data Collection The user can re enable the Elemez application for collection specific data in the background and sending it to Motorola Solutions Procedure 1 From the Home screen touch 2 Touch Manage Apps 3 Swipe left or right until the ALL tab displays 4 Scroll through the list and touch Elemez 5 In the App info screen touch Enable 6 Touch 7 Touch 8 Touch 9 To...

Page 97: ...Figure 79 MLog Manager Applications 97 MN000015A01 September 2013 ...

Page 98: ......

Page 99: ... extract the data from the image Digital Camera The device with an integrated camera based bar code scanning solution has the following features Omnidirectional reading of a variety of bar code symbologies including the most popular linear postal QR PDF417 and 2D matrix code types Cross hair reticle for easy point and shoot operation Picklist mode to decode a particular bar code from many in the f...

Page 100: ...e RS507 Hands free Imager Product Reference Guide for more information Scanning Considerations Typically scanning is a simple matter of aim scan and decode where a few quick trial efforts master it However consider the following to optimize scanning performance Range Any scanning device decodes well over a particular working range minimum and maximum distances from the bar code This range varies a...

Page 101: ... Note Scanning procedures depend on the application and device configuration An application may use different scanning procedures from those described Bar Code Capture with Linear Imager To capture bar code data Procedure 1 Ensure that an application is open on the TC55 and a text field is in focus text cursor in text field 2 Point the top of the TC55 at a bar code Figure 82 Scanning 3 Press and h...

Page 102: ...reen The Decode light emitting diode LED lights red to indicate that data capture is in process Figure 84 Application with Preview Window 4 Note When Picklist mode is enabled move the TC55 until the bar code is centered under the red target on the screen Move the TC55 until the bar code is visible on the screen 5 The Decode LED lights green a beep sounds and the device vibrates by default to indic...

Page 103: ...r Aiming Pattern 5 The scanner beeps and the LED turns green to indicate a successful decode 6 The captured data appears in the text field Bar Code Capture with RS507 Hands Free Imager Prerequisites Pair the RS507 with the TC55 See Pairing the RS507 Hands Fee Imager on page 124 for more information Procedure 1 Ensure that an application is open on the device and a text field is in focus text curso...

Page 104: ...isibility in bright lighting conditions The RS507 LEDs light green a beep sounds to indicate the bar code was decoded successfully Note that when the RS507 is in Pick List Mode the RS507 does not decode the bar code until the center of the crosshair touches the bar code Figure 88 Aiming Pattern Figure 89 Pick List Mode with Multiple Bar Codes in Aiming Pattern 4 The captured data appears in the te...

Page 105: ...n the keypad To configure DataWedge refer to the TC55 Integrator Guide Enabling DataWedge Procedure 1 Touch 2 Touch 3 Touch 4 Touch Settings 5 Touch the DataWedge enabled checkbox A blue checkmark appears in the checkbox indicating that DataWedge is enabled 6 Touch Disabling DataWedge Procedure 1 Touch 2 Touch 3 Touch 4 Touch Settings 5 Touch the DataWedge enabled checkbox The blue checkmark disap...

Page 106: ......

Page 107: ...a connection with up to eight devices at once by turning it into a portable Wi Fi hotspot While the TC55 is sharing its data connection an icon appears at the top of the screen and a corresponding message appears in the notification list USB Tethering Note USB tethering is not supported on computers running Mac OS If your computer is running Windows 7 or a recent version of Linux such as Ubuntu fo...

Page 108: ...table hotspot 6 Check Bluetooth tethering The host computer is now sharing the TC55 s data connection Post requisites To stop sharing the data connection uncheck Bluetooth tethering Portable Wi Fi Hotspot Prerequisites Configure the Wi Fi Hotspot settings Procedure 1 Touch 2 Touch 3 Touch More 4 Touch Tethering portable hotspot 5 Check Portable Wi Fi hotspot After a moment the TC55 starts broadcas...

Page 109: ...es when your data usage exceeds your plan s limit To monitor your data usage go to Data usage Caution The usage displayed on the data usage settings screen is measured by your device Your carrier s data usage accounting may differ Usage in excess of your carrier plan s data limits can result in steep overage charges The feature described here can help you track your usage but is not guaranteed to ...

Page 110: ...ts right side to the level where you want to receive a warning When your data usage reaches this level you ll receive a notification Set Auto Sync You can also conserve data usage by syncing your apps manually only when you need the data rather than relying on auto sync To turn auto sync off or on touch Auto sync data Disabling Data When Roaming To prevent the device from transmitting data over ot...

Page 111: ...ed only Emergency calls can be made Procedure 1 Touch 2 Touch 3 Touch Security 4 Touch Set up SIM RUIM card lock 5 Touch Lock SIM card Figure 92 Enter PIN to Lock SIM Card 6 Enter the PIN associated with the card Touch OK 7 Reset the TC55 Editing the Access Point Name Note Many service provider Access Point Name APN data are pre configured in the TC55 The APN information for all other service prov...

Page 112: ... APs access ports switches Radius servers etc for instructions on how to set up the infrastructure Once the infrastructure is set up to enforce the chosen WLAN security scheme use the Wireless networks settings configure the TC55 to match the security scheme The TC55 supports the following WLAN security options Open Wireless Equivalent Privacy WEP Wi Fi Protected Access WPA WPA2 Personal PSK Exten...

Page 113: ...tworks enter the required password or other credentials then touch Connect See the system administrator for more information The TC55 obtains a network address and other required information from the network using the dynamic host configuration protocol DHCP protocol To configure the TC55 with a fixed internet protocol IP address See Configuring the Device to Use a Static IP Address on page 116 7 ...

Page 114: ...tatic IP address 8 If the network security is WEP or WPA WPA2 PSK enter the required password and then touch Connect 9 If the network security is 802 1x EAP enter the information below and then touch Connect Touch the EAP method drop down list and select PEAP TLS or TTLS Touch the Phase 2 authentication drop down list and select an authentication method If required touch CA certificate and select ...

Page 115: ...h User certificate and select a user certificate Note User certificates are installed using the Security settings If required in the Identity text box enter the username credentials If desired in the Anonymous identity text box enter an anonymous identity username If required in the Password text box enter the password for then given identity 11 Touch Configuring for a Proxy Server A proxy server ...

Page 116: ...the proxy server Use the separator between addresses 7 Touch Connect 8 Touch Configuring the Device to Use a Static IP Address By default the device is configured to use Dynamic Host Configuration Protocol DHCP to assign an Internet protocol IP address when connecting to a wireless network To configure the device to connect to a network using a static IP address Procedure 1 In the network dialog b...

Page 117: ...ce enters suspend mode default MAC address Displays the Media Access Control MAC address of the device when connecting to Wi Fi networks IP address Displays the IP address of the device when connecting to Wi Fi networks WLAN Configuration Use the WLAN Configuration settings to configure additional WLAN settings From the Wi Fi screen touch WLAN Configuration to view the settings Country Override Ch...

Page 118: ...frequency hopping spread spectrum FHSS radio frequency RF to transmit and receive data in the 2 4 GHz Industry Scientific and Medical ISM band 802 15 1 Bluetooth wireless technology is specifically designed for short range 10 meters 32 8 feet communication and low power consumption Devices with Bluetooth capabilities can exchange information e g files appointments and tasks with other Bluetooth en...

Page 119: ...and create a link key for them Entering a common personal identification number PIN in the devices being paired generates the initialization key The PIN is never sent over the air By default the Bluetooth stack responds with no key when a key is requested it is up to user to respond to the key request event Authentication of Bluetooth devices is based upon a challenge response transaction Bluetoot...

Page 120: ...e Bluetooth radio turns off When Airplane mode is disabled the Bluetooth radio returns to the prior state When in Airplane Mode the Bluetooth radio can be turned back on if desired Bluetooth Radio Power Turn off the Bluetooth radio to save power or if entering an area with radio restrictions e g an airplane When the radio is off other Bluetooth devices cannot see or connect to the device Turn on t...

Page 121: ...igure 98 Bluetooth Pairing Enter PIN Figure 99 Bluetooth Pairing Smart Pairing 9 Enter a PIN in the text box and touch OK Enter the same PIN on the other device 10 For Simple Pairing touch Pair on both devices 11 The Bluetooth device is added to the Bluetooth devices list and a trusted paired connection is established Changing the Bluetooth Name By default the TC55 has a generic Bluetooth name tha...

Page 122: ...S list touch next to the device name 5 Under PROFILES check or uncheck a profile to allow the device to use that profile 6 Touch Unpairing a Bluetooth Device To unpair a Bluetooth device and erase all pairing information Procedure 1 Touch 2 Touch 3 Touch Bluetooth 4 In the PAIRED DEVICES list touch next to the device name 5 Touch Unpair 6 Touch Pairing with the CS3070 Procedure 1 Press the CS3070 ...

Page 123: ...isplays the PIN to enter on the CS3070 9 With the CS3070 scan the PIN using the Numeric Bar Codes See CS3070 Numeric Bar Codes for PIN Entry on page 123 and then scan Enter The scanner beeps to indicate it has paired with the device and the device displays Connected below the CS3070 device name CS3070 Numeric Bar Codes for PIN Entry Use the following bar codes for pin entry for Bluetooth connectio...

Page 124: ... Restore key c Install the battery onto the RS507 d Keep holding the Restore key for about five seconds until a chirp is heard and the Scan LEDs flash green e Scan the bar code below to place the RS507 in HID mode Figure 101 RS507 Bluetooth HID Bar Code 5 Touch 6 Touch 7 Touch Bluetooth 8 Touch SCAN FOR DEVICES The device begins searching for discoverable Bluetooth devices in the area and displays...

Page 125: ...other content from your screen to another device by bringing the devices together back to back Prerequisites Make sure both devices are unlocked support NFC and have both NFC and Android Beam turned on Procedure 1 Open a screen that contains a web page video photo or contact 2 Move the back of the TC55 toward the back of the other device Figure 102 Sharing Data Using NFC When the devices connect y...

Page 126: ...omplete usually indicated by the application Pairing with NFC Enabled Bluetooth Devices Prerequisites Ensure that the NFC enabled Bluetooth devices is on and in discoverable mode See the devices user documentation Procedure 1 Hold TC55 as shown Do not cover antenna area on battery door 126 Wireless September 2013 MN000015A01 ...

Page 127: ...Figure 104 Pairing with NFC Enabled Device 2 Move TC55 to close to the device The device indicates that pairing is successful Wireless 127 MN000015A01 September 2013 ...

Page 128: ......

Page 129: ...r supply Vehicle Cradle CRD TC55 VCD1 01 Provides mounting of the TC55 in a vehicle Chargers Power Supply 12 VDC 4 16 A PWRS 14000 148R Provides power to the Five Slot Universal Charge Only Cradle Power Supply 5 VDC 1 2 A PWRS 124306 01R Provides power to the TC55 Cables Rugged Charge Cable CBL TC55 CHG1 01 Provides power to the TC55 Micro USB Cable 25 MCXUSB 01R Provides USB communication with a ...

Page 130: ...ers a slot when a cup is not required 5 pack Protective Boot Blue Black SG TC55 BOOT1 01 Provides additional protection for the TC55 Protective Boot Grey Black SG TC55 BOOT2 01 Provides additional protection for the TC55 Stylus for Protective Boot KT TC55 STYLUS1 01 KT TC55 STYLUS1 03 Single stylus for Protective Boot with tether Stylus for Protective Boot with tether 3 pack Holster SG TC55 HLSTR1...

Page 131: ...ttery will increase Rugged Charge Cable Use the Rugged Charge Cable to provide power to the TC55 Note Do not connect the Rugged Charge Cable to the USB port of a host computer The TC55 will not charge from the host computer using the Rugged Charge Cable Use Motorola Solutions power supply p n PWRS 124306 01R with Rugged Charge Cable Figure 106 Rugged Charge Cable Accessories 131 MN000015A01 Septem...

Page 132: ...Rugged Charge Cable Setup Figure 107 Connect Rugged Charge Cable to TC55 Figure 108 Connect to Power 132 Accessories September 2013 MN000015A01 ...

Page 133: ...y cradle Provides 5 VDC power for operating the TC55 Simultaneously charges up to five TC55s Consists of a cradle base and optional cups Refer to the TC55 Integrator Guide for setup and configuration instructions Charging the TC55 To charge the TC55 insert the TC55 into an open slot Accessories 133 MN000015A01 September 2013 ...

Page 134: ... from 0 C to 40 C 32 F to 104 F Charging is intelligently controlled by the charger in order to ensure safe operation and optimize long term battery life To accomplish this for small periods of time the charger alternately enables and disables battery charging to keep the battery at acceptable temperatures The charger indicates when charging is disabled due to abnormal temperatures via the LED Ins...

Page 135: ...ng surface with a glass cleaner and a clean cotton cloth Install the vehicle mount on the windshield or other flat car surface using the supplied mounting disc The TC55 can detect when it is inserted into the cradle Use the Dock settings to configure the TC55 when in the cradle See the TC55 Integrator Guide for more information You can place the TC55 in the cradle either with or without the protec...

Page 136: ...unting surface Figure 113 Move Level Toward Windshield 3 Make sure that the suction bond is strong enough before proceeding to the next step 4 Place the TC55 top first into the cradle and push up 5 Rotate the bottom into the cradle and place in the bottom of the cradle 136 Accessories September 2013 MN000015A01 ...

Page 137: ...ote When the TC55 is installed in the vehicle cradle it automatically detects the insertion and goes into Car Mode by default 6 Position the TC55 for best viewing 7 Tighten the nuts to lock the cradle in place Accessories 137 MN000015A01 September 2013 ...

Page 138: ... the micro USB connector of the auto charge cable p n VCA400 01R to the input power connector in the Vehicle Charge Cradle Figure 116 Connect Auto Charge Cable to Vehicle Charge Cradle 9 Use the cable retention feature to secure the cable 138 Accessories September 2013 MN000015A01 ...

Page 139: ... Connect the other end to the vehicle power outlet The LED indicator flashes green indicating the TC55 is charging Removing the Device from the Vehicle Cradle Procedure 1 Lift the TC55 up Accessories 139 MN000015A01 September 2013 ...

Page 140: ...en the TC55 is inserted into the Vehicle Cradle Note To ensure that data communications such as FTP transfers are uninterrupted when the TC55 is inserted or removed from the Vehicle Cradle disable Dock detection When Dock detection is disabled the Vehicle Cradle will still charge the TC55 Figure 119 Dock Screen 140 Accessories September 2013 MN000015A01 ...

Page 141: ...disable the GPS radio when the TC55 is in the Vehicle Cradle Enable BT Radio Enable or disable the Bluetooth radio when the TC55 is in the Vehicle Cradle Change Notification Ring setting Select notification that occurs when the TC55 is in the Vehicle Cradle Options Play Sound or Vibrate Brightness Set the screen brightness when the TC55 is in the Vehicle Cradle Display timeout setting Set the amou...

Page 142: ... Procedure 1 Insert the top of the TC55 into the top of the Protective Boot Figure 122 Insert Top of TC55 into Boot 2 Rotate the bottom of the TC55 into the protective Boot Figure 123 Insert Bottom of TC55 into Boot 142 Accessories September 2013 MN000015A01 ...

Page 143: ...ether into Stylus 2 Feed the other end of the tether through the first loop 3 Pull the tether taut 4 Feed the loose end of the tether through the tether hole in the Protective Boot Figure 125 Feed Stylus through Tether Loop 5 Feed the stylus through the tether loop 6 Pull the tether taut 7 Insert the point of the stylus into the mounting hole in the boot Accessories 143 MN000015A01 September 2013 ...

Page 144: ...126 Insert Stylus Point into Mounting Hole 8 Rotate the stylus into the boot Figure 127 Lock Stylus into Place 9 Ensure that the top of the stylus snaps into the boot 144 Accessories September 2013 MN000015A01 ...

Page 145: ...ive Boot Holster Use the holster to securely carry the TC55 when working Figure 129 Holster Insert the TC55 with the 2 2940 mAh battery into the holster with the screen facing in or out Accessories 145 MN000015A01 September 2013 ...

Page 146: ...to the holster with the screen facing in Figure 131 Inserting the TC55 with 4 410 mAh Battery into the Holster The holster provides a sleeve for holding an optional stylus Note Do not place the stylus into the holder when the TC55 with the Protective Boot is in the holster 146 Accessories September 2013 MN000015A01 ...

Page 147: ...Figure 132 Stylus in Holster Accessories 147 MN000015A01 September 2013 ...

Page 148: ......

Page 149: ...aken where the device is charged in a non commercial environment Follow battery usage storage and charging guidelines found in this guide Improper battery use may result in a fire explosion or other hazard To charge the mobile device battery the battery and charger temperatures must be between 0 ºC and 45 ºC 32 ºF and 113 ºF Do not use incompatible batteries and chargers Use of an incompatible bat...

Page 150: ...device and should not come in contact with the device ammonia solutions compounds of amines or ammonia acetone ketones ethers aromatic and chlorinated hydrocarbons acqueous or alcoholic alkaline solutions ethanolamine toluene trichloroethylene benzene carbolic acid and TB lysoform Cleaning Instructions Do not apply liquid directly to the device Dampen a soft cloth or use pre moistened wipes Do not...

Page 151: ...ed applicator dipped in alcohol to remove any grease and dirt near the connector area 6 Use a dry cotton tipped applicator and repeat steps 4 through 6 Caution Do not point nozzle at yourself and others ensure the nozzle or tube is away from your face 7 Spray compressed air on the connector area by pointing the tube nozzle about inch away from the surface 8 Inspect the area for any grease or dirt ...

Page 152: ... a charge battery icon appears on the screen Battery charge level is very low Re charge or replace the battery After connecting the TC55 to the Rugged Charge Cable a battery charging icon appears on the screen Battery is depleted but is charging Press and hold the Power button to turn on the TC55 When charging the LED slowly blinks red The TC55 is at an extremely low power state Charge the TC55 fo...

Page 153: ...APN is not set up correctly See system administrator for APN setup information SIM card not installed properly Remove and re install the SIM card See Installing the SIM Card on page 28 Data plan not activated Contact your service provider and ensure that your data plan is enable No sound Volume setting is low or turned off Adjust the volume TC55 turns off TC55 is inactive The display turns off aft...

Page 154: ...a beep If the TC55 does not beep on a good decode set the application to generate a beep on good decode TC55 cannot find any Bluetooth devices nearby Too far from other Bluetooth devices Move closer to the other Bluetooth device s within a range of 10 meters 32 8 feet The Bluetooth device s nearby are not turned on Turn on the Bluetooth device s to find The Bluetooth device s are not in discoverab...

Page 155: ...lla Glass 2 Backlight LED backlight Battery Pack Rechargeable Lithium Ion 3 7V 2 940 or 4 410 mAh Smart battery Expansion Slot User accessible microSD slot up to 32 GB Connectivity USB 2 0 Host Client Notification LED audio and vibration Keypad Options On screen keyboard and 4 capacitive front panel keys Audio Speakers dual noise cancelling microphones and headset connector 3 5 mm jack with microp...

Page 156: ...A DC HSPA EDGE GPRS GSM Frequency band EDGE GPRS GSM 850 900 1800 1900 MHz HSPA Americas 850 1900 1700 2100 900 2100 MHz HSPA Rest of the World 900 2100 850 1900 MHz LTE Americas FDD2 FDD4 FDD5 FDD17 GPS Integrated Autonomous Assisted GPS A GPS GLONASS Wireless LAN Data Communications Wireless Local Area Network WLAN radio IEEE 802 11a b g n with internal antenna Data Rates Supported 802 11b 1 2 5...

Page 157: ...s when the user places the handset against head during a phone call to disable display output and touch input Electronic Compass Independent does not depend on GPS Imager SE655 Specifications Scan Repetition Rate Nominally 50 scans second Scan Angle 53 3 3 Roll 25 Pitch Angle 65 from normal Skew Tolerance 50 from normal Ambient Light Fluorescent 450 ft candles 4845 lux High Efficiency Fluorescent ...

Page 158: ...ztec Canadian Postal Composite AB Composite C Data Matrix Dutch Postal Japanese Postal Linked Aztec Maxi Code Micro PDF 417 microQR PDF 417 QR Code US Planet UK Postal US Postnet USPS 4 state US4CB 158 Technical Specifications September 2013 MN000015A01 ...

Page 159: ...ion 21 cradle connector cleaning 151 D datawedge 105 diagnostics 95 digital camera 99 display cleaning 151 DTMF tones 76 E Elemez 95 emergency calling 67 exit window 27 F file browser 77 finger usage 47 five slot universal charge only cradle 133 five slot charge only cradle 129 five slot charge only cradle base 129 flash 27 font size 46 H HAC 76 handset mode 67 harmful ingredients 150 headset mode...

Page 160: ...te 44 set time 44 set time zone 44 setting camera 84 video 85 setup 28 SIM card installation 28 soft reset 65 spare battery 130 speaker mode 67 status bar 52 system notification 48 T taking a panoramic photo 83 taking photos 82 touch key light 46 touch mode 47 TTY 76 TY HAC 76 U using a Bluetooth headset 67 using a wired headset 67 using the dialer 68 V vehicle cradle 129 video settings 85 videos ...

Reviews: