

100
Mbps
2
3
1
2
6
11
5
8
1
2
3
7
9
10
12
7
3
3
1
2
3
4
3
2
5
1
2
3
4
3
5
7
2
6
8
8
6
10
9
10
9
18
17
13
19
14
15
21
16
20
22
23
1
3
4
3
5
9
2
2
2
10
2
1
2
3
4
3
2
5
8
6
9
10
1
Talk
2
Navigation
3
Soft Key
4
Scan/Action Button
5
End
Note 1:
To reset the MC67, press and hold the Power button for five (5) seconds.
Numeric Keypad
Alpha-Numeric Keypad
PIM Keypad
Blue Key
Use this key to access function keys shown on the keypad
in blue.
>
Orange Key
Use this key to access the secondary layer of characters
and actions.
>
>
>
>
>
Press the Blue key once to activate this state temporarily,
followed by another key.
Press the Blue key twice to lock this state.
Press the Blue key a third time to unlock.
Press the Orange key once to activate this state
temporarily, followed by another key.
Press the Orange key twice to lock this state.
Press the Orange key a third time to unlock.
Notifications
Charging/Battery Status LED:
Scan/Decode LED:
Slow blinking amber: Battery charging
Solid amber: Fully charged
Fast blinking amber: Charging error
Scan/Decode
Charging/Battery Status
Radio Status
Radio Status LED:
Green: RF active
Using the Single-slot USB Cradle
Using the Four-Slot Spare Battery Charger
Slow Blinking Amber = Charging
Charging/Battery Status LED
Solid Amber = Fully charged
Fast Blinking Amber = Charging error
Note:
The 3600 mAh battery
charges in less than six
hours.
Use the Four-slot Battery Charger
to charge batteries separately.
Note:
Remove protective shipping film that covers the touch screen, exit window and
camera window before using.
Press the Orange key once to lock the keypad into
Alpha state.
Press the Orange key a second time to return to the
normal state.
Press the Blue key once to activate this state, followed by
another key.
Blue Key
Use this key to access function keys shown on the keypad
in blue.
>
Orange Key
Use this key to access the secondary layer of characters.
>
>
4
(Note 1)
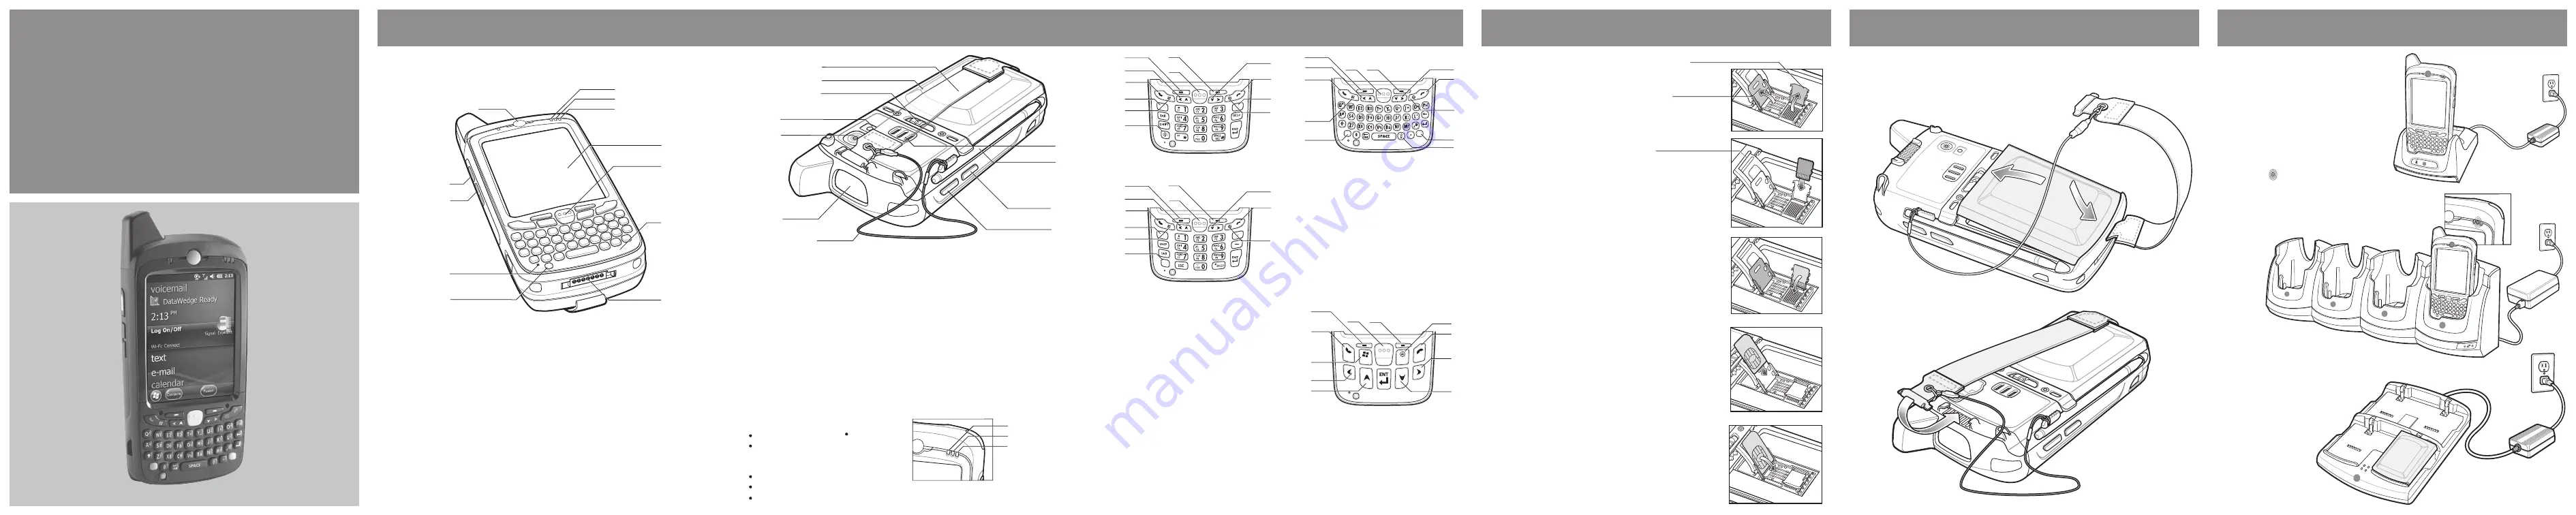
FEATURES
CARD INSTALLATION
BATTERY INSTALLATION
CHARGING
MicroSD Card Installation (Optional)
1.
Remove the handstrap.
2.
Lift the rubber access door.
3.
Slide the SIM card holder up to
unlock.
4.
Lift the SIM card holder.
5.
Carefully lift the microSD card holder.
6.
Insert the microSD card into the
card holder.
NOTE :
Proper position of the microSD card — the card
connector (i.e., gold contacts) should be facing out as
shown.
7.
Gently lower the microSD card holder until it snaps
into place.
SIM Card Holder
microSD Card Holder
Rubber Access Door
SIM Card Installation
(Optional)
8.
Insert the SIM card into the SIM holder.
NOTE :
The proper position of the SIM card—the card
connector (i.e., gold area) should be facing outward
with the beveled corner facing away.
9.
Lower the SIM card holder.
10.
Slide the SIM card holder down to lock into place.
11.
Close the rubber access door.
12.
Install the battery.
1.
Insert the battery, bottom first, into the battery compartment.
2.
Press down on the battery until the battery latch snaps into place.
3.
Replace the handstrap.
QUICK START GUIDE
Use the Single-slot USB cradle or Four-slot
cradles (Charge Only or Ethernet) to
charge the battery in the MC67.
Also charge a spare battery using the
Single-slot cradle.
Using the Four-slot Cradles
1
Scan/Action Button
2
Up/Down Button
3
Microphone
4
Power Button
5
I/O Connector
6
Keypad
7
Scan/Action Button
8
Touch Screen (with screen
protector)
9
Data Capture LED
10
Charging/Battery Status LED
11
WAN Radio Status LED
12
Phone Speaker
13
Handstrap
14
Battery
15
Battery Latch
16
Camera Flash (optional)
17
Camera (optional)
18
Exit Window (see Data
Capture Options)
19
Tether
20
Scan/Action Button
21
Action Button
22
Stylus
23
Speaker
3
DSD Keypad
6
Orange Key
7
Backlight
8
Blue Key
9
OK
10
Start Menu
MC67ND with
Windows
Embedded
Handheld
®
Red: Scanning active
Green: Good Decode


