User’s Guide
Video Baby Monitor
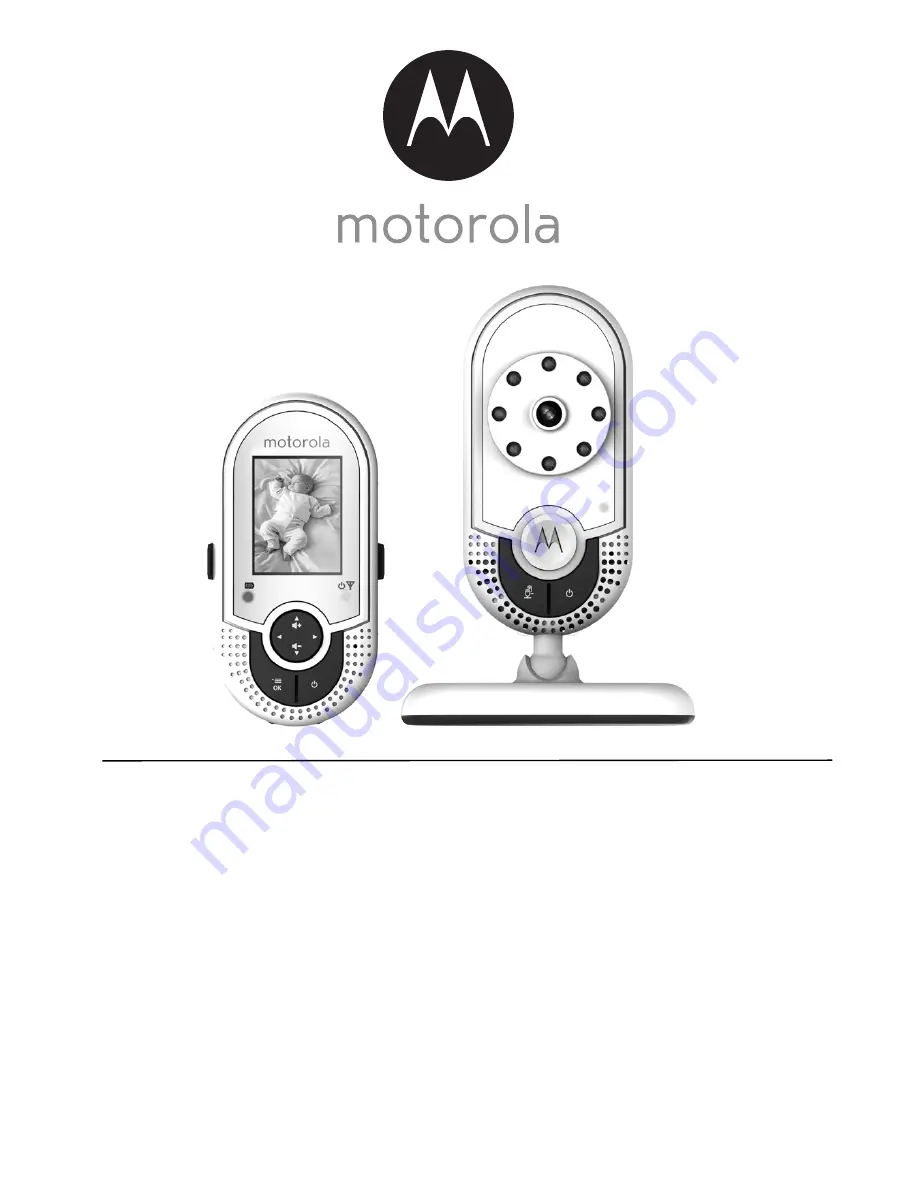
Models: MBP421, MBP421/2, MBP421/3, MBP421/4
The features described in this User’s Guide are subject to modifications without prior notice.
Page 1: ...User s Guide Video Baby Monitor Models MBP421 MBP421 2 MBP421 3 MBP421 4 The features described in this User s Guide are subject to modifications without prior notice ...
Page 2: ...u need to get the most from your product Before you use the baby monitor we recommend that you insert and fully charge the battery in the parent unit so that it continues to work if you disconnect it from the mains power to carry it to another location Please read the Safety Instructions on page 7 before you install the units Got everything 1 x Parent unit 1 x Baby unit camera 1 x Rechargeable Ni ...
Page 3: ...mage press and hold to move the image upward DOWN VOLUME Press to decrease the speaker volume While in the menu press to scroll down While viewing a zoomed image press and hold to move the image downward LEFT While in a menu press to choose the option on the left side While viewing a zoomed image press to zoom out or press and hold to move the image leftward RIGHT While in a menu press to choose t...
Page 4: ...s sound in the baby s room Displays when sound activation is on When the baby unit detects a sound in the baby s room the video image of the baby will be displayed on the parent unit Battery status scrolls when the battery is charging displays when the battery is fully charged displays when the battery is low and needs charging displays when you do not have a battery installed but operates using A...
Page 5: ...cal equipment such as TVs computers cordless or mobile phones fluorescent lights or dimmer switches If the signal is poor try moving the parent unit and or the baby unit to different positions in the rooms 1 Camera lens 2 Infrared lights 4 x infra red LEDs for night vision illumination 3 Power Link indicator On steadily when the baby unit is powered on and currently linked to parent unit Flashes w...
Page 6: ...2 Power on or off the parent unit 12 3 3 Turn on or off the parent unit screen 12 3 4 Adjust the speaker volume for parent unit 12 3 5 Adjust the LCD brightness of the parent unit 12 3 6 Adjust the sound sensitivity of the baby unit 13 3 7 Turn on or off the sound activation 13 3 8 Select the camera 13 3 9 Zoom 14 3 10 Pairing and replacing baby unit s 14 4 Disposal Of The Device Environment 15 5 ...
Page 7: ...dren Do not cover the Baby Monitor with a towel or blanket WARNING STRANGULATION HAZARD Keep the unit and adapter cord more than 1 metre from the cot and out of the baby s reach NEVER place camera or cords within the cot Secure the cords more than 1 metre away from the baby s reach Never use extension cords with AC Adapters Only use the AC Adapters provided CAMERA SET UP USE Determine a location f...
Page 8: ...hargers and power adapters provided Do not use other chargers or power adapters as this may damage the device and battery pack Only insert a battery pack of the same type Do not touch the plug contacts with sharp or metal objects Connect the power adapters to easily accessible mains power CAUTION There is a risk of explosion if the battery is replaced by an incorrect type Dispose of used batteries...
Page 9: ... baby unit to power 1 Insert the DC plug of the power adapter with the smaller DC plug into the DC jack on the side of the baby unit 2 Connect the other end of the power adapter to a suitable mains power NOTE Only use the provided power adapter DC JACK DC PLUG ...
Page 10: ...ment cover 3 Insert the plug of the battery pack into the jack inside the battery compartment and fit the battery pack into the compartment 4 Replace the battery compartment cover and re attach the belt clip stand refer to section 2 3 5 Insert the DC plug of the power adapter with the bigger DC plug into the DC jack on the side of the parent unit 6 Connect the other end of the power adapter to a s...
Page 11: ... each side NOTE It will only fit one way as indicated by UP and the arrows on the inside of the clip 2 The unit comes with the accessory fitted in the belt clip position 3 You can convert it into the desktop position by simply pulling the back part of the clip out slightly and then rotating it by half a turn as shown above Belt clip position Desktop position ...
Page 12: ...u place the parent and baby units too close together you may hear a high pitched noise This is not a fault The units are designed to be operated at some distance apart e g in separate rooms so move the units further apart 3 3 Turn on or off the parent unit screen You can turn off the parent unit screen and still have the ability to hear the sound from the baby unit Press on the parent unit at any ...
Page 13: ...tomatically whenever there are sounds detected from the baby units The parent unit screen will turn off automatically when no sounds are detected from the baby units within 20 seconds 1 Press MENU SELECT when the parent unit is not in use 2 Press or to scroll to 3 Press or to select to turn on or to turn off sound activation 4 Press MENU SELECT to confirm your selection You hear a beep when the sc...
Page 14: ...t Each new baby unit must be paired to the parent unit before use To pair and replace a baby unit 1 Press MENU SELECT when the parent unit is not in use 2 Press or to choose 3 Press or to choose a desired baby unit slot then press MENU SELECT The screen displays NOTE If you choose an occupied baby unit slot the new baby unit will replace the existing baby unit 4 Turn on the new baby unit and then ...
Page 15: ...e symbol on the product user s guide and or box indicates this Some of the product materials can be re used if you take them to a recycling point By reusing some parts or raw materials from used products you make an important contribution to the protection of the environment Please contact your local authorities in case you need more information on the collection points in your area Dispose of the...
Page 16: ...may cause permanent damage to the product which is not covered by the warranty Keep your MBP421 away from hot humid areas or strong sunlight and do not let it get wet Every effort has been made to ensure high standards of reliability for your MBP421 However if something does go wrong please do not try to repair it yourself contact Customer Service for assistance IMPORTANT Alwaysswitch offanddiscon...
Page 17: ...ance between the units but not closer than 1 metre The baby unit may be switched off Press the button to switch on the baby unit Battery Charging Indicator or on the parent unit screen flashes Battery pack in the parent unit is running low Connect the parent unit to the mains power with the supplied power adapter for recharging The parent unit beeps The parent unit may have lost connection with th...
Page 18: ...it Refer to section 3 5 for volume level settings The parent unit and the monitoring baby unit may be out of range with each other Reduce the distance between the units but not closer than 1 metre The baby monitor system produces a high pitched noise The parent unit and the baby unit are too close to each other Make sure the parent unit and baby unit are at least 1 metre away from each other The s...
Page 19: ...ded product Product orcertified accessory Accessory sold for use with this product that it manufactured to be free from defectsin materials and workmanship under normal consumer usage for the period outlined below This Warranty is your exclusive warranty and is not transferable Who is covered This Warranty extends only to the first consumer purchaser and is not transferable What will BINATONE do B...
Page 20: ...CE FOR DAMAGES IN EXCESS OF THE PURCHASE PRICE OF THE PRODUCT OR ACCESSORY OR FOR ANY INDIRECT INCIDENTAL SPECIAL OR CONSEQUENTIAL DAMAGES OF ANY KIND OR LOSS OF REVENUE OR PROFITS LOSS OF BUSINESS LOSS OF INFORMATION OR OTHER FINANCIAL LOSS ARISING OUT OF OR IN CONNECTION WITH THE ABILITY OR INABILITY TO USE THE PRODUCTS OR ACCESSORIES TO THE FULL EXTENT THESE DAMAGES MAY BE DISCLAIMED BY LAW Som...
Page 21: ...e fault of MOTOROLA or BINATONE are excluded from coverage Use of Non Motorola branded Products and Accessories Defects or damage that result from the use of Non Motorola branded or certified Products or Accessories or other peripheral equipment are excluded from coverage Unauthorised Service or Modification Defects or damages resulting from service testing adjustment installation maintenance alte...
Page 22: ...ense and risk to a BINATONE Authorised Repair Centre To obtain service you must include a the Product or Accessory b the original proof of purchase receipt which includes the date place and seller of the Product c if a warranty card was included in your box a completed warranty card showing the serial number of the Product d a written description of the problem and most importantly e your address ...
Page 23: ...lity EMC and the European Community Directive 2006 95 EC relating to Electrical Safety Directive 2011 65 EC on the restriction of use of hazardous substances RoHS and 2009 125 EC relating to ecodesign requirement for Energy Related Products ErP Assessment of compliance of the product with the requirements relating to the essential requirements according to Article 3 R TTE was based on Annex III of...
Page 24: ...sor Colour CMOS 0 3M Pixels Lens f 3 6mm F 2 4 IR LED 4 pcs Power supply adapter Input 100 240VAC 50 60Hz 150mA Rating Output 6VDC 600mA Frequency 2402 2478 5 MHz Channels 52 Operatingtemperature 5ºC 45ºC 41 113ºF Display 1 8 diagonal TFT LCD Display colour 65K colour LCD Brightness control 5 steps Battery rating 2 4V 750mAh Ni MH battery pack Power supply adapter Input 100 240VAC 50 60Hz 150mA Ra...
Page 25: ... for this product MOTOROLA and the Stylized M Logo are trademarks or registered trademarks of Motorola Trademark Holdings LLC and are used under license All other trademarks are the property of their respective owners 2014 Motorola Mobility LLC All rights reserved Version 2 0 Printed in China ...