background image

Using the ES400

2 - 9

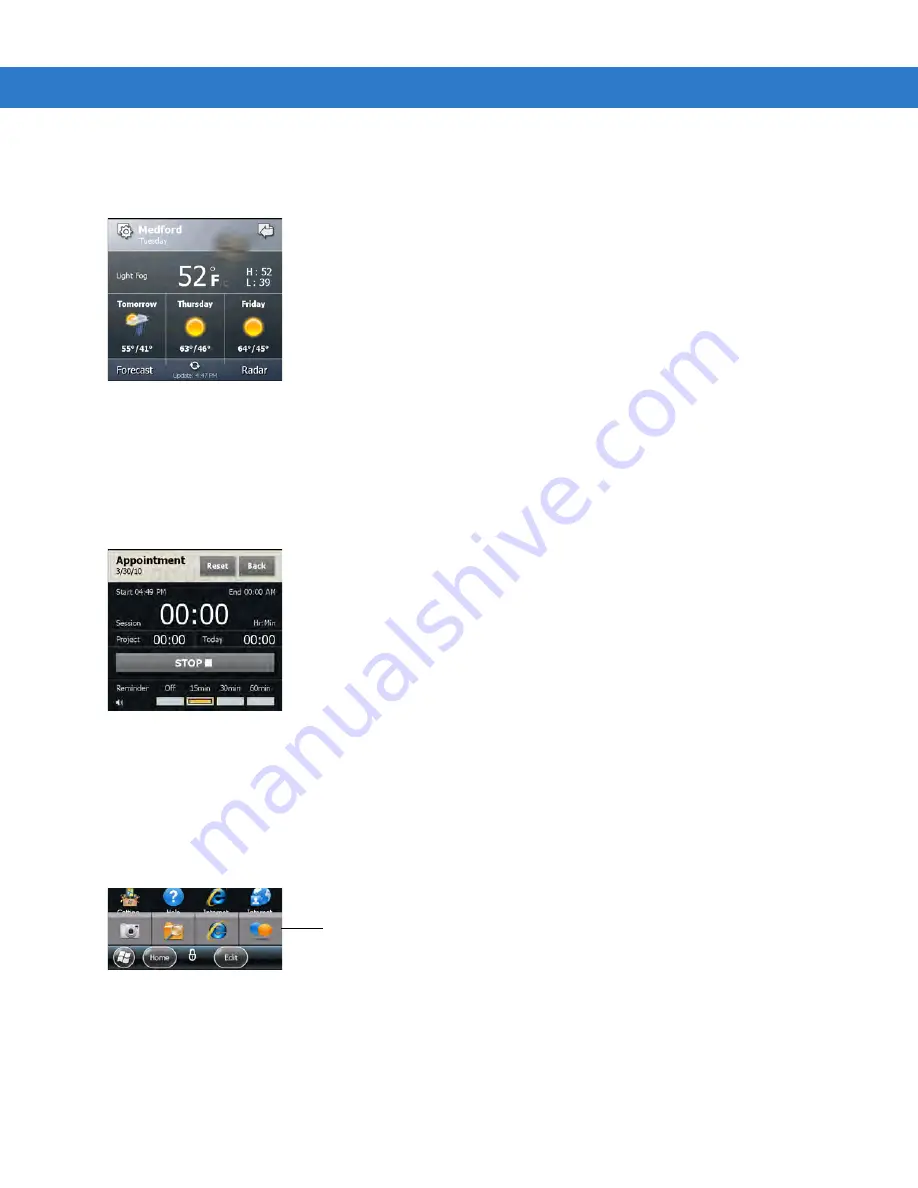
Weather Card

The Weather card display the weather for a selected city.

Figure 2-10    

Weather Card

See to 

Weather Card Setup on page 11-19

 for information on configuring the Weather card.

Time Tracker Card

The Time Tracker card provide a easy way for a worker to log hours spend at a job and output this information in a 
easy to use format.

Figure 2-11    

Time Tracker Card

See to 

Time Tracker Setup on page 11-20

 for information on configuring the Weather card.

Program Shortcuts

The Program Shortcut buttons provides easy access for four often used applications. Just tap the icon to launch 
the application. To configure the Program Shortcuts refer to 

Program Shortcuts Setup on page 11-16

.

Figure 2-12    

My Apps Window

Program Shortcut Buttons

Summary of Contents for ES400

Page 1: ...ES400 User Guide ...

Page 2: ......

Page 3: ...ES400 User Guide 72E 136310 01 Rev A September 2010 ...

Page 4: ...a network without written permission from Motorola The user agrees to maintain Motorola s copyright notice on the licensed programs delivered hereunder and to include the same on any authorized copies it makes in whole or in part The user agrees not to decompile disassemble decode or reverse engineer any licensed program delivered to the user or any portion thereof Motorola reserves the right to m...

Page 5: ...iii Revision History Changes to the original manual are listed below Change Date Description 01 Rev A 08 2010 Initial release ...

Page 6: ...iv ES400 User Guide ...

Page 7: ...ES400 1 2 Remove the Battery Cover 1 2 Installing a microSD Card 1 2 Installing the SIM Card GSM Only 1 4 Installing the Battery 1 5 Powering On the ES400 for the First Time 1 6 Network Activation 1 7 Power Off the ES400 1 8 Suspend 1 8 Removing the microSD Card 1 9 Removing the SIM Card 1 9 Installing the Tether 1 10 Chapter 2 Using the ES400 Introduction 2 1 Features 2 1 Keypads 2 2 Special Char...

Page 8: ...19 Charging Temperature 2 20 Battery Status Indications 2 20 Printing 2 20 Resetting the ES400 2 21 Locking the ES400 2 21 Password Unlocking 2 21 Finger Swipe Un locking 2 22 Notifications When ES400 is Locked 2 22 Chapter 3 Making Calls Introduction 3 1 Making a Call 3 1 Using the Phone Keypad 3 1 Smart Dialing 3 2 Using Contacts 3 3 Using Call Log 3 4 Answering a Call 3 4 Incoming Call Features...

Page 9: ...etup 4 1 CDMA Network Setup 4 1 GSM Network Setup 4 2 Dual Network Usage 4 3 Global Usage 4 3 Configuring a GSM Data Connection 4 4 Phone Settings 4 4 Sounds 4 4 Security 4 5 Enabling a PIN 4 5 Changing a PIN 4 5 Disabling a PIN 4 5 GSM Services 4 6 Call Barring Call Blocking 4 6 Caller ID 4 6 Call Forwarding 4 6 Call Waiting 4 6 Voice Mail and Text Messages 4 7 Fixed Dialing 4 7 Internet 4 7 Broa...

Page 10: ...ng 6 4 Creating and Sending MMS Messages 6 4 Viewing an MMS Message 6 5 Replying to an MMS Message 6 5 Blocking Incoming MMS Messages 6 5 Chapter 7 Data Capture Introduction 7 1 Digital Camera Scanning 7 1 Data Wedge 7 2 Chapter 8 Using the Camera Introduction 8 1 Taking Pictures 8 1 Camera Settings 8 3 Camera Menu Options 8 3 Size Quality Settings 8 3 Panorama 8 4 Timer 8 4 Advanced 8 4 About 8 5...

Page 11: ... Disabling Bluetooth 9 4 Discovering Bluetooth Device s 9 4 Available Services 9 5 Object Push Services via Beam 9 6 Internet Sharing 9 7 Hands free Services 9 7 Serial Port Services 9 8 ActiveSync Using Bluetooth 9 9 Phone Book Access Profile Services 9 10 Dial Up Networking Services 9 11 Connect to a HID Device 9 11 A2DP AVRCP Services 9 11 Chapter 10 Using GPS Navigation Introduction 10 1 Softw...

Page 12: ...Key to a Character 11 12 Remap a Key to a Function 11 13 Remap a Key to a Character Using the Soft Keypad 11 13 Remap Simultaneous Keys 11 14 Editing a Remap Key 11 14 Master Reset 11 15 Program Shortcuts Setup 11 16 My Apps Window Setup 11 17 Card Setup 11 18 Re Order Cards 11 18 Configure Cards 11 18 Weather Card Setup 11 19 Add a New Location 11 19 Change Location 11 19 Delete a Location 11 19 ...

Page 13: ...00 12 6 Connect Power 12 7 Remove the ES400 12 8 Host Adapter 12 9 Holster 12 10 ActiveSync 12 11 Installing ActiveSync 12 11 ES400 Setup 12 11 Setting Up an ActiveSync Connection on the Host Computer 12 11 Synchronization with the ES400 12 12 Chapter 13 Maintenance Troubleshooting Introduction 13 1 Maintaining the ES400 13 1 Battery Safety Guidelines 13 1 Cleaning 13 2 Materials Required 13 2 Cle...

Page 14: ...eypad C 5 Smart Dialing C 5 Using Contacts C 6 Using Call History C 7 Making a Speed Dial Call C 7 Answering a Call C 8 Incoming Call Features C 9 Missed Call Notification C 9 Emergency Calling C 9 Muting a Call C 9 Using Speed Dial C 10 Adding a Speed Dial Entry C 10 Editing a Speed Dial Entry C 11 Deleting a Speed Dial Entry C 11 Using Call History C 11 Managing Call History C 12 Changing the Ca...

Page 15: ...Software Installation Installation Using ActiveSync D 1 Installation Using Storage Card D 1 Installation Using AirBEAM D 2 MSP D 2 Update Loader Image D 2 Download Update Loader Package D 2 ActiveSync D 2 microSD Card D 3 Glossary Index ...

Page 16: ...xiv ES400 User Guide ...

Page 17: ...he ES400 Enterprise Mobility Developer Kit EMDK Help File provides API information for writing applications Configurations This guide covers the following configurations NOTE Screens and windows pictured in this guide are samples and can differ from actual screens Configuration Radios Display Memory Data Capture Options Operating System Keypads ES400 WLAN 802 11a b g WPAN Bluetooth v2 0 WWAN CDMA ...

Page 18: ... Fusion Software To determine the Fusion software version tap Start Wireless Companion Wireless Status Versions Phone Software To determine the Phone software version press Phone information Chapter Descriptions Topics covered in this guide are as follows Chapter 1 Getting Started provides information on getting the ES400 up and running for the first time Chapter 2 Using the ES400 provides informa...

Page 19: ...dix D Software Installation provides information for installing applications and operating system updates Notational Conventions The following conventions are used in this document Enterprise Digital Assistant refers to the Motorola ES400 Italics are used to highlight the following Chapters and sections in this and related documents Icons on a screen Bold text is used to highlight the following Di...

Page 20: ...se have the following information available Serial number of the unit found on manufacturing label Model number or product name found on manufacturing label Software type and version number Motorola responds to calls by email telephone or fax within the time limits set forth in support agreements If your problem cannot be solved by Motorola Enterprise Mobility Support you may need to return your e...

Page 21: ...nd stylus Lithium ion battery 1540 mAh or 3080 mAh USB Rapid Charge Cable Power Supply Country specific plugs Tether Regulatory Guide Quick Start Guide Inspect the equipment for damage If any equipment is missing or damaged contact the Motorola Enterprise Mobility Support center immediately See page xviii for contact information Prior to using the ES400 for the first time remove the protective shi...

Page 22: ...ush the battery cover toward the bottom of ES400 3 Lift the battery cover off the ES400 Figure 1 1 Battery Cover Removal Installing a microSD Card The microSD card slot located under the battery provides secondary non volatile storage Refer to the documentation provided with the card for more information and follow the manufacturer s recommendations for use 1 2 CAUTION Follow proper ESD precaution...

Page 23: ...M card holder Figure 1 2 Open SIM Holder 3 Slide the microSD card holder to the right to unlock 4 Lift the microSD card holder Figure 1 3 Open microSD Card Holder 5 Insert the microSD card into the holder Figure 1 4 Insert microSD Card 6 Close the microSD card holder SIM Card Holder microSD Card Holder ...

Page 24: ...equires a Subscriber Identification Module SIM card Obtain the card from the service provider The card can contain the following information Mobile phone service provider account details Information regarding service access and preferences Contact information which can be moved to Contacts on the ES400 Any additional subscribed services To install the SIM card 1 Insert the SIM card into the SIM ca...

Page 25: ...at the end of the card is not laying on top of the SIM Card tab Figure 1 7 Close and Lock SIM Card Holder Installing the Battery To install the battery 1 Locate the battery contacts 2 Insert the battery bottom first into the battery compartment 3 Press the battery down into the battery compartment 4 Slide the battery lock latch down to secure the battery in place SIM Card Tab ...

Page 26: ...Power button to turn on the ES400 The splash screen displays as the ES400 boots then the calibration window appears 1 Remove the stylus from the back of the ES400 2 Tap the screen to begin calibration 3 Carefully press and briefly hold the tip of stylus on the center of each target that appears on the screen Battery Lock Latch NOTE The Calibration screen can be accessed by tapping Start Settings S...

Page 27: ...gs button 5 If the network is unsupported a message appears with links for manually setting the data connection and MMS settings To activate on a CDMA network 1 Create an account with the CDMA carrier Provide the MEID number located on the back of the ES400 or tap Start Settings System Display Info to the customer service representative 2 If a SIM card was not installed a No SIM card found dialog ...

Page 28: ...nd releases the Power button User places the ES400 into the optional holster Power timeout Battery reaching a critical low value ES400 wakes from suspend when one of the following occurs User presses the Power button ES400 receives an incoming call or data Bluetooth event occurs User inserts a USB device into the microUSB port User places the ES400 in the cradle User connects or removes a headset ...

Page 29: ...der 12 Slide the microSD card holder door to the left to lock 13 Close the SIM card holder 14 Slide the SIM card holder down to lock 15 Replace the battery 16 Slide the battery lock latch down to lock the battery in place 17 Replace the battery cover Removing the SIM Card To remove an SIM card 1 Press the Power button to suspend the ES400 2 Slide the battery cover toward the bottom of the device 3...

Page 30: ...ery in place 12 Replace the battery cover Installing the Tether The ES400 comes with an optional tether to secure the stylus to the ES400 1 Remove the stylus from the back of the device 2 Feed one loop of the tether through the stylus 1 and pass the other loop through the first 2 3 With the stylus secured to the tether feed the free loop through the tether anchor and pass the stylus through the lo...

Page 31: ...0 Features Power Button Receiver Touch Screen Volume Buttons Scan Button Programmable Button Headset Port microUSB Port Camera Button LED Indicator Illumination Light Camera Lens Charging Communication Contacts Ambient Light Proximity Sensor Finger Print Reader Battery Cover LED Aimer Primary Microphone Handset Mode Secondary Microphone Speakerphone Mode Speaker Speaker Optical Nav Pad Keypad Styl...

Page 32: ...r on the display Tap the special character Table B 2 on page B 4 lists the available special characters Figure 2 3 Special Character Display Also press to display additional characters Tap the special character to select Keypad Remapping The user has the ability to remap the keypad keys to characters or applications Refer to Chapter 11 Settings for detailed information on remap keypad keys Enterin...

Page 33: ...riefly when the 4 way navigation is enabled and appears briefly when mouse cursor is enabled With 4 way navigation the user moves their thumb across the optical nav pad and moves the highlight object on the screen With the mouse cursor the user moves the cursor around the screen like on a PC Press the optical nav pad to select items on the screen similar to a mouse click Single hand Method Two han...

Page 34: ...oll up and down web pages documents and lists such as the contacts list file list message list calendar appointments list etc When finger scrolling swipe or flick your finger on the screen To scroll down swipe your finger upward on the screen To scroll up swipe your finger downward on the screen Optical Nav Pad ...

Page 35: ...he screen displays the status icons listed in Table 2 1 Tap anywhere on the Status Bar to open the Device Management window Refer to Device Management on page 2 13 for more information Figure 2 7 Status Bar Icons To view notifications tap the Status Bar and select See Status on page 2 18 for more information Tap to Open Programs Window Tap to Lock the Device Tap to Open the Contacts Status Bar Car...

Page 36: ...O enabled Microsoft customer feedback alert Connectivity Connection is active Connection is not active Synchronization is occurring Wi Fi available Wi Fi in use HSDPA available GSM only 3G available GSM only GPRS available GSM only EGPRS available GSM only 1xRTT available CDMA only EVDO Rev 0 available CDMA only EVDO Rev A available CDMA only Dormant State no data transmission during a 1x or EVDO ...

Page 37: ...displays the current date and time and notifications Figure 2 8 Simple Home Card GPRS in use GSM only GPRS connecting GSM only EGPRS in use GSM only EGPRS connecting GSM only EVDO in use CDMA only EVDO connecting CDMA only SIM Card not installed GSM only Audio All sounds are on All sounds are off Vibrate is on Battery Battery is charging Battery has a full charge Battery has a high charge Battery ...

Page 38: ... Outlook application Tasks Indicates the number of unfinished tasks Tap to open the Task application Messages Indicates the number of unread SMS and MMS messages Tap to open the Messaging application Voicemail Indicates the number of voice messages in the voicemail box Missed Calls Indicates the number of missed call Home Email Indicates the number of unread emails in a personal email account Tap ...

Page 39: ...to log hours spend at a job and output this information in a easy to use format Figure 2 11 Time Tracker Card See to Time Tracker Setup on page 11 20 for information on configuring the Weather card Program Shortcuts The Program Shortcut buttons provides easy access for four often used applications Just tap the icon to launch the application To configure the Program Shortcuts refer to Program Short...

Page 40: ...ry depending upon the open application Figure 2 14 Tile Bar Examples Table 2 3 Programs Available on the Start Menu Icon Description Icon Description ActiveSync Synchronize information between the ES400 and a host computer or the Exchange Server AirBEAM Client Allows legacy customers to deploy AirBEAM Smart packages to devices Alarms Set the clock to the date and time of your locale Alarms can als...

Page 41: ...te handwritten or typed notes drawings and voice recordings Office Mobile 2010 Provides access to Excel Mobile PowerPoint Mobile OneNote Mobile SharePoint WorkSpace Mobile and Word Mobile applications Phone Make calls Pictures Videos View and manage pictures animated GIFs and video files Rapid Deployment Client Allows the ES400 user to stage a device for initial use by initiating the deployment of...

Page 42: ...SMS or MMS message Toolbox Contains the Adobe Reader and Voice Commander applications Wireless Companion Opens the Wireless Companion folder Windows Live Use the mobile version of Windows Live to find information on the web Windows Media Play back audio and video files Table 2 3 Programs Available on the Start Menu Icon Description Icon Description ...

Page 43: ...dow Figure 2 15 Device Management Window The navigation bar consists of eight tabs Programs Memory Manager Sound Profiles Power Radio Alarms Fusion Status Settings Tap an icon to open the associated tab Scroll left or right to view more icons Programs The Programs tab lists the programs that are currently running on the ES400 and allows for easy program switching and a quick way to end processes ...

Page 44: ...tilization and a quick way to free up space Figure 2 17 Memory Manager Tab Device Storage Lists the total available Flash and the amount of Flash that is currently being used SD Card Lists the total available memory and the amount of memory that is currently being used RAM Lists the total available RAM and the amount of RAM that is currently being used Tap View Large Files to display files on the ...

Page 45: ...is set to Play Sound Ring and system volumes are set to level 4 Loud Ring type is set to Vibrate Ring Reminder is set to Vibrate Sound Notification is set to Vibrate Sound Ring and system volumes are set to level 5 Ambient Profile settings are set based on the surrounding environment s sound level The Temporary profile is created when changes are made by the system for example the user adjust the ...

Page 46: ...e the following settings slide the display up to view more options Phone radio Turns the phone radio on or off Wi Fi Turns the Wi Fi radio on or off Bluetooth Turns the Bluetooth radio on or off Device timeout Sets the amount of time after inactivity that the ES400 goes into suspend mode Backlight Sets the amount of time after inactivity that the ES400 backlight turns off Brightness Sets the displ...

Page 47: ...b To turn an alarm on or off tap the alarm name To change an alarm setting tap Edit Alarm Refer to Alarms on page 11 10 for information on configuring the alarms Fusion The Fusion tab provides access to the Fusion interface Figure 2 22 Fusion Tab Refer to Chapter 5 Using WLAN for information on using and setting up a WLAN ...

Page 48: ...ap the Status bar and select Figure 2 23 Status Tab Tap a notification to read the associated information Settings The Settings tab lists the settings applications on the ES400 Tap an item in the list to open the associated setting application or folder Slide the list up to view more settings icons Figure 2 24 Settings Tab Refer to Table 11 1 on page 11 1 for a list of setting application icons an...

Page 49: ...io notifications Charging the ES400 Before using the ES400 for the first time charge the battery using the provided USB Rapid Charge Cable 25 128458 01R or the optional One Slot USB Charge cradle For cable and cradle setup and charging procedures see Chapter 12 Accessories Place the ES400 into the cradle or connect the cable The battery automatically begins charging See Table 2 4 for charging indi...

Page 50: ...ry The message displays until the user taps Dismiss Alternately tap the Status Bar to display the Device Management window Tap Printing The ES400 supports printing to third party printers The Motorola Print Manager available from the Support Central web site http supportcentral motorola com provides support for printing to Bluetooth enabled printers The ES400 also supports printing using the USB H...

Page 51: ...ons of new messages missed calls and upcoming appointments You can also receive a call when the ES400 is locked The ES400 locks when a time out has occurred or you lock the ES400 manually To manually lock the ES400 tap the lock icon in the center of the Home screen Tile bar Password Unlocking When the ES400 is not used for a period of time and the user tries to access the device the Lock screen ap...

Page 52: ...the Lock screen appears Swipe your finger across the fingerprint reader in the direction used during enrollment If the fingerprint sensor does not read the fingerprint properly enter a PIN to un lock the ES400 See Locking the ES400 on page 11 3 for information on setting up fingerprint reading Figure 2 29 Swipe Finger Across Fingerprint Reader Notifications When ES400 is Locked The Lock screen dis...

Page 53: ...Using the ES400 2 23 Figure 2 30 Lock Screen Notifications Voice messages Missed calls Unread Emails Text messages ...

Page 54: ...2 24 ES400 User Guide ...

Page 55: ...and read email over High Speed Packet Access HSPA or Evolution Data Optimized EvDO using Cellular Line Making a Call With the ES400 the user can make a call from the phone contacts and Call Log Using the Phone Keypad To make a call 1 Press NOTE If using the Windows Mobile Dialer refer to Windows Mobile Dialer on page C 4 for information on using the dialer NOTE The user can make emergency calls ev...

Page 56: ...vary depending upon carrier and network Smart Dialing Smart Dialing makes it easy to dial a phone number When the user starts entering numbers or characters Smart Dialing automatically searches and sorts the contact entries on the SIM card in Contacts and the phone numbers in Call Log including incoming outgoing and missed calls You can then select the desired number or contact from the filtered l...

Page 57: ...pears after a space dash or underscore in a contact name If the matching list is long narrow down the search further by entering another letter Figure 3 2 Finding a Contact To make a call or send a message using Smart Dialing 1 Begin entering the first few numbers or characters 2 In the Smart Dialing panel touch the screen or use the Optical Nav Pad on the keypad to navigate to the desired contact...

Page 58: ... press To ignore the incoming call tap Ignore This sends the caller to voice mail depending on the service provider Otherwise this presents a busy signal to the calling party Tap or press to end the call Incoming Call Features The user can use other programs on the ES400 during a call To switch back to the phone press Press to end the call To hold the current call and answer a waiting call tap Ans...

Page 59: ... headset to automatically switch audio to the headset The ES400 defaults to handset mode When a wired headset is plugged into the ES400 headset port or a Bluetooth headset is configured for use with the ES400 the earpiece and speakerphone are muted and audio is heard through the headset Using a Bluetooth Headset You can use a Bluetooth headset for audio communication when using an audio enabled ap...

Page 60: ...s to manage the calls stored in Call Log Using the Call Log Menu se the Call Log menu to make a call send an SMS and remove item from the log 1 Press and then tap 2 Tap an item to call the number or tap to open the Options window for that item Table 3 2 Call Log Icons Icon Description This icon appears next to the contact information for all outgoing calls This icon appears next to the contact inf...

Page 61: ...e 1 Press to display the dialer 2 Enter the first phone number and tap the Call Line area When the call connects the name or number appears in the Call Line 3 Tap 4 Tap The dialer re appears 5 Enter the second number and tap Send 6 When the call connects the first call is placed on hold and the second call is active NOTE For use on GSM UMTS networks Conference Calling and the number of conference ...

Page 62: ...that call active The second call go on hold 8 Tap to create a conference call three callers Figure 3 6 Two Merged Calls 9 To add a third caller tap The dialer appears When the call connects the new call is active and the conference is on hold Figure 3 7 Adding a Third Call ...

Page 63: ...s Figure 3 9 Un Merge Calls 12 Tap to remove a caller from the conference 13 To end the conference call tap next to the Call Line Calls Complete dialog appears and then the dialer displays NOTE To speak privately with one party during a conference call tap and then tap next to the caller To include all parties again tap ...

Page 64: ...ers to communicate seamlessly with the ES400 Users can make phone calls look up contact information launch programs or check calendars Voice Commander contains the following features Eyes free and hands free voice command and control Speaker independent speech recognition technology no training is required Ease of use conversational user interface Personal Voice Tag and Digit Model Adaptation to e...

Page 65: ... Halley Johnson please select 3 Select the contact intended to call Find To look up contact information 1 Initiate Voice Commander The ES400 responds with Say command 2 Say Find Mary Smith System responds with Mary Smith home 5555551212 To look up a specific number 1 Initiate Voice Commander The ES400 responds with Say command 2 Say Find Michael Archer at work The ES400 responds with Michael Arche...

Page 66: ...mand 2 Say Callback The ES400 responds with Call Mary Smith at home is it correct 3 Say Yes The ES400 responds with Dialing Start To launch an application 1 Initiate Voice Commander The ES400 responds with Say command 2 Say Start calendar The ES400 responds with Go to Calendar The Calendar application launches Appointments To read today s tomorrow s or this week s appointments 1 Initiate Voice Com...

Page 67: ...ory page displays Voice Play Music To play a specific music file 1 Initiate Voice Commander The ES400 responds with Say command 2 Say Play The Moment The ES400 responds with The Moment 3 Windows Media starts to play The Moment To play all music files 1 Initiate Voice Commander The ES400 responds with Say command 2 Say Play music The ES400 responds with Play music 3 Windows Media starts to play all...

Page 68: ...er can be also terminated manually by tapping Menu Exit Note that goodbye will not be accepted during voice digit dialing operation NOTE User can say Pause or Resume to control music playing The command Resume only works when Windows Media is running The commands Previous and Next only work when playing all music files Voice Commander only supports media files with mp3 and wma format Voice Command...

Page 69: ... complete If the user has a Global Phone service with Verizon or Sprint and has a SIM card as part of the service power up the ES400 and complete activation without inserting the SIM card Insert the SIM card afterwards The Phone Network Setup application provides the ability to change networks when detected by the ES400 or manually when the user decides to change networks Automatic Network Setup S...

Page 70: ...SM UMTS First Searches first for GSM UMTS networks and then for CDMA networks if GSM UMTS networks are not found 4 Select GSM UMTS Preferred and select Auto GSM UMTS Searches for either GSM or UMTS networks GSM Only Searches for only GSM networks UMTS Only Searches for only UMTS networks 5 Tap Band Select All Configures the ES400 to use all bands NA CA Configures the ES400 to use bands used in Nor...

Page 71: ...n be used internationally with the use of a Global SIM card provided by the CDMA carrier After arriving install the global SIM card into the ES400 See Installing the SIM Card GSM Only on page 1 4 To set the ES400 to use the global SIM card 1 Tap Start Setting Connections Phone network Setup 2 On the Band tab tap Network type and select GSM UMTS First 3 Tap GSM UMTS Preferred and select Auto GSM UM...

Page 72: ...ame text box if required by the service provider 10 Enter a password in the Password text box if required by the service provider 11 Enter a domain name in the Domain text box if required by the service provider 12 Tap Finish 13 Tap OK to exit Connections Phone Settings Use the Phone Settings window to customize settings such as the ring type and ring tone for incoming calls security options and o...

Page 73: ...nge PIN 2 Use the dialer keypad to enter the current PIN 3 Tap Enter 4 Use the dialer keypad to enter a new four to eight digit PIN 5 Tap Enter 6 Reenter the new PIN for confirmation and tap Enter 7 Tap OK to confirm the change Disabling a PIN 1 Deselect the Require PIN when phone is used check box 2 Use the dialer keypad to enter the current PIN NOTE To use custom wav mid or wma files as ring ton...

Page 74: ...he caller ID Select the No one radio button to prevent the caller s identity from appearing to others Call Forwarding Use call forwarding to forward incoming calls to a different phone number To forward all calls to a different phone number select the Forward all incoming phone calls check box enter the phone number to receive forwarded calls in the To text box To forward incoming calls to a diffe...

Page 75: ...oadcast Channels Enable broadcast messages from local cell sites These messages include emergency directions and information services TTY Use an optional TTY device with the ES400 to send and receive calls Plug the TTY device into the ES400 s headset jack and set the ES400 to operate in 1 of 3 TTY modes When you set the ES400 to a TTY mode it operates in that mode whenever the TTY device is connec...

Page 76: ...uide VCO Receive TTY characters but transmit by speaking into microphone HCO Transmit TTY characters but receive by listening to earpiece Off Disable TTY functionality HAC Turn Hearing Aide Compatibility HAC on and off ...

Page 77: ...re Once you have set up the infrastructure to enforce your chosen WLAN security scheme use the Fusion or Wireless Zero Config WZC software to configure the ES400 to match Fusion Overview The Fusion software contains applications with which to create wireless profiles Each profile specifies the security parameters to use for connecting to a particular WLAN as identified by its ESSID The Fusion soft...

Page 78: ...Bar Options 2 Select WLAN Management from the drop down list 3 Select Windows Manages WLAN radio button 4 Tap Save 5 Tap OK 6 Perform a reboot To switch from WZC to Fusion 1 Tap the Status Bar Options 2 Select WLAN Management from the drop down list 3 Select Fusion Manages WLAN radio button 4 Tap Save and then tap OK 5 Perform a reboot Supported Applications The Fusion menu items and their corresp...

Page 79: ...tificates used for authentication Yes Yes Manage PACs Invokes the PAC Manager application which helps you manage the list of Protected Access Credentials used with EAP FAST authentication Yes No Options Invokes the Options application which allows you to configure the Fusion option settings Yes Yes Wireless Status Invokes the Wireless Status application which allows you to view the status of the c...

Page 80: ...ure 5 3 Operating Mode Dialog Box 7 Tap Next The Security Mode dialog box displays 8 In the Security Mode drop down list select Legacy Pre WPA Figure 5 4 Security Authentication Dialog Box 9 In the Authentication drop down list select None 10 Tap Next The Encryption dialog box displays 11 In the Encryption Type drop down list select WEP 40 40 24 Figure 5 5 Encryption Dialog Box ...

Page 81: ... select the key to enter 16 In the Key field enter 10 hexadecimal characters 17 In the Confirm field re enter the key When the keys match a message appears indicating that the keys match 18 Repeat for each WEP key 19 In the Transmit Key drop down list select the key to transmit 20 Tap Next The IPv4 Address Entry dialog box displays Figure 5 7 IP Address Entry Dialog Box 21 Ensure that all three ch...

Page 82: ...ndow 3 Tap a network name Figure 5 10 Configure Wireless Network Window 4 In the Connects to drop own list select either The Internet or Work 5 Check the This is a hidden network checkbox if the network is a hidden network 6 Tap Next NOTE Obtain the proper WLAN configuration information from your system administrator prior to performing the WZC setup procedures The following setup procedure exampl...

Page 83: ...n is selected enter an encryption key in the Network key text box 10 Tap Next Figure 5 12 Configure Network Authentication Window 11 If required select Use IEEE 802 1x network access control check box 12 In the EAP type drop down list box select the EAP type 13 Tap Finish More Information on WZC For more information on Microsoft Wireless Zero Config see the Microsoft Software Developer Network MSD...

Page 84: ...5 8 ES400 User Guide ...

Page 85: ...il account 3 Tap New 4 To add recipients enter their email addresses separating them with a semicolon Tap To to add email addresses stored in Contacts 5 Enter a subject and compose the message 6 To add an attachment to the message tap Insert and tap the item you want to attach Picture Voice Note or File 7 Tap Viewing an Email Message To view an email message 1 On the Home screen tap for an Outlook...

Page 86: ...ure automatically fixes common spelling errors as the user types so that messages are more accurate The character counter in the Status Bar indicates the size of the message being composed Tap Message Options then select the Request message delivery notification check box to request notification when the text messages is received 5 Tap to send the message If the ES400 phone feature is on the text ...

Page 87: ...ssage Tap to call the sender or save dismiss or delete the message To view a text message 1 Press Text Messages 2 In the message list tap a text message The window displays previous text conversations Replying to an SMS Message To reply to a text message 1 Tap 2 In the message list tap a text message The window displays previous text conversations 3 Enter text in the reply field 4 Tap Text Message...

Page 88: ...p Done 5 Tap in the text window to enter a text message A window appears allowing you to add a text message plus emoticons favorite web addresses pre defined text contact information and calendar information Tap Done after adding information 6 Tap to attach a picture or video stored on the ES400 to the message 7 Tap to attach a sound file stored on the ES400 to the message 8 Tap to take a picture ...

Page 89: ... a audio file as a ringtone Replying to an MMS Message To reply to an MMS message 1 Press Text Messages 2 Tap the MMS message 3 In the threaded message tap the MMS message to open and view an MMS message 4 After viewing the MMS message tap Menu Reply via MMS to reply with an MMS message or tap Menu Reply via SMS to reply with a text message Blocking Incoming MMS Messages To block incoming MMS mess...

Page 90: ...6 6 ES400 User Guide ...

Page 91: ...decode the bar code data and display the bar code content 1 Enable DataWedge See Data Wedge on page 7 2 2 Launch an application that supports text inputs such as Word Mobile 2010 or Excel Mobile 2010 3 Point the camera lens on the back of the ES400 at a bar code 4 Press and hold A preview window appears on the display window and a red aiming line emits from the ES400 The LED lights red indicating ...

Page 92: ...edge process The DataWedge Status changes to Ready 3 Tap OK To disable DataWedge 1 Tap Start Settings System DataWedge 2 Tap the Running option to end the DataWedge process The DataWedge Status changes to Stopped 3 Tap OK NOTE When DataWedge is enabled the Camera button on the right side of the ES400 enables data capture After using the data capture feature disable DataWedge to return the Camera b...

Page 93: ...ated on the lower right side of the ES400 The Camera screen displays the view finder Depending upon what mode was last used either Camera mode or Video mode is enabled The icon in the top right corner indicates the mode If video mode is enabled tap anywhere on the screen to display the Status bar and then tap Camera icon Figure 8 1 Camera View Finder To take a picture 1 Point the ES400 at the subj...

Page 94: ...igure 8 2 Panorama Alignment Targets 4 Slowly move the ES400 to the right until the two alignment targets overlap and turn green When they turn green the ES400 takes another picture Figure 8 3 Successful Alignment 5 Continue until five pictures are taken The ES400 stitches the five pictures together and stores a panorama picture in memory Tap the icon at the bottom of the screen to stop stitching ...

Page 95: ...e of the image The image can be set to three sizes 1 3 Megapixels 1280 pixels x 1024 pixels 2 Megapixels 1600 pixels x 1200 pixels 3 2 Megapixels 2048 pixels x 1536 pixels Select one of the three yellow Quality boxes to set the quality of the image The image can be set to three quality settings Low Medium and High Increasing the size and quality of the picture increases the size of the file saved ...

Page 96: ...at comments have not been added to a particular picture or group of pictures If After each photo is enabled in the Quick Review and the Image Viewer an Edit icon displays in the Status bar Tap the Edit icon to open the Photo Info window If When exiting is enabled a dialogue box appears prompting the user to add comments before exiting GPS location GPS coordinates can be used to tag pictures with c...

Page 97: ... and then tap Video icon To record a video 1 Point the ES400 at the subject 2 Press the Camera button on the side of the ES400 or the Optical Nav Pad The ES400 begins recording A timer appears at the top of the screen indicating the running time of the video 3 Press the Camera button or the Optical Nav Pad to end the recording and store it in memory Video Settings The Status bar at the top of the ...

Page 98: ...n image resolution of either 640 x 480 with 16 colors or 320 x 200 with 256 colors The total palette of colors is 262 144 Format Use the Format option to set the format that the video is recorded in Options MP4 or 3GP Time Date stamp Use the Time Date stamp option to add a time and date stamp to the video file Storage Allows the user to either have the video saved to the ES400 s built in memory or...

Page 99: ... Gallery icon Figure 8 6 Gallery Application The default view for the gallery displays the thumbnails by date To view more thumbnails slide the display to the left Albums Tap the Albums icon to display the Albums view Figure 8 7 Album View To create a new album tap Create new Album Opens the Gallery Menu Toggles Selection Mode Opens the Camera view Opens Albums View Closes the Gallery Application ...

Page 100: ... using email or MMS messaging Select Via e mail to send the selected items through email An Email message is created Enter the email address of the recipient and then tap Send Select Via MMS to send the selected items through MMS messaging An MMS messaging window appears See MMS Messaging on page 6 4 for information on creating an MMS message Move to Album Tap Move to album to move the selected it...

Page 101: ...he screen to display the Status bar 2 Tap the Annotation icon Figure 8 9 Add Annotations 3 To add a mark tap Add and then tap on a specific location on the image A mark with the number 1 appears The user can add as many marks as they like 4 To remove a mark tap Remove and then tap one of the marks already on the image Add Annotation Add Audio Comment View Image Information Close Open Menu Delete I...

Page 102: ...r and configuring the annotation settings Send Tap Send to send the image using email or MMS messaging Select Via e mail to send the image through email An email message is created Enter the email address of the recipient and then tap Send Select Via MMS to send the image through MMS messaging An MMS messaging window appears See MMS Messaging on page 6 4 for information on creating an MMS message ...

Page 103: ...age to other people moving the image to another folder and configuring the annotation settings Send Tap Send to send the image using email or MMS messaging Select Via e mail to send the image through email An Email message is created Enter the email address of the recipient and then tap Send Select Via MMS to send the image through MMS messaging An MMS messaging window appears See MMS Messaging on...

Page 104: ...8 12 ES400 User Guide ...

Page 105: ...oid making Bluetooth connections and discoveries during critical 802 11b communications AFH for Bluetooth consists of four main sections Channel Classification A method of detecting an interference on a channel by channel basis or pre defined channel mask Link Management Coordinates and distributes the AFH information to the rest of the Bluetooth network Hop Sequence Modification Avoids interferen...

Page 106: ... is requested it is up to user to respond to the key request event Authentication of Bluetooth devices is based upon a challenge response transaction Bluetooth allows for a PIN number or passkey that is used to create other 128 bit keys used for security and encryption The encryption key is derived from the link key used to authenticate the pairing devices Also worthy of note is the limited range ...

Page 107: ...nect to the ES400 Turn on the Bluetooth radio to exchange information with other Bluetooth devices within range Communicate only with Bluetooth radios in close proximity Enabling Bluetooth To enable Bluetooth 1 Tap Status Bar Bluetooth Mode Figure 9 1 Bluetooth Mode Tab NOTE If there is an active Bluetooth connection between the ES400 and another Bluetooth device and there is no data activity the ...

Page 108: ...devices 2 Ensure that the Bluetooth device to discover is in discoverable and connectable modes 3 Ensure that the two devices are within 30 feet 10 meters of one another 4 Tap Status Bar Bluetooth Devices Figure 9 2 Bluetooth Devices Tab 5 Tap Add new device The ES400 begins searching for discoverable Bluetooth devices in the area 6 Select a device from the list 7 Tap Next The Enter Passcode windo...

Page 109: ...ted paired connection is established Available Services The ES400 with Microsoft Bluetooth stack offers the following services OBEX Object Push Services via Beam Hands Free Audio Gateway Services Serial Port Services Personal Area Networking Services PBAP Services Dial up Networking HID Client A2DP AVRCP See the following sections for information on these services Object Push Services via Beam Use...

Page 110: ...earches for Bluetooth devices in the area 7 Tap Tap to send next to the Bluetooth device to send the file to The ES400 communicates with the device and send the contact When completed Tap to send changes to Done Internet Sharing Internet Sharing allows the user to connect a computer or laptop to the ES400 and use the ES400 as a modem to connect to an office network or ISP To use ES400 as a modem u...

Page 111: ... headset user manual for instructions on communicating with a Bluetooth device Serial Port Services Use the wireless Bluetooth serial port connection similar to a physical serial cable connection Configure the application that will use the connection to the correct serial port To establish a serial port connection 1 Ensure that Bluetooth is enabled and discoverable on both devices 2 Ensure that th...

Page 112: ...e application that will use the connection to the correct serial port To set up a Bluetooth ActiveSync connection 1 Ensure that Bluetooth is enabled and discoverable on both devices 2 Ensure that the two devices are within 30 feet 10 meters of one another 3 On the computer click Start Settings Control Panel 4 Double click Bluetooth Devices 5 On the Options tab select the Turn discovery on and Allo...

Page 113: ...OM port that was added 8 Click OK 9 Click Start All Programs Microsoft ActiveSync 10 Click File Connection Settings Figure 9 5 ActiveSync Connection Settings 11 On the Allow connections to one of the following drop down list select the COM port with the number you noted earlier 12 On the ES400 tap Start ActiveSync 13 Tap Menu Connect via Bluetooth Synchronization is automatically initiated ...

Page 114: ...xt The device is added to the Bluetooth list 8 A dialog box appears requesting to transfer contacts to the car kit 9 Select Yes or No 10 If Yes is selected contacts from the ES400 are transferred to the car kit Dial Up Networking Services Dial up networking allows the user to connect a PC or laptop to the ES400 and use the ES400 as a modem to connect to an office network or ISP Before setting up d...

Page 115: ...that the two devices are within 10 meters 32 8 feet of one another 4 Tap Start Settings Bluetooth Devices 5 Tap Add new device The ES400 begins searching for discoverable Bluetooth devices in the area 6 Select a stereo headset from the list 7 Tap Next The Enter Passcode window appears Refer to the device s User Manuals for more information 8 Tap Connect The ES400 connects to the stereo headset For...

Page 116: ...9 12 ES400 User Guide ...

Page 117: ...atible with the ES400 Refer to the application s user guide for application installation and setup information ES400 GPS Setup The GPS enabled ES400 automatically manages access to the GPS receiver to allow multiple programs to simultaneously access GPS data By default the ES400 has the following settings 1 Tap Start Settings System External GPS icon 2 In the Programs tab the GPS program port is s...

Page 118: ... from satellites To improve GPS signal strength place the ES400 where there is a clear view of the sky A direct line of sight is required between the ES400 and the GPS satellites to access information from the satellites Assisted GPS GPS can be used in stand alone or Assisted GPS A GPS modes A Stand alone GPS receiver downloads data from GPS satellites In certain environments it can take several m...

Page 119: ...f the data tap Source and select one of the options WAN default WLAN Active Sync Any None To set the frequency of updating the data tap Update Frequency and select one of the options On Demand default 1 Day 2 Days 4 Days 7 Days To manually update the data tap the Update Now button ...

Page 120: ...10 4 ES400 User Guide ...

Page 121: ...Alarms can also be set at specified days and times of a week Power Check battery power and set the time out for turning off the display to conserve battery power Home Customize the appearance of the Home screen and the information to display on it Sounds Notifications Enable sounds for events notifications and more and set the type of notification for different events Connections Folder Contains c...

Page 122: ...er Enables or disables the ES400 s wireless radios and customizes Wi Fi Bluetooth and Phone settings Personal Folder Buttons Assign a program to a button Holster Configure ES400 behavior when placed in the holster KeyRemap Remap keypad keys to characters or applications Nav pad Set the function of the optical Nav Pad Phone Configure the phone Owner Information Enter personal information on the ES4...

Page 123: ...ting function External GPS Set the appropriate GPS communication ports if required Refer to ES400 GPS Setup on page 10 1 Memory Check the device memory allocation status and memory card information and stop currently running programs Master Reset Resets the ES400 to default settings Refer to Master Reset on page 11 15 Regional Settings Set the regional configuration to use including the format for...

Page 124: ...Password field A strong password must contain at least seven characters and contain at least three of the following uppercase and lowercase letters numerals and punctuation d Re enter the password in the Confirm field 3 To set a hint to remember the password tap the Hint button and then enter a hint for a password reminder 4 Tap Save and then tap Yes Finger Swipe Locking To enable device un lockin...

Page 125: ...t appears in the first box If the fingerprint is read unsucessfully a red fingerprint appears in the box 4 Repeat swiping the finger two more times 5 Upon successful reading a template is created Swipe the finger one more time to verify the template 6 Once the fingerprint is enrolled tap Save and then OK Editing Fingerprint Swipes To change or edit the enrolled fingerprint 1 Tap Edit fingerprint 2...

Page 126: ...n 1 Tap Lock screen options Figure 11 4 Lock Screen Options Window 2 Select items to display on the Lock screen 3 Tap OK when done Audio Feedback To enable an audio sound upon a successful finger swipe Tap Audio feedback to toggle audio on and off Microsoft Locking Locking the ES400 turns off keyboard and touch screen functionality This is helpful when the ES400 is turned on and you want to preven...

Page 127: ...st select a time value for the protection to take affect after non use 4 From the Password type drop down list select either Simple PIN or Strong alphanumeric 5 For a simple password enter a four digit password in the Password field For a stronger password a Enter a seven character password in the Password field A strong password must contain at least seven characters and contain at least three of...

Page 128: ... window is accessed by tapping anywhere on the Status Bar Sound Profiles To create a new sound profile or to edit a custom profile 1 Tap Status Bar 2 Tap next to a custom profile or tap Create New to create a new profile Figure 11 6 Sound Window 3 Edit or enter a new name for the profile in the text box 4 Select each feature listed and select an available option Ring type Set the type of ring that...

Page 129: ... for the profile in the text box 5 For each radio tap the name to toggle the value to On or Off Phone radio Wi Fi Bluetooth 6 Scroll down to view more options 7 Tap the option to select each feature listed and select an available option Device timeout Sets the amount of time after inactivity that the ES400 goes into suspend mode Backlight Sets the amount of time after inactivity that the ES400 goe...

Page 130: ...ility to automatically detect the brightness in a specific environment 1 Tap Start Settings System Backlight Keylight 2 Use the Battery Power tab to set the backlight and keylight settings when the ES400 is on battery power 3 Use the External Power tab to set the backlight and keylight settings when the ES400 is on external power Backlight Set the backlight functionality Select On Any Input to tur...

Page 131: ...entation of the ES400 For example if the ES400 is rotated 90 counterclockwise the display rotates counterclockwise 90 About Tab Use the About tab to view accelerometer information Optical Nav Pad The ES400 uses two types of cursors for navigating on the screen 4 way Cursor To change the functionality of the Optical Nav Pad tap Start Settings Personal Nav Pad Select the Navigation mode of the Optic...

Page 132: ... Start Settings Personal KeyRemap Figure 11 8 Key Remap Window Remap a Key to a Program To remap a key to a program 1 Press the key on the keypad to remap 2 Tap Remap to Figure 11 9 Remap To Window 3 Tap Program 4 From the program list select a program 5 Tap Save and then tap OK Remap a Key to a Character To remap a key to a character 1 Press the key on the keypad to remap ...

Page 133: ...ap Remap to 3 Tap Function 4 From the Function list select a function Scroll down to see all options 5 Tap OK 6 Tap Use key in 7 Select All Programs or a specific program that the key remap will function in 8 Tap Save and then tap OK Remap a Key to a Character Using the Soft Keypad To remap a key to a soft keypad character 1 Press the key on the keypad to remap 2 Tap Remap to 3 Tap Soft keypad The...

Page 134: ...the remap to feature Editing a Remap Key To edit an existing remapped key 1 Tap Library Figure 11 11 Library Window 2 Select the remapped key to edit 3 To change the key remapping to another key follow the instructions detailed above To reset the remapped key to the default value tap Reset Key 4 Tap Yes to reset to the default state or Cancel to keep the current remap state and then tap OK To rese...

Page 135: ...al information Data on the SIM card and microSD card is not deleted To reset the ES400 1 Tap Start Settings System Master Reset Figure 11 12 Master Reset Window 2 Tap Reset 3 Enter 1111 in the text box 4 Tap Reset tile to delete all user data and restore default settings or tap Cancel tile to exit without deleting the data ...

Page 136: ...ser Guide Program Shortcuts Setup To change program shortcuts 1 Tap My Apps Edit Dock Figure 11 13 Add Shortcut Icon 2 Tap a shortcut button to remove the assigned shortcut 3 Tap a new program icon and then tap Save ...

Page 137: ...icon to add to the new list Each icon highlights indicating it is selected As icons are added to the list the icon counter increments Figure 11 14 Add Programs 4 Tap Save To make the new list the default tap the name of the list To edit a customized application list 1 Tap My Apps Edit View 2 Tap next to the list to edit 3 Tap an icon to add or delete from the list 4 Tap Save and then tap OK ...

Page 138: ...d hold an icon and then drag it to a new location Tap to return to the front of the card Configure Cards Cards can be removed so that they do not appear on the Home screen On any card tap to flip the card over Tap to configure the cards Figure 11 16 Card Configuration Window The window lists the available cards A next to the name indicates that the card is enabled A indicates that the card is disa...

Page 139: ...zip code 3 Tap the Magnifying Glass icon 4 Select the new location from the list 5 Tap Back to return to the Weather card front Change Location To change the location 1 Tap the Settings icon 2 Select a location from the list Delete a Location To delete a location 1 Tap the Settings icon 2 Scroll to the desired location 3 Tap the X The location is removed from the list 4 Tap Back to return to the W...

Page 140: ...is stored in the Windows directory in file TimeTracker_data_file csv Figure 11 18 Time Tracker Main Screen 1 To create a new project tap the Settings icons Figure 11 19 New Project 2 In the text box enter the project name 3 Tap to add the project to the list 4 Tap Save 5 In the main screen tap the project name to open the project screen ...

Page 141: ... standard POP Post Office Protocol This protocol is supported by most ISPs and is currently more common among consumer applications POP3 is the current standard Setting Up an IMAP or POP Account When setting up an IMAP or POP account the ES400 may be able to retrieve account settings automatically or you may need to enter certain settings manually Automatic Email Setup 1 Press 2 Tap Setup E mail 3...

Page 142: ...play name field enter a name for the new email account This name appears within the list of available email accounts on the E mail page 11 Tap Next 12 Tap the Automatic Send Receive field and select the time interval you would like for the ES400 to send and check for new email messages 13 Tap the Review all download settings link for additional download settings and options See Editing an Email Ac...

Page 143: ...OP3 or IMAP4 14 Tap Next 15 In the User name field enter the username for the account 16 In the Password field enter the password for the account 17 Tap Next 18 In the Outgoing SMTP mail server field enter the outgoing mail server address 19 Check the appropriate fields and then tap OK Outgoing server requires authentication is used if a password is required for outgoing mail in addition to incomi...

Page 144: ...equire SSL for Outgoing e mail checkbox to enable SSL encryption of outgoing email if supported by the mail server Network connection drop down list to select a firewall connection setting Select either The Internet open no firewall Work behind a firewall or a data connection 11 Tap Done and then tap Next 12 In the Automatic Send Receive drop down list select the time interval the ES400 sends and ...

Page 145: ...nter a signature message 8 Tap OK to save the new signature Using Microsoft ActiveSync With a Corporate Outlook Account Microsoft ActiveSync can be used to sync corporate email with the ES400 If your company uses Microsoft Exchange Server 2003 and 2007 as the corporate email system you can use Exchange ActiveSync to wirelessly synchronize your email and organizer information directly with your com...

Page 146: ...tton Calendar sync allows synchronizing calendar events with the Exchange Server up to a determined time frame Choose from All 2 Weeks 1 Month 3 Months or 6 Months E mail sync lets you choose your email sync settings Download the past determines how far back in email history to maintain a sync record between the ES400 and the Exchange Server Message Format determines what display format to use whe...

Page 147: ...ce Commander automatically updates the recognition database A check in a box indicates that the contact can be recognized normally An unchecked box indicates that the contact is not in the recognition range A grayed box indicates that the name contains some unrecognizable characters such as symbols or marks The user can build a voice tag to enable it The default recognition database is limited to ...

Page 148: ... application is not in the recognition range A grayed box indicates that the application name contains some unrecognizable characters such as symbols or marks The user can build a voice tag to enable it Play Tap to hear the pronunciation of an application Voice Tag The user can record a voice tag for selected applications to enhance usability and accuracy indicates that the voice tag is built To r...

Page 149: ...After the second beep repeat it 5 Voice Commander builds the recorded voice tag 6 Voice Commander plays back the recorded voice tag to confirm the voice tag has been created successfully and appears to the right of the music file name Digit Trainer Settings The user can improve the Voice Commander digit dialing success by performing the Digit Trainer sequence 1 Tap 2 Start reading first string aft...

Page 150: ...the Advanced Settings tab to set the voice recognition sensitivity Select Sensitive makes the recognizer easier to return a recognition result whenever there is an utterance detected This setting is used in environment with stationary noises such as in a car a bus or a factory Normal this setting is used in most environments Accurate when selected the recognizer becomes very strict in responding t...

Page 151: ...Cable VCA400 01R Charges the ES400 in a vehicle holder Consumer Grade Auto Charge Cable CAC400 1000R Charges the ES400 in a vehicle holder Miscellaneous Power Supply PWRS 124306 01R Provides power to the ES400 or Single Slot USB Cradle using the USB Rapid Charge Cable 1540 mAh Battery BTRY ES40EAB00 Replacement battery 3080 mAh Battery BTRY ES40EAB02 Replacement battery 1540 mAh Battery Kit KT 125...

Page 152: ...X Stylus Kit KT 125237 03R Replacement Stylus 3 pack 2X Stylus Kit KT 125240 03R Replacement Stylus 3 pack Tether Kit KT 133855 01R Replacement tethers 5 pack Soft Holster SG ES4021210 01R Soft belt mount holder Screen Protector Kit KT 125249 03R Package of three screen protectors Host Adapter 25 133854 01R Provides host connections Table 12 1 ES400 Accessories Continued Accessory Part Number Desc...

Page 153: ...icates the status of the battery charging in the ES400 See Table 2 4 on page 2 20 for charging status indications The 1540 mAh battery fully charges in less than three hours and the 3080 mAh battery fully charges in less than six hours Communication with Host Computer To communicate with a host computer 1 Ensure ActiveSync is installed and configured on the host computer See ActiveSync on page 12 ...

Page 154: ... 4 ES400 User Guide Figure 12 3 Communication Setup 4 Place the ES400 into the cradle 5 The USB Connect dialog box appears 6 Tap ActiveSync RNDIS or ActiveSync Serial 7 Tap Connect USB Rapid Charge Cable ...

Page 155: ...face using the supplied mounting disc Windshield Installation 1 Fix the suction cup mount to the selected area with the suction lever facing up Figure 12 4 Install on Windshield 2 Flip the lever down to create a vacuum between the suction cup and the mounting surface WARNING Some countries prohibit the mounting of any electronic device in any location on the vehicle dashboard Be sure to check with...

Page 156: ...re proceeding to the next step Install the ES400 To install the ES4000 into the Vehicle Holder 1 Place the ES400 bottom first into the holder 2 Push the ES400 back until it snaps into place Figure 12 6 Insert ES400 into Vehicle Holder 3 Position the ES400 for best viewing 4 Tighten the nuts to lock the holder in place ...

Page 157: ...ect Power To connect power to the Vehicle Holder 1 If required connect the micro USB connector of the auto charger to the input power connector in the vehicle holder Figure 12 8 Commercial Grade Auto Charger Figure 12 9 Consumer Grade Auto Charger ...

Page 158: ...nect the other end to the cigarette lighter socket The LED indicator flashes green indicating the ES400 is charging Remove the ES400 To remove the ES400 from the Vehicle Holder lift the ES400 up and then remove from the bottom of the holder Figure 12 11 Remove ES400 from Vehicle Holder ...

Page 159: ...the a device s connector to the Host Adapter NOTE The Host Adapter can only be connected to the ES400 and not the Single Slot USB cradle CAUTION Do not connect a USB device that draws more than 100 mA If a device is connected that draws more than 100 mA the ES400 displays a Warning dialog box Remove the device from the Host Adapter NOTE When connecting a USB Flash drive to the Host Adapter the USB...

Page 160: ...into suspend mode depending upon the holster application setting Use the Holster window to control the behavior of the ES400 when it is placed in a holster 1 Tap Start Settings Personal Holster 2 Tap Profile set to to select a profile for when the ES400 is placed in the holster See Power Radio on page 2 15 for a description of each profile 3 Tap Display wake up on removal to set the ES4000 to wake...

Page 161: ...is connected to the host computer or set to only synchronize on command Selects the types of information to synchronize and control how much data is synchronized Installing ActiveSync To install ActiveSync on the host computer download version 4 5 or higher from the Microsoft web site at http www microsoft com Refer to the installation procedures included with the ActiveSync software ES400 Setup T...

Page 162: ...tings and click Next and then click Finish During the first synchronization information stored on the ES400 is copied to the host computer When the copy is complete and all data is synchronized the ES400 can be disconnect from the host computer For more information about using ActiveSync start ActiveSync on the host computer then see ActiveSync Help NOTE Assign each ES400 a unique device name Do n...

Page 163: ...e ES400 from temperature extremes Do not leave it on the dashboard of a car on a hot day and keep it away from heat sources Do not store the ES400 in any location that is dusty damp or wet Use a soft lens cloth to clean the ES400 If the surface of the ES400 screen becomes soiled clean it with a soft cloth moistened with a diluted window cleaning solution Periodically replace the rechargeable batte...

Page 164: ...cture attempt to insert foreign objects into the battery immerse or expose to water or other liquids or expose to fire explosion or other hazard Do not leave or store the equipment in or near areas that might get very hot such as in a parked vehicle or near a radiator or other heat source Do not place battery into a microwave oven or dryer Battery usage by children should be supervised Please foll...

Page 165: ...r dipped in alcohol to remove any grease and dirt near the connector area 6 Use a dry cotton tipped applicator and repeat steps 3 through 5 7 Spray compressed air on the connector area by pointing the tube nozzle about inch away from the surface CAUTION Do not point nozzle at yourself and others ensure the nozzle or tube is away from your face 8 Inspect the area for any grease or dirt repeat if re...

Page 166: ...urface CAUTION do not point nozzle at yourself and others ensure the nozzle or tube is pointed away from your face 6 Ensure that there is no lint left by the cotton tipped applicator remove lint if found 7 If grease and other dirt can be found on other areas of the cradle use lint free cloth and alcohol to remove 8 Allow at least 10 to 30 minutes depending on ambient temperature and humidity for t...

Page 167: ... than three hours and the 3080 mAh battery charges in less than six hours Extreme battery temperature Battery does not charge if ambient temperature is below 0 C 32 F or above 40 C 104 F ES400 not functioning Perform a reboot See Resetting the ES400 on page 2 21 Cannot see characters on display ES400 not powered on Press the Power button During data communication no data transmitted or transmitted...

Page 168: ...ion running Stop DataWedge application Tap Start Settings System DataWedge Tap Running to stop DataWedge and then tap OK The ES400 does not decode while reading a bar code Scanning application is not loaded Load a scanning application on the ES400 See your system administrator Unreadable bar code Ensure the symbol is not defaced Distance between exit window and bar code is incorrect Place the ES40...

Page 169: ...evice and name from the phone Refer to the phone s user documentation for instructions Table 13 3 Troubleshooting the Single Slot USB Cradle Symptom Possible Cause Action ES400 battery is not charging ES400 was removed from cradle or cradle was unplugged from power too soon Ensure cradle is receiving power Ensure ES400 is seated correctly The 1540 mAh battery fully charges in less than three hours...

Page 170: ... securely connected to the cradle s power port ES400 battery is not recharging ES400 was removed from the cradle too soon Replace the ES400 in the cradle The 1540 mAh battery fully charges in less than three hours and the 3080 mAh battery charges in less than six hours Battery is faulty Replace the battery No power to charger Ensure that power is applied to the charger The ES400 LED flashes green ...

Page 171: ...Height 129 mm 5 08 in Width 60 4 mm 2 38 in Depth 16 5 mm 0 67 in With 3080 mAh battery Height 129 mm 5 08 in Width 60 4 mm 2 38 in Depth 21 5 mm 0 85 in Weight With 1540 mAh battery 156 g 5 5 oz With 3080 mAh battery 188 5 g 6 5 oz Display PenTile 3 in diagonal color display touch VGA 640 x 480 portrait Super Bright 750 NITS luminous Touch Panel Polycarbonate analog resistive touch with haptic to...

Page 172: ...perature 0 C to 40 C 32 F to 104 F Storage Temperature 40 C to 70 C 40 F to 158 F Charging Temperature 0 C to 40 C 32 F to 104 F Humidity 5 95 non condensing Drop Specification Military Standard MIL STD 810G 4 ft 1 22 m drop specification 3 ft 0 91 m drop to vinyl covered concrete across the operating temperature range 36 drops at 32 F 0 C room temperature and 104 F 40 C Tumble 150 1 65 ft 0 5 m t...

Page 173: ...annels frequencies depend on regulatory rules and certification agency Security WPA2 Personal or Enterprise 802 1x EAP TLS TTLS CHAP MS CHAP MS CHAPv2 PAP or MD5 PEAP TLS MSCHAPv2 EAP GTC LEAP EAP FAST TLS MS CHAPv2 EAP GTC Antenna Internal antenna Voice Communications Voice over IP ready with P2P PBX PTT clients Wi Fi certified IEEE 802 11 a b g direct sequence wireless LAN Wi Fi Multimedia WMM M...

Page 174: ...55022 Class B EN55024 EN 301 489 1 EN 301 489 3 EN 301 489 7 EN 301 489 17 EN 301 489 24 EN 60601 1 2 EN 50121 3 2 EN 50121 4 Australia AS NZS CISPR 22 Data Capture Options Data Types 1D and 2D bar codes photographs video signatures documents Color Camera Resolution 3 2 Mega pixel with illumination light and auto focus Illumination User controllable light source for efficient data capture illumina...

Page 175: ...ete 2 of 5 Codabar UPCE1 Coupon COde Trioptic 39 Chinese 2 of 5 Korean 3 of 5 GS1 DataBar GS1 DataBar Truncated GS1 DataBar Limited GS1 DataBar Stacked GS1 DataBar Expanded GS1 DataBar Expanded Stacked GS1 DataBar Stacked Omni 2 D Bar Codes PDF 417 Micro PDF Marco Micro PDF Composite AB Composite C Data MAtrix QR Code Micro QR Aztec Linked Aztec US Planet US Postnet UK 4 state Australian 4 state J...

Page 176: ... 81 6 mm 3 21 in Depth 93 mm 3 66 in Weight 228 g 8 04 oz Input Power 5 VDC 1 2 A Interface USB Operating Temperature 0 C to 50 C 32 F to 122 F Storage Temperature 40 C to 70 C 40 F to 158 F Charging Temperature 0 C to 40 C 32 F to 104 F Humidity 5 to 95 non condensing Drop 76 2 cm 30 0 in drops to vinyl tiled concrete at room temperature Electrostatic Discharge ESD 15 kV air 8 kV contact ...

Page 177: ...bet A Z both lowercase and uppercase numbers 0 9 and assorted characters The keypad is color coded to indicate which modifier key to press to produce a particular character or action The keypad default is lowercase alpha characters See Table B 1 for key and button descriptions and Table B 2 on page B 4 for the keypad s special characters Figure B 1 QWERTY Keypad ...

Page 178: ... mode temporarily followed by another key This illuminates the LED and displays the following icon at the bottom of the screen until a second key is pressed Press the Orange key twice to lock this mode This illuminates the LED and displays the following icon at the bottom of the screen Press the Orange key a third time to unlock Talk Talk Green Phone press to display the phone keypad window or to ...

Page 179: ...ication without tapping the screen OK Use this key to close open applications Shift Changes the state of the alpha characters from lowercase to uppercase Press the Shift key to activate this mode temporarily followed by another key This displays the following icon at the bottom of the screen until a second key is pressed Press the Shift key twice to lock this mode This displays the following icon ...

Page 180: ... Move from one field to another Table B 1 Keypad Descriptions Continued Key Action Table B 2 Special Characters Key Special Characters Key Special Characters a a ä ą á å â à æ ă ã A A Á Â Ä À Å Ã Ă Ą Æ c ç č ć C Ç Č Ć d ď đ D Ď Đ e é è ê ë ě ę E É È Ê Ë Ě Ę g ğ G Ğ i í ï î ij ì ı I Í Ï Î IJ Ì ı l ł ĺ ľ L Ł Ĺ Ľ n ñ ň ń N Ñ Ň Ń o ó ò ø ô õ ö ő œ O Ó Ò Ø Ô Õ Ö Ő Œ r ř ŕ R Ř Ŕ s š ś ş ß S Š Ś Ş ß t ť ţ ...

Page 181: ...and an Information Status bar The Information Status bar highlights the application plug in that is under it and provides additional information Figure C 1 Windows Mobile Home Screen To enable the Windows Mobile Home screen 1 Tap Setting Home 2 On the horizontal scroll select Items 3 In the item list select the Windows Default checkbox Deselect all other checkboxes 4 Tap OK The Windows Mobile Home...

Page 182: ...ormation Status bar information relevant to that application appear in the bar Figure C 2 Moving Today Screen You can also touch and hold the Information Status bar and move it up and down over an application name Remove your finger and the Information Status bar and application name center in the screen Figure C 3 Moving Information Status Bar ...

Page 183: ...rance to customize the background and the Items to change the display format Classic Today Screen The user can change the Today screen to the classic layout that is used in Windows Mobile 6 1 Figure C 5 Classic Today Screen To change to the classic view tap Start Settings Home Items Application Icon Application Information Tile Bar Status Bar Today Screen Task Tray ...

Page 184: ...ew location and release Windows Mobile Dialer Use the ES400 to make phone calls set up speed dials keep track of calls and send text messages Your wireless service provider may also provide other services such as voice mail call forwarding and caller ID Also use the integrated phone to connect to an ISP or work network in order to browse the Web and read e mail Connect to the Internet or work netw...

Page 185: ...ne keypad that correspond to the phone number or contact to call The contact panel lists contacts that match the sequence that you entered Smart Dialing starts looking for numbers or contacts that match the sequence entered To find a phone number Enter the first one or two digits to find a phone number in Call History Enter the first three digits or more to find a phone number from the saved Conta...

Page 186: ... make a call or send a text message using Smart Dialing 1 Begin entering the first few numbers or characters 2 In the Smart Dialing panel use the up and down arrows on the keypad to navigate to the desired contact or phone number 3 When the correct contact is selected press to make a voice call 4 To send a text message to the selected contact tap Send Text Message 5 To call a different phone numbe...

Page 187: ...istory Figure C 9 Call History Window 3 Tap the phone icon next to the number to begin dialing and return to the phone keypad 4 Press on the ES400 keypad to stop dialing or end the call Making a Speed Dial Call Use Speed Dial to call someone saved in the speed dial directory NOTE To make a call from an open contact tap the number to call See On Device Help for more information about Contacts Phone...

Page 188: ...number of the desired contact in the list Figure C 10 Speed Dial Contact List 3 To stop dialing or end the call press Answering a Call A dialog box appears on the ES400 when it receives an incoming call If the phone is set to ring a ring tone sounds Answer or ignore the incoming call To answer an incoming call tap Answer on the dialog box or press Figure C 11 Incoming Call To ignore the incoming c...

Page 189: ...ll box on the Home screen Emergency Calling Your service provider programs one or more emergency phone numbers such as 911 or 999 that you can call under any circumstances even when your phone is locked or the SIM card is not inserted Your service provider can program additional emergency numbers into your SIM card However your SIM card must be inserted in your phone in order to use the numbers st...

Page 190: ...umber in the list Figure C 12 Speed Dial Contact Location 5 In the Location field tap the up down arrows to select an available location to assign as the new speed dial entry The first speed dial location is reserved for voice mail 6 Tap OK to add the contact to the speed dial list 7 Tap OK to exit the Speed Dial Contact List To add a speed dial entry from the Contacts window 1 Tap Start Contacts ...

Page 191: ...the speed dial entry Using Call History Use Call History to call someone who was recently called or recently called in Call History provides the time and duration of all incoming outgoing and missed calls It also provides a summary of total calls and easy access to notes taken during a call Table 4 1 lists the call history icons that appear in the Call History window NOTE Editing names and phone n...

Page 192: ...g calls incoming calls or calls listed alphabetically by caller name 5 Tap OK to exit the Call History window Resetting the Recent Calls Counter 1 Press to display the Phone dialer 2 From the Phone dialer tap Call History 3 Tap 4 Select Call Timers Figure C 14 Call History Call Timers Table C 2 Call History Icons Icon Description This icon appears next to the contact information for all outgoing c...

Page 193: ...window Viewing Call Status 1 Press to display the Phone dialer 2 From the Phone dialer tap Call History 3 Tap an entry The Call Status window appears Figure C 15 Call History Detail 4 Tap OK and then OK to exit Using the Call History Menu Use the Call History menu to dial voice mail access the Activation Wizard save to contacts view a note delete a listing send an SMS and make a call 1 Press to di...

Page 194: ... displays For example select Send Text message to display the Text Messages window 6 Tap OK to exit the Call History window Swapping Calls GSM To move between two phone calls 1 Press to display the Phone dialer 2 Enter the first phone number and press Talk When the call connects Hold appears on the dialer 3 Tap Hold on to place the first number on hold 4 Enter the second number and tap Talk Figure...

Page 195: ...nswer to connect to the first call Figure C 18 Answer a Call 2 When a second call arrives tap Answer The first call is placed on hold 3 Tap Flash to swap from one call to the other Figure C 19 Call Swapping 4 Tap End or press the red phone key on the keypad to end active call The remaining call re connects tap Answer to connect to the call 5 Tap End or press on the keypad to end the last call ...

Page 196: ...keypad to end the conference call Three way Calling CDMA To create a three way phone session with two people and you as the initiator 1 Press to display the Phone dialer 2 Enter the first phone number and tap Flash 3 To call a second person tap Keypad Enter the second number and tap Flash 4 When the second person answers the call tap Talk to create a three way calling session 5 Tap Flash to drop t...

Page 197: ...or more information 2 Locate the package file on the host computer 3 In ActiveSync on the host computer open Explorer for the ES400 4 Copy the CAB file from the host computer to the temp directory on the ES400 5 On the ES400 navigate to the temp directory 6 Tap on the application CAB file to install the application on the ES400 Installation Using Storage Card To install an application using a micr...

Page 198: ...tains an Image Update feature that updates all operating system components All updates are distributed as update packages Update packages can contain either partial or complete updates for the operating system Motorola distributes the update packages on the Support Central Web Site http supportcentral motorola com To update an operating system component copy the update package to the ES400 using o...

Page 199: ...lling a microSD Card on page 1 2 for installation instructions 3 Connect the ES400 to AC power See Chapter 12 Accessories 4 Press the 1 9 and Power keys simultaneously 5 Immediately as soon as the device starts to boot press and hold the camera button 6 The Update Loader application looks for the update loader file in the root directory of the microSD card When it finds the file it loads the updat...

Page 200: ...D 4 ES400 User Guide ...

Page 201: ...in this framework each recognizable symbology uses its own unique format See Symbology Bit Binary digit One bit is the basic unit of binary information Generally eight consecutive bits compose one byte of data The pattern of 0 and 1 values within the byte determines its meaning Bits per Second bps Bits transmitted or received boot or boot up The process an ES400 goes through when it starts During ...

Page 202: ... H Hz Hertz A unit of frequency equal to one cycle per second Host Computer A computer that serves other terminals in a network providing such services as computation database access supervisory programs and network control I Internet Protocol Address See IP IP Internet Protocol The IP part of the TCP IP communications protocol IP implements the network layer layer 3 of the protocol which contains...

Page 203: ...and react relatively quickly They require external light to reflect their information to the user M MDN Mobile Directory Number The directory listing telephone number that is dialed generally using POTS to reach a mobile unit The MDN is usually associated with a MIN in a cellular telephone in the US and Canada the MDN and MIN are the same value for voice cellular users International roaming consid...

Page 204: ...of the host ID address field into a field for subnets Default is often 255 255 255 0 Symbology The structural rules and conventions for representing data within a particular bar code type e g UPC EAN Code 39 PDF417 etc T TCP IP Transmission Control Protocol Internet Protocol A communications protocol used to internetwork dissimilar systems This standard is the protocol of the Internet and has beco...

Page 205: ...ZERTY keypad B 2 B backlight 11 2 11 10 battery charging 1 2 2 19 12 3 installing 1 2 1 5 battery charging 2 19 using single slot USB cradle 12 3 battery cover 1 2 battery icon 2 7 2 20 Bing 2 10 Bluetooth 9 1 adaptive frequency hopping 9 1 security 9 2 turning off 9 4 turning on 9 3 bluetooth discovering devices 9 4 turning on and off 9 3 bullets xvii C CAB files deployment via ActiveSync D 1 dep...

Page 206: ...inger swipe un locking 2 22 Full Home card 2 8 Fusion 2 17 G GPRS data connection 4 4 registry file 4 4 WAN configuration 4 4 GPS assist 11 2 GSM access point name 4 4 configure GPRS data connection 4 4 settings phone 4 4 PIN 4 5 security 4 5 services 4 6 4 7 GSM network setup 4 2 H headset 3 5 hexadecimal keys 5 5 High Speed Downlink Packet Access 3 1 C 4 I icons ActiveSync C 4 battery 2 7 2 20 s...

Page 207: ... pass phrase 5 5 password unlocking 2 21 passwords 11 4 11 7 hint 11 4 Phone 2 11 phone answering a call 3 4 C 8 call history 3 6 C 11 call swapping C 14 C 15 conference call 3 7 3 10 C 16 contacts 3 3 C 6 muting a call 3 5 C 9 speed dial adding entry C 10 calling C 7 deleting entry C 11 editing entry C 11 text messaging 6 2 three way call 3 10 C 16 three way calling 3 7 using keypad 3 1 C 5 phone...

Page 208: ...lot USB cradle 12 1 12 3 charging 12 3 SMS Staging 2 11 sound profiles 2 14 creating 11 8 speaker icon 2 19 special character key 2 2 B 4 special characters 2 2 speed dial C 7 C 10 starting the ES400 1 6 status 2 18 status bar 2 5 status icon 2 6 battery 2 7 2 20 speaker 2 19 storage card deploying CAB files D 1 strap 1 1 stylus 1 1 subscriber identification module 1 4 suspend 9 3 suspend the ES40...

Page 209: ...W Weather card 2 9 Wi Fi 11 2 Windows Live 2 12 Windows Live Messenger 2 11 wired headset 3 5 wireless internet 4 4 Wireless Companion 2 12 wireless manager 11 2 WLAN 802 11a b g xv WPAN Bluetooth xv WWAN configuring GSM 4 4 ...

Page 210: ...Index 6 ES400 User Guide ...

Page 211: ......

Page 212: ...w York 11742 USA 1 800 927 9626 http www motorola com enterprisemobility MOTOROLA and the Stylized M Logo and Symbol and the Symbol logo are registered in the U S Patent and Trademark Office All other product or service names are the property of their registered owners Motorola Inc 2010 ...

Reviews: