Installation Guide
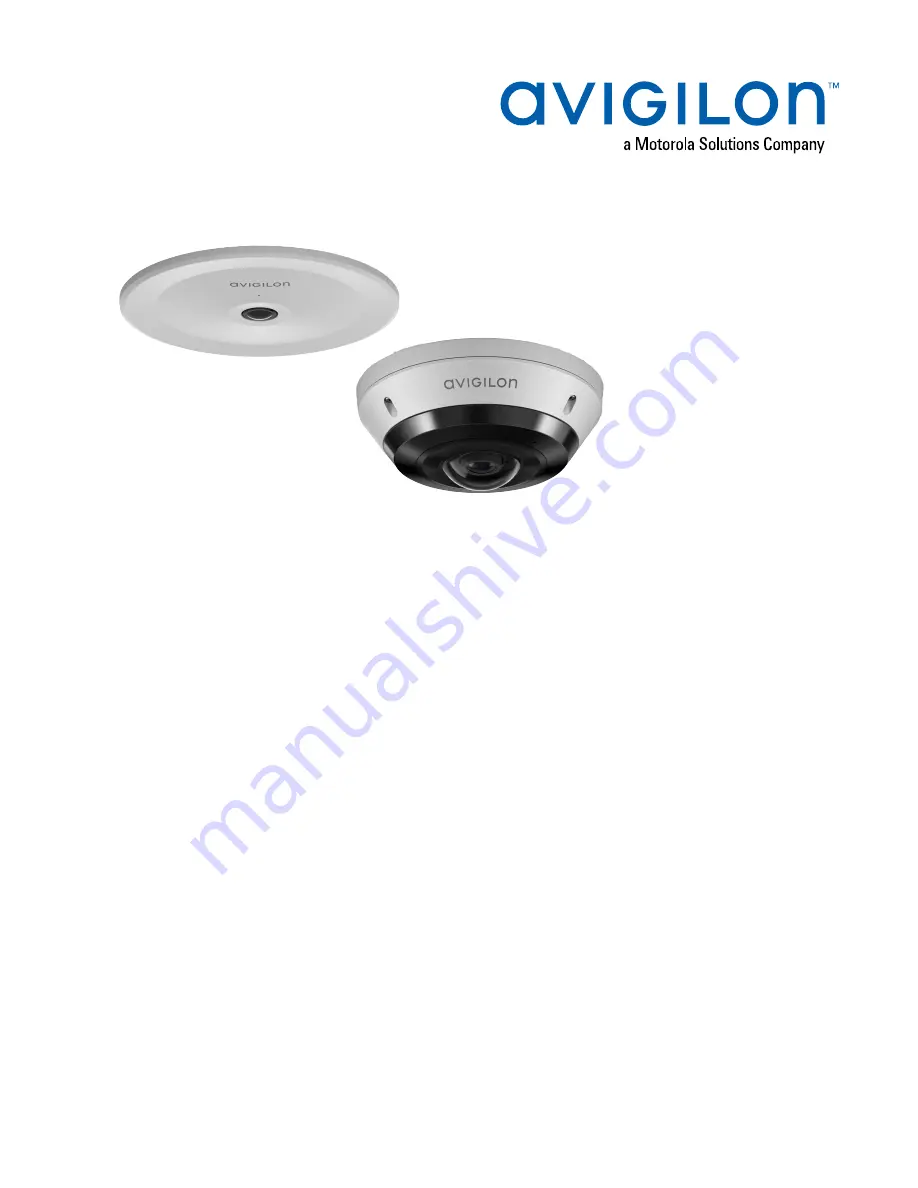
Avigilon™ H5A Fisheye Camera Models:
8.0C-H5A-FE-DO1
12.0W-H5A-FE-DO1
8.0C-H5A-FE-DO1-IR
12.0W-H5A-FE-DO1-IR
8.0C-H5A-FE-DC1
12.0W-H5A-FE-DC1
Page 1: ...Installation Guide Avigilon H5A Fisheye Camera Models 8 0C H5A FE DO1 12 0W H5A FE DO1 8 0C H5A FE DO1 IR 12 0W H5A FE DO1 IR 8 0C H5A FE DC1 12 0W H5A FE DC1...
Page 2: ...min 26 W min with IR model or PoE 11 W min 26 W min with IR model l Do not connect directly to mains power for any reason CAUTION Failure to observe the following instructions may result in injury to...
Page 3: ...een the equipment and the receiver l Connect the equipment into an outlet on a circuit different from that to which the receiver is connected l Consult the dealer or an experienced radio TV technician...
Page 4: ...n trademark patent or other intellectual property rights of Avigilon Corporation or its licensors Disclaimer This document has been compiled and published using product descriptions and specifications...
Page 5: ...nting and Aiming Video Analytics Cameras 13 Preparing the Cables 13 Inserting an Ethernet Cable through the Single Hole Grommet 14 Inserting Cables through the 3 Hole Grommet 15 Surface Mount Installa...
Page 6: ...ting Cables 51 Installing the Fisheye Cover 52 Connecting to the Camera 54 Initializing a Camera Username and Password 54 Assigning an IP Address 54 Accessing the Live Video Stream 55 Optional Configu...
Page 7: ...Limited Warranty and Technical Support 65 vii...
Page 8: ...screws Star shaped captive screws to fix the dome cover to the base 3 IR illuminator Provides scene illumination in the IR spectrum for supported camera models 4 Microphone Built in audio receiver 5...
Page 9: ...Microphone on page 55 4 Power connector block Accepts an external DC power connection when Power over Ethernet is not available 5 microSD card slots x2 Accepts up to two microSD cards for onboard stor...
Page 10: ...l number and part number label Bottom View 1 Mounting slots The mounting points for the camera If using the optional electrical box wall plate adapter or NPT adapter align the mounting posts with the...
Page 11: ...ole An entry hole for the cables required for camera operation Wall Plate Adapter View 1 Cable entry holes Entry holes for the cables required for camera operation 2 Camera mounting posts Align the mo...
Page 12: ...ncorrect orientation H5A FE DC In Ceiling Mount Cover View 1 In ceiling cover Discreet cover which can be painted to blend into the mounting surface 2 Cover lock Locking point for securing the cover t...
Page 13: ...l Enabling the Microphone on page 55 4 Power connector block Accepts an external DC power connection when Power over Ethernet is not available 5 microSD card slots x2 Accepts up to two microSD cards f...
Page 14: ...le An entry hole for the cables required for camera operation 11 I O connector block Provides connections to external input output and audio devices 12 Serial number tag Device information product ser...
Page 15: ...on H5A FE MT NPTA Pendant Mount NPT Adapter View Note The NPT pipe and NPT female to NPT female adapter are not supplied by Avigilon and should be sourced separately However if you are using the NPT a...
Page 16: ...that fits properly into the cable entry hole area of the camera base Post will prevent installation in the incorrect orientation 8 Camera mounting posts Align the mounting posts on the pendant NPT ada...
Page 17: ...t Female NPS thread mount for pendant camera installations 2 Pendant wall mount screws Screws for securing the pendant wall mount to the mounting bracket 3 NPT pipe entry hole A 3 4 NPT threaded hole...
Page 18: ...of the camera packaging 2 Connect a network cable to the RJ45 plug on the configuration cable The network cable must provide PoE IEEE 802 3af Class 3 to power the camera during configuration 3 Connec...
Page 19: ...provided star shaped screwdriver to loosen the screws Note Be careful not to scratch or touch the dome bubble The resulting marks or fingerprints may affect the overall image quality Keep the protecti...
Page 20: ...ortant Video analytics are not currently supported when the H5A Fisheye camera is mounted on a wall and looking horizontally at the scene l We recommend installing the camera above 2 74 m 9 feet l The...
Page 21: ...et You must pull the required Ethernet cable through the single hole sealing grommet included with the camera 1 Remove the sealing grommet from the accessory kit 2 Pull the tab on the grommet to open...
Page 22: ...o the camera follow this procedure for using the 3 hole sealing grommet to insulate the cables from the weather 1 Remove the sealing grommet from the accessory kit 2 Thread the Ethernet cable into the...
Page 23: ...Thread the additional cables through the secondary grommet holes Threading thin cables through the secondary holes may require the use of silicone sealant at the opening to ensure weather proofing 5 D...
Page 24: ...ock l Optional conduit shroud for side entry conduit cabling l 3x screws and anchors for securing the camera to the mounting surface l 3 hole rubber grommet for multi cable installations l Single hole...
Page 25: ...se make note of the direction the orientation arrow is facing This will help you to align the camera body in the same orientation when installing When installing the camera to a wall make sure that th...
Page 26: ...ing Template drill 3 pilot holes into the mounting surface for the mounting screws If you are mounting the camera to a wall make sure the up orientation arrow is at the top or the video image will be...
Page 27: ...ting slots on the camera base to the drilled pilot holes and use the provided self tapping screws to secure the camera to the mounting surface 6 Pull the required cables through the rubber sealing gro...
Page 28: ...required cables will be run along the mounting surface Use this procedure if the mounting surface is difficult to drill into or if the cables must be routed outside of the mounting surface 1 Using the...
Page 29: ...ea of the mounting template 3 Hammer the supplied plastic anchors into the holes 4 Arrange and feed the required cables through the conduit 5 Loosen the screw holding the cable entry tab on the side o...
Page 30: ...onal conduit shroud to the cable entry tab position The conduit shroud is compatible with up to 1 2 conduits 7 Pull the required cables through the cable entry hole on the camera base Mounting the Cam...
Page 31: ...use the provided self tapping screws to secure the camera to the mounting surface Tip Make sure the cables run through the space provided by the conduit shroud and that they are not pinched 9 Pull th...
Page 32: ...trical components and cables must be contained in an electrical gang box To mount the camera to an electrical gang box you must use the provided wall plate adapter 1 Install the electrical gang box as...
Page 33: ...the wall plate adapter to the electrical gang box 4 Pull the required cables through the electrcal box and a cable entry hole on the wall plate Then feed the cables through the cable entry hole on the...
Page 34: ...the camera base with the arrow on the wall plate adapter Align the mounting slots on the camera base to the mounting posts on the wall plate adapter and push the camera base onto the adapter Mounting...
Page 35: ...he right end of the mounting slots 7 Tighten the mounting posts to fix the camera base into place 8 Pull the required cables through the rubber sealing grommet For more information see Preparing the C...
Page 36: ...d around the grommet should line up with the cable entry hole The rubber grommet should be pressed firmly into the cable entry hole to create a seal Connecting Cables Refer to the diagrams in the Over...
Page 37: ...802 3at Class 4 power is required for maximum LED power l PoE IEEE 802 3af Class 3 is sufficient to power camera models without IR LEDs IR model cameras will have reduced LED power with IEEE 802 3af...
Page 38: ...1 Attach the lanyard to the cover 2 Attach the cover to the base and tighten the screws with the star shaped screwdriver 3 Remove the plastic cover on the dome bubble Installing the Fisheye Cover 31...
Page 39: ...p for use with single hole rubber grommet only Installation Steps Complete the following sections to install the device Mounting in the Correct Orientation The H5A Fisheye camera provides 360 views of...
Page 40: ...diagram below Mounting in the Correct Orientation 33...
Page 41: ...ting template to cut an entry hole for the camera into the ceiling Mark or otherwise make note of the position of the orientation arrow so that the other parts can be mounted in the same orientation I...
Page 42: ...en pull the required cables through the adapter Ensure the orientation arrow on the adapter is facing the same direction as it did on the mounting template 3 Pull off the elastic clamp retainer holdin...
Page 43: ...al arms extend outside the mounting adapter 5 With your thumb on the outside edge of the mounting adapter and your forefinger on one of the orange clamp handles pinch the clamp down until the clamp is...
Page 44: ...mounting adapter mount the camera base to the adapter 1 Attach the lanyard on the mounting adapter to the anchor on the camera base 2 Pull the required cables through the cable entry hole on the came...
Page 45: ...in ceiling adapter and push the camera base onto the adapter 4 Twist the camera base clockwise until the posts come to the right end of the mounting slots and the alignment feature is in the locked po...
Page 46: ...hat the orientation arrows on the in ceiling adapter and camera base point in the same direction 6 Pull the required cables through the rubber sealing grommet For more information see Preparing the Ca...
Page 47: ...curely seated on the inside and outside of the cable entry hole 8 Use the cable clip to hold the Ethernet cable in the correct position Connecting Cables Refer to the diagrams in the Overview section...
Page 48: ...e following methods l Power over Ethernet PoE IEEE 802 3af Class 3 If PoE is available the LEDs will turn on l External Power Connect an external 12 V DC power source to the power connector block For...
Page 49: ...Attach the lanyard to the in ceiling cover 2 Push the in ceiling cover onto the camera base 3 Rotate the cover clockwise while pushing up so that it clicks into place Installing the In Ceiling Cover 4...
Page 50: ...adapter for electrical box installations l Star shaped screwdriver l Power terminal block l Optional conduit shroud for side entry conduit cabling l 3x screws and anchors for securing the camera to th...
Page 51: ...cables through the NPT conduit pipe 2 Apply thread seal tape to the pipe and screw on the 1 1 2 NPT female to NPT female pipe adapter 3 Screw the lock nut onto the NPT adapter 4 Apply thread seal tape...
Page 52: ...the cables will be pulled from inside the mounting surface use the cable entry hole at the rear of the pendant wall mount l If the cables will be coming out of an external conduit pipe use the 3 4 NPT...
Page 53: ...5 Pull the required cables through the preferred cable entry hole on the pendant wall mount l If you are using the pipe entry hole pull the cables through the pipe conduit then the wall mount Next ap...
Page 54: ...he wall mount to the bracket Use the T20 star shaped key provided in the camera package 7 Loosely thread the lock nut onto the NPT adapter then secure the NPT adapter into the pendant wall mount Mount...
Page 55: ...NPT Adapter Before installing the camera you must first prepare either the wall mount or NPT pipe mount Note The following steps show installation of the camera into NPT adapter installed onto a pipe...
Page 56: ...e entry hole 2 Align the mounting slots on the camera base to the mounting posts on the NPT adapter and push the camera base onto the adapter 3 Twist the camera base clockwise until the posts come to...
Page 57: ...mounting posts to fix the camera base into place 5 Pull the required cables through the rubber sealing grommet For more information see Preparing the Cables on page 13 Installing the Camera into the N...
Page 58: ...d around the grommet should line up with the cable entry hole The rubber grommet should be pressed firmly into the cable entry hole to create a seal Connecting Cables Refer to the diagrams in the Over...
Page 59: ...802 3at Class 4 power is required for maximum LED power l PoE IEEE 802 3af Class 3 is sufficient to power camera models without IR LEDs IR model cameras will have reduced LED power with IEEE 802 3af...
Page 60: ...1 Attach the lanyard to the cover 2 Attach the cover to the base and tighten the screws with the star shaped screwdriver 3 Remove the plastic cover on the dome bubble Installing the Fisheye Cover 53...
Page 61: ...ater or version 6 14 12 or later when connecting a camera in the factory default state the client software will ask you to create a new user For more information see the Avigilon Control Center Client...
Page 62: ...ity of 64 GB or more Video Speed Class microSD card required with Class V10 or better recommended If the microSD card does not meet the recommended capacity or write speed the performance of the onboa...
Page 63: ...the microphone that is built into the camera o External Source Gain configures the gain for any line level audio input that is connected to the audio input connector on the I O terminal block For more...
Page 64: ...is connected to a third party network management system you can configure the camera s specialty features in the camera s web browser interface For more information see the Avigilon High Definition H...
Page 65: ...s on the power connector block The connection can be made with either polarity Use a small slotted 5 64 or 2 mm blade width screwdriver to loosen and tighten the terminals 4 Attach the power connector...
Page 66: ...activate connect the Input to the Ground pin To deactivate leave disconnected or apply between 3 15 V 4 Audio Input line level 5 Audio Ground 6 Audio Output line level An external power amplifier sho...
Page 67: ...the camera s web user interface For more information see the Avigilon High Definition H4 and H5 IP Camera Web Interface User Guide Troubleshooting Network Connections and LED Behavior Note For any of...
Page 68: ...firmware revert button Resetting through the camera s web interface will not produce the desired result l A different LED blinking pattern than those described above Perform a factory reset of the cam...
Page 69: ...ings Use the firmware revert button to reset the device The firmware revert button is shown in the following diagram 1 Ensure the camera is powered on 2 Remove the cover 3 Press the reset button 4 The...
Page 70: ...H4 and H5 IP Camera Web Interface User Guide 1 Locate and make note of the MAC Address MAC listed on the Serial Number Tag for reference 2 Open a Command Prompt window and enter the following commands...
Page 71: ...structions provided To clean the dome bubble l Use hand soap or a non abrasive detergent to wash off dirt or fingerprints l Use a microfiber cloth or non abrasive fabric to dry the dome bubble Importa...
Page 72: ...Avigilon warranty terms for this product are provided at avigilon com warranty Warranty service and technical support can be obtained by contacting Avigilon Technical Support avigilon com contact Lim...