background image

44 

C

USTOMIZING

 Y

OUR

 N

AVUS

 > C

USTOMIZING


THE

 M

AP

 P

AGE

The Line, Point City, and Area Tabs contain two common settings: 

Text Size and Max Zoom: 
 

Text Size

: Specifies how large or small the names of items on 

your Map page appear. If you do not want the name of an item to 

appear on the Map page, select 

Off

 in the 

Text Size

 field. 


Max Zoom

: Specifies the maximum map scale at which a map 

item displays. If 

Auto

 is selected, the maximum map scale is 

determined by the 

Map Detail

 setting on the Map tab (see page 

43

) to prevent the map from becoming too cluttered. If 

Off

 is 

selected, the item does not display.

Some map data is only visible at certain zoom scale ranges. For 

example, you may set 

Street Label

 (from the Line tab) to a 

Max 

Zoom

 of 200 miles, but the street names would not show above a 0.8 

mile zoom scale. Setting the 

Max Zoom

 to 

Auto

 generally gives the 

best display performance.

Resetting Map Setup Default Settings

You may reset (restore) map settings for each individual setup tab, or 

you can reset map settings for all five tabs at once. 

To reset the map setup default settings:

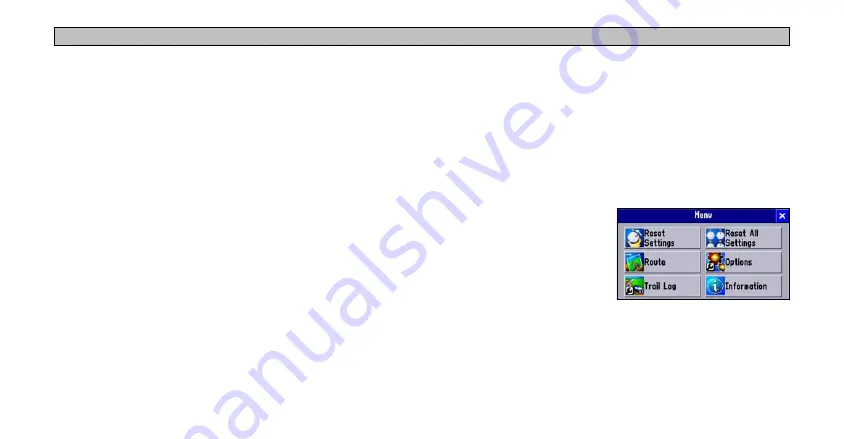
1.  While on the Map Setup page, select the tab (Map, Line, Point, 

etc.) you wish to restore to the original settings.

2.   Press the 

MENU

 key. A reset menu appears.

3.  To restore the settings for the 

current tab selection, select 

Reset Settings

.


To restore the settings for all 

tabs on the Map Setup page, 

select 

Reset All Settings

.

Summary of Contents for Navus

Page 1: ...Owner s Manual...

Page 2: ...r any purpose without the express prior written consent of DaimlerChrysler Motors Company LLC and Garmin Information in this document is subject to change without notice DaimlerChrysler Corporation re...

Page 3: ...ice simulator mode page 8 To learn more about GPS page 56 To learn safety information pages 1 2 Contact Garmin If you should encounter any dif culty while using your Navus or if you have any questions...

Page 4: ...e 8 Navus Operation 9 Learning How to Use the Map Page 9 Viewing the Map Page for the First Time 9 Map Page Features 10 Driving and Routing Modes 16 Changing the Map View While Driving 17 Looking Ahea...

Page 5: ...d Area Tabs 43 Resetting Map Setup Default Settings 44 Changing the Data Tabs 45 Customizing the Overall Setup 48 Restoring your Navus s Original Settings 48 General Tab 49 Guidance Tab 50 Routing Tab...

Page 6: ...n or damage may result Use a clean dry lens cloth to remove dust from the touchscreen Carefully wipe the display to prevent scratches Water isopropyl alcohol or eyeglass cleaner can be used if needed...

Page 7: ...ol while you are driving Pull over in a safe and legal manner and location before you attempt such operations Do not use the navigation system to route you to emergency services such as police and re...

Page 8: ...ith an alternate route The map database supplied with the product contains the most recent map data that was available to us at the time of production We use Navteq data sources Some communities may c...

Page 9: ...Feature Keys Used to perform speci c tasks such as opening the Menu page and nding places See page 6 for more information Power Key Press to turn the Navus on or off Feature Keys Used to perform speci...

Page 10: ...ccessory position so that your Navus will turn on automatically Once on the Navus looks for satellites Make certain your Navus has an unobstructed view of the sky as it looks for satellites For exampl...

Page 11: ...lar to the one shown below Step 5 To create a route to this restaurant touch Go To which is located at the bottom of the Food Drink page A Route Preference window appears Touch Faster Time Step 6 View...

Page 12: ...you press and hold the MENU ROUTE key for more than two seconds a Route page appears PAGE MARK Key PAGE switches between a variety of pages that you can view on your Navus It also returns you to a ma...

Page 13: ...n 1 Press the unit s MENU key Select Options 2 Touch the Display tab 3 Press the unit s FIND key to begin calibration Follow the on screen instructions Adjusting the Speaker Volume To adjust the speak...

Page 14: ...en keyboards letters or numbers that are not needed do not appear on the keyboard Practice Using the Navus in Simulator Mode Consider practicing the unit s operation by using the simulator mode prior...

Page 15: ...s before navigating an actual route so that you can quickly understand what you are seeing on the Map page and reduce the time spent looking away from the road while driving Viewing the Map Page for t...

Page 16: ...our vehicle is stationary Map Toolbar You can display a map toolbar on the left side of the map The tools icons enable you to zoom in and out of the map To view the map toolbar simply touch any part o...

Page 17: ...view areas not currently visible This action is called panning While in panning mode the data tabs on the right of the screen are hidden Press the box zoom to activate it and then draw a box on the t...

Page 18: ...tion of travel always appears at the top of the Map page If you are headed South the Map page shifts so that South appears at the top of the Map page Change the orientation from North Up to Track Up o...

Page 19: ...to detail map as you zoom in Detail map at 200 foot zoom Base map at 20 mile zoom Data Tabs The right side of the Map page displays data tabs which display a variety of information about your trip su...

Page 20: ...r The panning arrow circled is highlighting a point of interest When the i icon appears touch it to view information about the selected object or location In the example on the right the University of...

Page 21: ...ter hovers over an existing map object When the map pointer points to an area where no map data exists a ag icon appears in the upper right side of the Map page To save this area as a waypoint touch t...

Page 22: ...avel address of your current position and the name of the next road ahead Map Page in Driving Mode In routing mode the map displays map details your current location your route is marked a blue colore...

Page 23: ...u can use this feature in driving mode and routing mode Looking Ahead on the Map Page In the example at left your current driving position always appears on the map You can also look ahead on the map...

Page 24: ...as the distance to that turn As you are close to approaching the upcoming turn the Next Turn page appears The message is announced to alert you in case you need to change lanes and start looking for...

Page 25: ...Estimated time enroute time until you reach the turn and the estimated time of arrival at the turn The numbered column shows how many miles until the next turn The Current Route page keeps a log of y...

Page 26: ...displayed on the Trip Information page Be certain to reset the Trip Information page before beginning a trip To reset the trip information or the maximum speed 1 From the Trip Information page press...

Page 27: ...Log 1 Make certain the desired Mileage Log name is displayed Then press the unit s MENU key to display a Menu page 2 Select Rename Log 3 Enter the new name by using the on screen keyboard that appear...

Page 28: ...ing the time the vehicle has been in motion since the Trip Computer was last reset Overall Avg Your average speed of travel including time stopped during the time the Navus has been tracking your loca...

Page 29: ...You can also search for Chrysler Dealers To nd a place and route to it 1 Press the FIND key The Find menu appears 2 Select an option that will help you nd your destination such as Food Drink or Chrys...

Page 30: ...t point the voice guidance tells you the direction and distance to your destination Use this option if you are travelling on obscure roads or off road Other Ways to Find Places When you are in driving...

Page 31: ...not in your immediate location For example if you are physically in Kansas and you want to nd a hotel in Colorado select Near Other and a map of the U S appears Touch an area in Colorado that is close...

Page 32: ...ty type the name of the city using the on screen keyboard 5 Select Enter a State Province and select your desired state or province from the list that appears 6 Select Postal Code to type the zip code...

Page 33: ...ft corner of the page if you want to mark the address or intersection as a waypoint Touch Show Map if you want to see it on the Map page Re ning Your Search Always try to narrow your search as much as...

Page 34: ...a waypoint Touch Show Map if you want to see it on the Map page Finding Exits Select Exit from the Find menu to search for highways freeways and interstates throughout the U S This information is usef...

Page 35: ...f the interstate or highway you are searching for Finding Waypoints You can search for waypoints that you have created and stored in your Navus by selecting Waypoints from the Find menu See page 15 fo...

Page 36: ...information page and the Navus calculates a route to it Select an option from the Route Preference window if necessary See page 24 for more information Other Ways to nd Recent Finds To re ne your sear...

Page 37: ...u plan to visit For example we chose Fraser CO 2 While still on the information page for Fraser press the FIND key and select Lodging to look for a place to stay in Fraser In our example we chose Kare...

Page 38: ...te Planning a Route Planning routes is fast and easy once you become familiar with and understand the various steps and options To plan a new route 1 Press and hold the MENU key A Route Menu page appe...

Page 39: ...e menu appears 2 Select Save A Route Saved window appears It includes the name of your current completed route 3 If necessary change the name of the route to something more meaningful to you by touchi...

Page 40: ...oute 2 Select Route List and highlight the intended route Information about that route appears 3 Select Rename to personalize the route name if necessary by using the on screen keyboard 4 Select Delet...

Page 41: ...dow appears You can alter your route for either 1 2 1 2 5 or 15 miles If you are in New York City for example and you see that the next few blocks are unusually congested with traf c you might want to...

Page 42: ...rip Itinerary page listing your current destination appears 2 Select Add Extra Stop An Add Extra Stop page appears with two options for nding your location Use Map or Find 3 Select an option from the...

Page 43: ...Select the stop you want to move and press the Up or Down arrow to change the order of the stop in the route Repeat until the stops are in the desired order 4 Select Done when nished To create a route...

Page 44: ...The Navus avoids all roads types that have a check mark in the Avoid box To avoid a road 1 Press and hold the MENU key for two seconds to view the Active Route menu Select Routing Setup The Routing t...

Page 45: ...ect a rectangular area to avoid on your routes A Map page appears enabling you to mark a start point 5 Touch the rst corner of the area you want to avoid and touch the check mark in the right corner A...

Page 46: ...es A window asking you to verify that you want to route home appears Select Yes and your Navus directs you to your HOME waypoint To set a HOME waypoint 1 Press and hold the MENU key A Route Menu page...

Page 47: ...r HOME Waypoint If you travel frequently you may want to change your HOME waypoint to a new location such as a hotel or your meeting place so you can nd your was in unfamiliar surroundings To change y...

Page 48: ...ngs or default settings do not need to be changed in order for your unit to function completely If you do not like the settings you can change some or all of them See the page 48 for instructions on r...

Page 49: ...w background Night shows a black background which provides easier viewing while driving at night Auto allows your Navus to automatically switch between the two at sunrise and sunset AutoZoom When On t...

Page 50: ...me map data is only visible at certain zoom scale ranges For example you may set Street Label from the Line tab to a Max Zoom of 200 miles but the street names would not show above a 0 8 mile zoom sca...

Page 51: ...f you do not want them to appear while you are driving Information displayed while you are just driving Information displayed while you are routing Your Navus includes three tab styles that contain pr...

Page 52: ...ng tab and then for the Routing tab To create your own customized data tabs 1 From the Tab Setup page select the Mapping or Routing tab 2 Press the MENU key on the unit The Menu page appears 3 From th...

Page 53: ...ch the X in the upper right corner To change the data tab color From the Tab Setup page select the color box to display a list of optional tab colors The Mapping and Routing tabs must be the same shad...

Page 54: ...Guidance To change a setting within each tab simply touch the down arrow associated with that setting A drop down box of options appears Touch the option you desire Restoring your Navus s Original Se...

Page 55: ...n messages as drive point eight miles west then turn right Status messages include phrases such as lost satellite reception Route Guidance The unit speaks guidance messages during route navigation as...

Page 56: ...Off The Next Turn page never appears SPEAK Key Only The Next Turn page appears when you press the SPEAK key Automatic Only The Next Turn page automatically appears as you approach a turn Both The Next...

Page 57: ...but it might not nd the best route Quick Calculation This takes a bit more time to calculate than the Quickest Calculation method but generates a better quality route Better Route This generates an ev...

Page 58: ...s setting is equivalent to the Faster Time setting on the Route Preference window see page 50 As you continue to drive with your Navus it remembers and stores your driving habits If you want your unit...

Page 59: ...Offset eld appears in the Time Zone eld Touch UTC Offset and then manually enter the difference between UTC and the local time zone by using the on screen keyboard that appears If you are not certain...

Page 60: ...ting does not affect the display of map data or user entered data Map data such as city street and point of interest names is always displayed in the language in which it is stored in the map Display...

Page 61: ...t recent ones The display of the trail log on the map can be turned on and off from the Main Menu page the default is Off This is primarily for users who are driving off road Clear Clears all of the p...

Page 62: ...ime it was received The time difference tells the GPS receiver how far away the satellite is Now with distance measurements from a few more satellites the receiver can determine your position and disp...

Page 63: ...d the satellite and is collecting data The corresponding number s on the sky view is faintly highlighted Solid signal strength bar The GPS receiver has collected the necessary data and the satellite s...

Page 64: ...ired with good geometry have been locked onto a two dimensional position x is being calculated Reads 2D Diff Nav if WAAS enabled 3D Navigation At least four satellites with good geometry have been loc...

Page 65: ...sures that the Navus is searching for the correct satellites and is useful if you have traveled over 500 miles with the unit turned off GPS Information Page Options To display the GPS Information page...

Page 66: ...k the view of these satellites When this occurs WAAS reception may be unavailable even though normal GPS reception remains unaffected and fully operational Information Opens the Information page which...

Page 67: ...CF Door toward you to open it 2 Push the eject button to the left of the CF card Continue to push the eject button until the CF card ejects 3 Gently slide the card out of the unit To insert the prepr...

Page 68: ...also includes a database of all Chrysler Dealers When the Enabled box is checked your Navus uses the map data from the source to build the map in your Navus To disable a map uncheck the box by touchin...

Page 69: ...om products navus Viewing Software Information The Software Information page displays the software version that is currently loaded in the Navus It also shows the Navus s unit ID number which is used...

Page 70: ...quipment generates uses and can radiate radio frequency energy and if not installed and used in accordance with the instructions may cause harmful interference to radio communications However there is...

Page 71: ...that the Software is the property of Garmin and is protected under the United States of America copyright laws and international copyright treaties You further acknowledge that the structure organizat...

Page 72: ...full details and a copy of the limited warranties This product its packaging and its components contain chemicals known to the State of California to cause cancer birth defects or reproductive harm Th...

Page 73: ...Hiding 13 17 Date 53 Daylight Savings 53 Defaults 48 Detail Maps 62 Detail Maps Info 62 Detours Adding 35 Differentially Corrected 60 Driving Mode 16 F FIND Key 6 G General Tab 49 GPS is Off 58 H Hid...

Page 74: ...s Deleting 34 Detours 35 Modifying 35 Recalculating 35 Renaming 34 Resuming 33 Saving 34 Stopping 33 Via Points 36 ROUTE Key 6 Route Preference 50 Custom 51 Off Road 50 Routing Mode 16 S Searching Sky...

Page 75: ......

Page 76: ...e subject to change without notice 2005 DaimlerChrysler Motors Company LLC Chrysler Jeep Dodge and Mopar are registered trademarks and Navus is a trademark of DaimlerChrysler Corporation Garmin is a r...

Reviews: