background image

11 

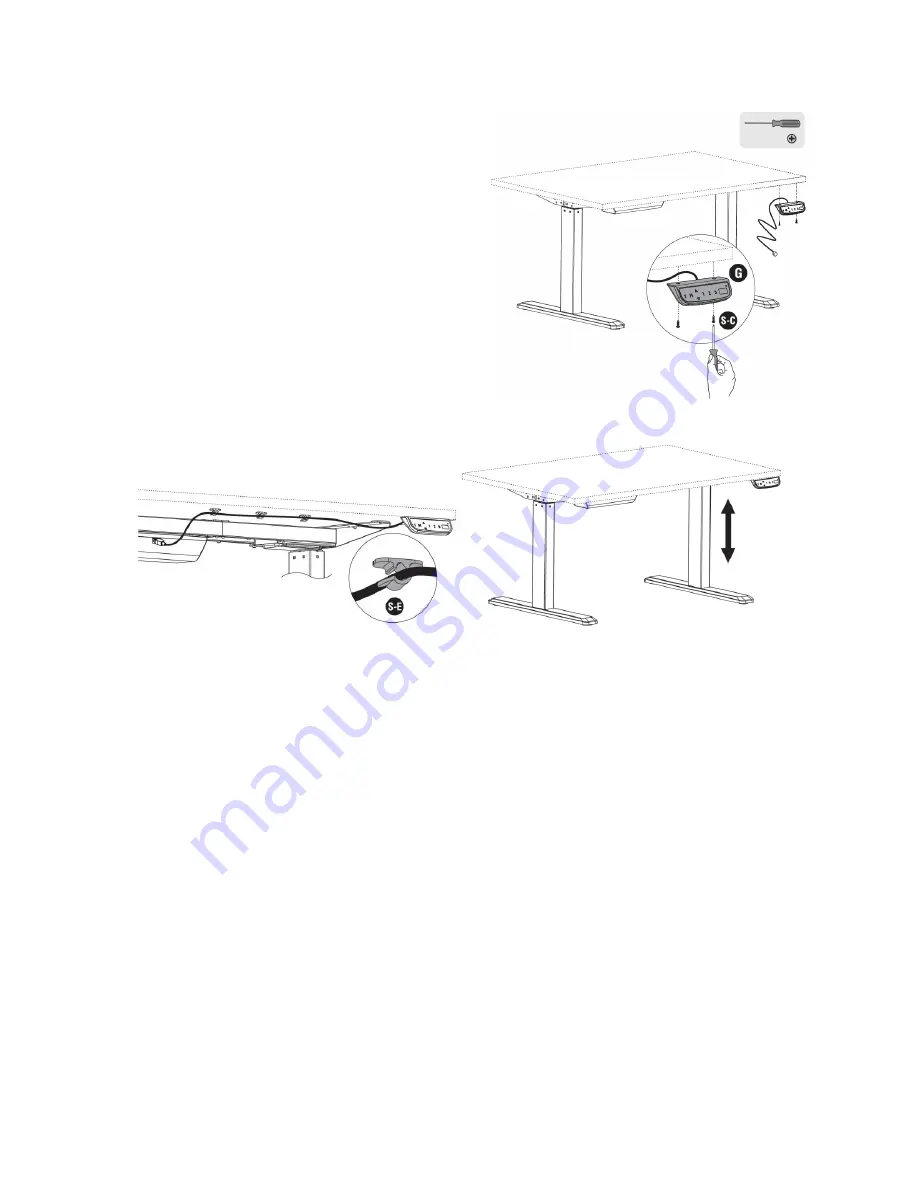
18.


Using 2x Screws (S-C) and a #2 Phillips 
screwdriver (not included), attach the 
Control Panel (G) to the underside of 
your desktop. Do not overtighten the 
screws 

19.


Remove the protective film from 3x 
Cable Clips (S-E), then attach them to 
the underside of the desktop. Next feed 
the cable lead from the Control Panel 
(G) into each of the Cable Clips (S-E) 
and close each clip. 


Congratulations, your desk is fully assembled and ready for use! 


SYSTEM RESET 

When it is used for the first time or after certain faults have occurred, the system needs to 
be reset so that it accurately displays the desktop height. Perform the following steps to 
reset the unit. 

1.


Upon power on, the system will beep and the current height will be displayed on 
the Control Panel (G) Display. 

2.


Press and hold the 

 button on the Control Panel (G) until the desk is in the fully 

down position, then release the button.


3.


Press and hold the 

 button for 5 seconds. The display will show RST, then the 

display will show 65.0, which is the desktop height in centimeters. 


Summary of Contents for 15722

Page 1: ......

Page 2: ...ICE 4 PACKAGE CONTENTS 4 RECOMMENDED TOOLS 6 CONTROL PANEL OVERVIEW 6 ASSEMBLY 7 SYSTEM RESET 11 OPERATION 12 Movement 12 Memory 12 Timed Reminder 12 Screensaver Mode 13 Power Saving Mode 13 TECHNICAL SUPPORT 13 TROUBLESHOOTING 14 REGULATORY COMPLIANCE 15 Notice for FCC 15 ...

Page 3: ...a proper ground connection Do not modify the plug or use a cheater plug to bypass the ground connection Take care to prevent damage to the power cord Do not allow it to become crimped pinched walked on or become tangled with other cords Ensure that the power cord does not present a tripping hazard Never unplug the unit by pulling on the power cord Always grasp the connector head or adapter body Th...

Page 4: ...t into any space and accommodate wide desktops CUSTOMER SERVICE The Monoprice Customer Service department is dedicated to ensuring that your ordering purchasing and delivery experience is second to none If you have any problem with your order please give us an opportunity to make it right You can contact a Monoprice Customer Service representative through the Live Chat link on our website www mono...

Page 5: ...per Supports C 2x Base Supports D 1x Lifting Column E 1x Lifting Column F 1x Control Panel G 1x Power Cord H 2x Extension Cords I 20x Screws S A 8x Screws S B 2x Screws S C 1x Allen Key S D 3x Cable Clips S E 8x Rubber Pads S F ...

Page 6: ...NDED TOOLS The following common tools are recommended for assembly These tools are not included 2 Phillips Screwdriver Powered Screwdriver with 2 Phillips Screwdriver Bit Carpenter s Level CONTROL PANEL OVERVIEW ...

Page 7: ...s facing up 2 Using the included Allen Key S D loosen the eight screws near the center of the frame 3 Expand the frame to a length appropriate for your desktop not included Depending on the length of your desktop it is advised to leave 4 8 of desktop overhang at each end 4 Using the included Allen Key S D tighten the eight screws 5 Using a 2 Phillips Screwdriver not included remove the four screws...

Page 8: ...y S D and 4x Screws S A attach the Upper Supports C to the ends of the Telescopic Frame A as shown in the images below 8 Using the included Allen Key S D and 8x Screws S A attach the Lifting Columns E and F to the Telescopic Frame A ...

Page 9: ... Supports B as shown in the image above and to the right 11 Connect one end of one of the Extension Cords I into the lead on one of the Lifting Columns E or F then plug the other end into the Control Unit B Repeat using the second Extension Cord I and the other Lifting Column E or F 12 Plug the Control Panel G into the side of the Control Unit B 13 Plug the Power Cord H into the Control Unit B the...

Page 10: ...C Ensure that the desktop is straight and evenly supported 16 Using 8x Screws S B and your powered screwdriver with 2 Phillips bit not included attach the desktop to the Upper Supports C 17 Each of the individual feet can be adjusted up or down to fine tune the level Use a carpenter s level not included to ensure that the desktop is level on both its length and width and adjust the feet accordingl...

Page 11: ...bled and ready for use SYSTEM RESET When it is used for the first time or after certain faults have occurred the system needs to be reset so that it accurately displays the desktop height Perform the following steps to reset the unit 1 Upon power on the system will beep and the current height will be displayed on the Control Panel G Display 2 Press and hold the button on the Control Panel G until ...

Page 12: ...can use to remind yourself of the need to change your working position The timer can be set from 0 5 2 0 hours in 0 5 hour increments To set the timer press the T button The display will flash 0 5h Then press the T button repeatedly to increment the time on the display to the desired length of time Once the desired length of time is displayed wait for the display to stop flashing and the LED in th...

Page 13: ... mode momentarily pressing any of the buttons will have no effect Press and hold the M button for 3 seconds to exit power saving mode and allow further operation TECHNICAL SUPPORT Monoprice is pleased to provide free live online technical support to assist you with any questions you may have about installation setup troubleshooting or product recommendations If you ever need assistance with your n...

Page 14: ...movement has caused the desktop to reach the minimum height before it thinks it should or the overcurrent protection circuit has been triggered three times Remove any obstacles and perform a System Reset to clear the error ER2 The system has overheated and needs time to cool down The error code will clear automatically when operation can be resumed ER3 There is a motor cable connection problem Che...

Page 15: ...pursuant to Part 15 of the FCC Rules These limits are designed to provide reasonable protection against harmful interference in a residential installation This equipment generates uses and can radiate radio frequency energy and if not installed and used in accordance with the instructions may cause harmful interference to radio communications However there is no guarantee that interference will no...

Reviews: