


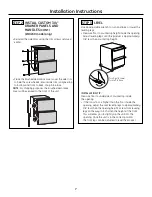


STEP 2 INSTALL CUSTOM 3/4"
DRAWER PANELS AND HANDLES
(ZIDI240 model only)
3/4" Overlay Panel Dimensions
Model ZIDI240 requires field-installed
overlay drawer panels.
• The overlay panels must be secured
to 1/4" thick backer panels that
slide into the trims. A .10" thick
spacer panel must be placed
between the overlay and backer
panels.
• Custom handles of your choice,
supplied by your cabinet maker,
must be installed on these overlay panels. Countersink
all screws into the backer panels. Screws cannot
protrude from the backer panels.
IMPORTANT NOTE:
Maximum total weight for custom
drawer panels are 25 pounds (12-1/2 pounds maximum
each drawer).
Assemble overlay panels with
glue and screws.
• Center spacer panel on the
backer panel, left to right
and top to bottom. Secure
the panels with glue.
• Center the spacer/backer panel
on the overlay panel. Secure with glue and screws.
Countersink all screws into the backer panel.
3/4" Overlay Panel Dimensions
(in inches)
A (Width)
B (Height)
1/4" Backer
23-3/16"
14-11/16"
0.10" Spacer
22-1/2"
14-3/16"
3/4" Overlay
23-5/8"
15-1/16"
6
STEP 1 REMOVE PACKAGING
• Remove corner blocks and foam drawer stops.
• Remove all packing material, tape and protective
plastic coverings.
CAUTION:
Small objects are a choke
hazard for children. Remove and discard any parts not
used.
ATTENTION :
Les petits objets
peuvent étrangler les enfants. Il faut jeter toutes
les piéces qui ne sont pas utilisées.
Overlay
Panel
1/4"
Backer
Panel
Drawer
.10 Inch
Spacer
Spacer Panel
Backer Panel
Overlay Panel
STEP 2 INSTALL CUSTOM 3/4"
DRAWER PANELS AND
HANDLES
(CONT.)
(ZIDI240 model only)
Install custom drawer panels and handles:
• Open drawers.
• Remove 2 screws holding each trim; lift trims off.
Retain screws.
• Custom handles of your choice, supplied by your
cabinet maker, must be installed onto the overlay
panels before they are slid into the trims. Countersink
all screws into the backer panels. Screws cannot
protrude from the backer panels.
• Slide overlay panels into the trims.
Installation Instructions
Handle
Custom
Drawer Panel
Screws Must
Be Countersunk
Into Panel
A
B
B
12-1/2 lbs. max.
12-1/2 lbs. max.
*
*Maintain a 1/4" min. gap between
top and bottom drawer panels.


