System Hardware Features
22
0112-0109 H
The panel has two lights as well as the Interrupt button. From the top
of the panel these are:
•
Assay Running (Locked)—Yellow light
The FLIPR
®
Tetra System is performing a task. The upper and
lower doors are locked and cannot be opened until the task
finishes or is halted using the Interrupt button.
•
Assay Finished (Unlocked)—Green light
No tasks are being run and it is safe to open the upper and
lower instrument doors.
•
The Interrupt button is an override button to halt all tasks, so
you can access the instrument. If pressed the yellow light
flashes until the system has reached a safe state to open the
doors, when the green light comes on.
CAUTION!
The Interrupt button immediately ends the experiment and
should only be used in emergencies. The system may need to be
reinitialized by selecting
Reset
from the
Instrument
menu prior to
resuming normal instrument function.
Manual Mode
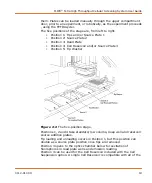
In manual operation all assay components must be positioned in the
five-position stage by hand, through the upper manual door, prior to
running an experiment. Once the experiment starts no further plate or
tip changes can be made. If you need to exchange plates or tips during
an experiment then you must run the FLIPR
®
Tetra System in Remote
Mode, using the TETRAcycler to replace used tips or plates.
The FLIPR
®
Tetra System always starts in
Manual Mode
. Toggle
between manual and remote modes with the
Set Manual Mode
and
Set Remote Mode
commands in the
Instrument
menu, or use the
software buttons available.
In Manual Mode, the TETRAcycler gripper parks itself on the plate-
landing pad.
Note:
The top compartment door should remain closed during normal
system operation. Do not operate the instrument if the door is open.
All system functions halt when the door is open.
Summary of Contents for FLIPR Tetra
Page 1: ...FLIPR Tetra High Throughput Cellular Screening System User Guide 0112 0109 H December 2011...
Page 12: ...Contents 12 0112 0109 H...
Page 16: ...System Overview 16 0112 0109 H...
Page 40: ...System Hardware Features 40 0112 0109 H...
Page 148: ...Exchanging Hardware 148 0112 0109 H...
Page 156: ...Calibration and Signal Test 156 0112 0109 H...
Page 196: ...Running an Experiment 196 0112 0109 H...
Page 232: ...Robotic Integration 232 0112 0109 H The following drawings illustrate these requirements...
Page 282: ...Data Processing Algorithms 282 0112 0109 H...
Page 294: ...Consumables and Accessories 294 0112 0109 H...
Page 298: ...Using AquaMax Sterilant 298 0112 0109 H...
Page 302: ...Electromagnetic Compatibility EMC 302 0112 0109 H...


