


0112-0109 H
129
6
Exchanging Hardware
Exchanging Pipettor and Pin Tool Heads
The following procedures instruct you on how to exchange pipettor and
pin tool heads and their respective wash reservoirs on the FLIPR
®
Tetra
System.
Uninstalling a Pipettor or Pin Tool Head
The following procedure uninstalls a 384 pipettor head as an example.
To uninstall a 384 pipettor head:
1.
Unload all tips that may be present on the pipettor head by
selecting
Unload Tips
from the
Instrument/Manual
Operation
menu of the ScreenWorks Software.
2.
Select
Change Head
from the
Instrument/Manual
Operation
menu. This command instructs the pipettor head to
move over the Read Plate position.
CAUTION!
DO NOT select
DONE
in the dialog that opens until you
have completed work on the pipettor.
3.
Open the upper front door to access the pipettor head.
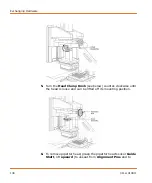
4.
Turn the
D-Axis Knurled Nut
(see below) counter-clockwise
until it loosens and can be lifted.
For 1536 pipettor heads only: After loosening the
D-Axis
Knurled Nut
, install the
Pipettor Head Guard
, which seats
over the 1536-pipettor head plungers, by tightening the two
thumb screws. This guard protects the plungers from being
damaged while the pipettor head is being handled outside the
instrument.
Note:
All pipettor and pin tool heads must be installed and calibrated
on their intended instrument for the first time by a certified Molecular
Devices Field Service Engineer. Once calibrated, each head can be
easily exchanged but only on the instrument for which they were
calibrated.
If you have any questions or concerns regarding the above procedure,
please contact Molecular Devices Technical Support at
+1-800-635-5577.
Summary of Contents for FLIPR Tetra
Page 1: ...FLIPR Tetra High Throughput Cellular Screening System User Guide 0112 0109 H December 2011...
Page 12: ...Contents 12 0112 0109 H...
Page 16: ...System Overview 16 0112 0109 H...
Page 40: ...System Hardware Features 40 0112 0109 H...
Page 148: ...Exchanging Hardware 148 0112 0109 H...
Page 156: ...Calibration and Signal Test 156 0112 0109 H...
Page 196: ...Running an Experiment 196 0112 0109 H...
Page 232: ...Robotic Integration 232 0112 0109 H The following drawings illustrate these requirements...
Page 282: ...Data Processing Algorithms 282 0112 0109 H...
Page 294: ...Consumables and Accessories 294 0112 0109 H...
Page 298: ...Using AquaMax Sterilant 298 0112 0109 H...
Page 302: ...Electromagnetic Compatibility EMC 302 0112 0109 H...