modway KIREI HIGH TV 180 2L Assembly Instructions Manual Download Page 1

Page 1 of 11

Before you start, here are some helpful advice: 

1

.

We suggest you spend a short time reading through this leaflet and then follow the simple step-by-step

instructions.

2

.

 it is assembled by two adults, on a carpeted or   

    padded area, in the room that it is intended for. Approximate assembly time: 70 minutes. 
3

.

Please do not use any tools other than those provided or recommended in these instructions.

4

.

Please do not throw away any of the packaging or instructions until you have checked all the components and

hardware and the furniture is fully assembled.

5

.

Assemble all components loosely until advised to tighten. Depending on use, it may be necessary to tighten the

components from time to time, so please save the tools that have been provided.

6

.

Please keep all pieces out of reach of children.

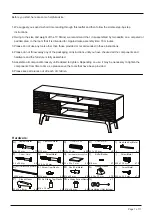
Owing to the size and weight of the TV Stand, we recommend that

Q)

x 4

L)

x 9

G)

x 4

B)

CamLock/Metal

Ø 15 mm

Ø 15 mm

x 17

R)

x 4

M)

x 4

H)

x 4

C)

Dowel/Wood

Ø 8 x 30 mm

x 50

P)

x 2

K)

x 1

F)

x 4

A)

Cambolt/Metal

Ø 6 x 35 mm

x 17

S)

N)

x 18

I)

x 1

D)

x 9

O)

x 18

J)

x 14

E)

Screw/Metal

x 1

Hardware :

Screw/Metal

25 x 25 x 2 mm

Floor Protector/Sponge/Felt

M 7 x 50 mm

Screw/Metal

5.5 x 35 mm

1200 mm

Anti-Deflection Bar/Metal

Screwdriver (Not Include)

x 1

L 4

Hex/Allen Key/Metal

M 6.4 x 53 mm

Ø 8 mm

Buffer/Rubber

Screw/Metal

M 6 x 12.5 mm

Screw Cup/Plastic

Ø 5 x 15 mm

Shelf Pin/Metal

9 x 14 x 10 mm

Wedge/Plastic

M 3.5 x 15.5 mm

Screw/Metal

42 x 14 x 8 mm

Stoper/Plastic

Ø 8 x 19 mm

Pin Sliding Top/Plastic

Ø 8 x 16 mm

Pin Sliding Bottom/Plastic

Summary of Contents for KIREI HIGH TV 180 2L

Page 1: ...y to tighten the components from time to time so please save the tools that have been provided 6 Please keep all pieces out of reach of children Owing to the size and weight of the TV Stand we recomme...

Page 2: ...r Board 1 x1 Center Board 5 x1 Frame Door Right x1 Center Board 2 x1 Fixed Shelf x1 Assembly Leg x2 Support 1 x2 Back Board 1 x1 Back Board 2 x1 Support 2 x2 Adjustable Shelf x1 Frame Door Left x1 Cen...

Page 3: ...Page 3 of 11 STEP 1 Hardware required Screwdriver not included Ax4 Cx26 Sx1 Hardware required Screwdriver not included Ax9 Cx4 Sx1 STEP 2...

Page 4: ...Page 4 of 11 STEP 3 STEP 4 Hardware required Bx4 Sx1 Hardware required Dx3 Ex1...

Page 5: ...Page 5 of 11 STEP 5 STEP 6 Hardware required Screwdriver not included Hardware required Bx2 Lx2 Sx1 Dx6 E...

Page 6: ...Page 6 of 11 STEP 7 STEP 8 Hardware required Screwdriver not included Jx14 Kx1 Sx1 Hardware required Screwdriver not included Ax4 Cx16 Sx1...

Page 7: ...Page 7 of 11 STEP 9 STEP 10 Bx2 Sx1 Hardware required Screwdriver not included Bx2 Sx1 Hardware required Screwdriver not included...

Page 8: ...Page 8 of 11 STEP 11 STEP 12 Hardware required Cx4 E Fx4 Gx4 Hx4 Sx1 Hardware required Screwdriver not included G H E F...

Page 9: ...Bx7 Lx7 Sx1 STEP 13 Page 9 of 11 STEP 14 Hardware required Screwdriver not included Hardware required Mx4...

Page 10: ...Page 10 of 11 STEP 15 Hardware required Ix1 Px2 Qx4 Rx4 STEP 16 Hardware required...

Page 11: ...Page 11 of 11 STEP 17 STEP 18 Hardware required Screwdriver not included Nx18 Ox18 Sx1...

Reviews: