background image

Motion Alerts and Regions of Interest

Exclusion Zones

Exclusion Zones

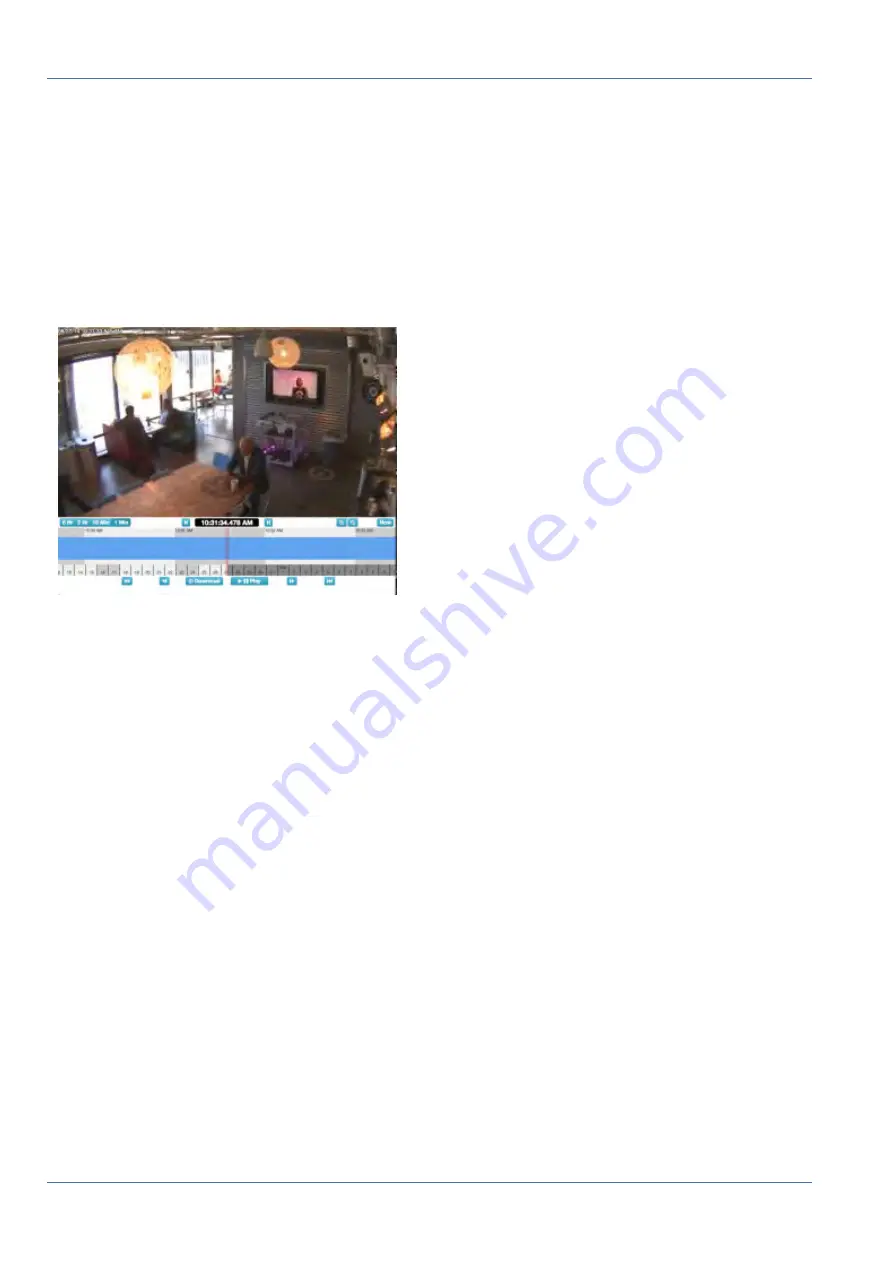
Often there is repetitive motion in a scene that you want to ignore. A great example of this is a TV or a sway-
ing tree. Having constant motion makes it difficult to quickly find the item you are looking for.
In this scene, there is a TV in view of the cameras that will appear as constant motion. As you can see from 
the blue streak across the timeline, it is difficult to find when people walked through the area. We want to 
mask out the TV from triggering motion.

 Fig. 59: Field of view without motion tuning

76 / 102

Summary of Contents for Cloud Bridge

Page 1: ...User Guide MOBOTIX Cloud 2020 MOBOTIX AG V02_5 14 2020 ...

Page 2: ...Connectors Rear 15 MOBOTIX Cloud Bridge Dimensions 16 Installation and Setup 17 Overview 18 Optional Bridge and Camera Settings 24 Introduction 25 The MOBOTIX Cloud Bridge 26 Cameras for the MOBOTIX Cloud 27 The Web User Interface 27 Bridges 28 Cameras 29 Layouts 31 Camera Settings 35 Configuring Cameras 36 Bridge Settings 45 Configuring the Bridge 46 General Settings 46 Metrics Settings 47 2 102 ...

Page 3: ...Gallery Viewer 71 Motion Alerts and Regions of Interest 75 Exclusion Zones 76 Creating Notifications 78 Bandwidth Considerations 83 Balancing the Bandwidth 84 Bandwidth Usage and Recommendations 88 Maps 91 Using Maps 92 System Alerts and Notifications 97 Using System Alerts and Notifications 98 Technical Specifications 101 3 102 ...

Page 4: ...4 102 ...

Page 5: ...5 102 2 Support ...

Page 6: ...ir support cannot help you they will contact the support channel to get an answer for you as quickly as possible If you have Internet access you can open the MOBOTIX help desk to find additional information and soft ware updates Please visit www mobotix com Support Help Desk 6 102 ...

Page 7: ...7 102 3 Imprint ...

Page 8: ...on This document is protected by copyright Passing on information to others is not permitted without prior written consent of the manufacturer Violations will be subject to criminal punishment Patent and Copy Protection All rights reserved Trademarks or registered trademarks belong to the corresponding owners Address MOBOTIX AG Kaiserstrasse 67722 Langmeil Germany Phone 49 6302 9816 103 E Mail sal...

Page 9: ...9 102 4 Notices ...

Page 10: ...act your local sales representative for information on network requirements n Handle the device with care Do not apply shock or drop the device Failure to adhere may cause the device to malfunction n This device is designed to be used indoors n Do not directly disconnect device from the power when running Power down by pressing the power button on the front of the device n Do not use the device in...

Page 11: ...11 102 5 Legal Notes ...

Page 12: ...e Use of Certain Hazardous Substances in Electrical and Electronic Equipment RoHS Directive 2011 65 EC as far as they are subject to these regulations for the RoHS Declaration of MOBOTIX please see www mobotix com Sup port Download Center Marketing Documentation Certificates Declarations of Conformity Disposal Electrical and electronic products contain many valuable materials For this reason we re...

Page 13: ...13 102 6 Delivered Parts Connectors and Dimensions ...

Page 14: ... Delivery MOBOTIX Cloud Bridge Scope of Delivery Scope of Delivery MOBOTIX Cloud Bridge Item Count Description 1 1 1 MOBOTIX Cloud Bridge 1 2 1 Wall mount 1 3 1 Power cord 1 4 3 External power supply 1 5 1 Important Safety Instructions 1 6 1 MOBOTIX Cloud Attach ID 14 102 ...

Page 15: ...MOBOTIX Cloud Bridge Connectors Front MOBOTIX Cloud Bridge Connectors Rear Delivered Parts Connectors and Dimensions MOBOTIX Cloud Bridge Connectors Front 15 102 ...

Page 16: ...Delivered Parts Connectors and Dimensions MOBOTIX Cloud Bridge Dimensions MOBOTIX Cloud Bridge Dimensions 16 102 ...

Page 17: ...17 102 7 Installation and Setup ...

Page 18: ...1MP HD camera we recommend about 500 kbps upload speed per camera Consumer grade bandwidth is acceptable You do not need business grade DHCP Enabled It is best to make sure the router supplied by your Internet provider has DHCP enabled The MOBOTIX Cloud Bridge and most cameras will use DHCP IP addresses by default If you need to implement static IP addresses on either the MOBOTIX Cloud Bridge or t...

Page 19: ...thernet PoE switch to the CamLAN port of the MOBOTIX Cloud Bridge The MOBOTIX Cloud Bridge CamLAN port provides DHCP addresses for the cameras and is non routable to the WAN Alternatively cameras may be connected to the same switch as the WAN port of the bridge If you are using managed switches be sure to enable Multicast Log Into your MOBOTIX Cloud Reseller Account and Create a Customer Account L...

Page 20: ... account for testing or evaluation you need to delete it from the previous account before you can add it to another account Bridges cannot be re used between customers They need to be returned to MOBOTIX so that the data can be erased and the hardware re certified A new bridge is required for each new customer location Fig 2 Adding a bridge to MOBOTIX Cloud Fig 3 Attaching a bridge to MOBOTIX Clou...

Page 21: ...he camera system n Set a secure password for the web interface and ONVIF access use the same user name and password for both the web interface and ONVIF access n Activate HTTPS for connections n Disable public access n Configure basic settings n Ethernet settings DHCP static IP address n Basic image and exposure settings n Apply proper settings for time and date To download MOBOTIX MxManagementCen...

Page 22: ...o cameras appear after five minutes cycle the power on the cameras Some camera manufacturers only reply to ONVIF commands when the camera is first started If the bridge is started after the camera it may never be discovered without restarting the camera To further troubleshoot connect a laptop to the network with the cameras and scan to see if the cameras appear on the network Note Some camera man...

Page 23: ...the down arrow in the top right of the camera s preview to open the Actions menu see Fig 7 Camera Action menu Select the appropriate recording and resolution settings You may have to enter the ONVIF username and password for MOVE or ONVIF cameras see optional settings below in Fig 6 Camera settings Fig 6 Camera settings Fig 7 Camera Action menu Installation and Setup Overview 23 102 ...

Page 24: ...ss you will need to connect a monitor and key board to the bridge You can login to the admin interface with user admin and the password is the last five digits of the Bridge s serial number In the admin interface choose Configure Network then WAN and fill in all of the fields to set the static IP address Camera Static IP Addresses You can configure the cameras with static IP addresses There are no...

Page 25: ...25 102 8 Introduction ...

Page 26: ... that sur veillance is in use Local Display like all items in the MOBOTIX Cloud VMS is managed and configured from the cloud Bridge Failure The bridge is hardware that is located on the customer s premise It is a basic computer similar to a PC or the insides of an NVR or DVR and is therefore susceptible to hardware failure The MOBOTIX Cloud data cen ter is a fully redundant and distributed system ...

Page 27: ...y and crossover in the communications with the cameras to do this reliably A camera should only com municate with the MOBOTIX Cloud VMS Camera Quality and Camera Failures Today s digital IP cameras are very complex They contain a tremendous amount of software and hardware The software almost always has security issues and serious bugs It is common for these cameras to crash and hang The MOBOTIX Cl...

Page 28: ...oud account before you can record video add cameras or perform any other functions Adding a Bridge From the Dashboard click the Add bridge button in the lower right corner to add the bridge to your account You will need the Attach ID which is packaged with the bridge Fig 8 Adding a bridge to MOBOTIX Cloud 28 102 ...

Page 29: ...bridge is added and attached to your account you will be able to add cameras and start the recording process Fig 9 Attaching a bridge to MOBOTIX Cloud by entering the Attach ID Cameras Once a bridge has been attached to an account it will begin to scan the network for compatible cameras It will scan on both the WAN and CamLAN sides of the network We recommend only connecting cameras to the CamLAN ...

Page 30: ...wer cycled to be discovered You can add an available camera by clicking on the Plus button to the right of the camera s name When adding a new camera the camera will be configured and a preview image of the camera will appear Some times the camera may take up to one minute or longer for the preview image to appear because some cam eras are very slow to configure and setup You can now edit the came...

Page 31: ... the same across the web interface and the mobile devices You can control which layouts users get access to Creating a Layout Choose Layouts from the navigation menu on the left You can create your first layout by clicking the Create a Layout button in the bottom right corner Fig 12 Creating a layout Introduction The Web User Interface 31 102 ...

Page 32: ...youts Fig 13 Layouts menu Select New Layout from the menu and a new layout will appear under Layouts You will automatically be prompted to Add Cameras as shown in Fig 14 Adding cameras to a layout To add cameras to an existing layout click on the layout and then from the Layouts menu select the Add Cameras button A new dialog allows selecting from the available cameras Use the Filter box to enter ...

Page 33: ...Fig 14 Adding cameras to a layout Introduction The Web User Interface 33 102 ...

Page 34: ...ct ratios for the cameras along with the maximum number of cameras per row and the option to show the camera name above each preview window Fig 15 Layout settings Deleting Layouts You may delete a layout by selecting the Delete Layout option from the Layouts menu You will be promp ted to confirm this before the layout is deleted 34 102 ...

Page 35: ...35 102 9 Camera Settings ...

Page 36: ...ameras Configuring Cameras You can configure common settings across all added cameras Such settings include retention resolution bandwidth bit rate motion settings and alerts Specific options will change based on the camera 36 102 ...

Page 37: ...ssword used to access the camera For MOBOTIX MOVE cameras this is the user name and password for ONVIF access If you have stored the username and password in Account Camera Settings this list of passwords you will not need to enter the passwords again here This is useful if you have many cameras and you are using the same password on all of them Note When changing user names passwords of cameras a...

Page 38: ...guring Cameras Fig 16 Camera settings Retention Cloud Retention Sets the number of days that recorded video will be kept in the cloud Note that changing this value may affect billing Fig 17 Camera Retention Settings 38 102 ...

Page 39: ... preview video to the cloud The bridge will not exceed this bandwidth for transmission A low value will cause the previews to appear slowly when viewing them in a layout Note You should not set the total of your preview video maximum bandwidths to more than 50 of your total available bandwidth Full Video Recording Resolution Resolution that will be used for H 264 recording with full frame rate Qua...

Page 40: ...t you can also select to do full recording all the time Keep in mind that the preview video is always recorded n Always Requires at least double the amount of upload bandwidth n EVENT This setting makes the most efficient use of bandwidth and also helps to quicker find inter esting video clips recommended setting Fig 18 Camera resolution settings 40 102 ...

Page 41: ... be over ridden for the region The values specified for the region will be used instead of the master values for any objects that are in the region Alert Check this box to activate alerts for any motion detected in the region Alerts can have a specified period when they are active For example you could have motion alerts only when the office is closed or at night Alert When This sets the time to t...

Page 42: ... for holidays Alert Level The level of the alert can be specified here The users can specify that they only want to receive alerts that are HIGH LOW or Both This allows limiting the alerts that users will receive Fig 19 Motion detection settings Audio Audio Enabled Enables audio recording if the camera has audio capabilities Copy Audio To Enables audio to be copied from one camera to other cameras...

Page 43: ... the camera Street Address Address where the camera is located Latitude Longitude The coordinates of the camera Azimuth The direction into which the camera is looking Range The approximate distance the camera can see Floor If in a building the floor the camera is located on You may change floors for the camera on a map by changing the number here To delete a camera from the map delete all entered ...

Page 44: ... this camera Packet Loss A graph of packet loss between the camera and the bridge If this graph shows red it means that your network may have problems Check the cabling and resolve the packet loss problem between the camera and the bridge for reliable operation Fig 22 Camera bandwidth utilization Fig 23 Camera packet loss 44 102 ...

Page 45: ...45 102 10 Bridge Settings ...

Page 46: ...tify the bridge The time zone of the bridge is also used on all cameras con nected to the bridge The Default Transmit Bandwidth enables the user to decide how much bandwidth should be used to upload recorded video The default setting is Auto and will use 30 of available measured upload bandwidth The camera transmit default setting of Background will use the settings here for Default Transmit Bandw...

Page 47: ...up the latitude and longitude if you only provide the street address city state and zip code Fig 25 Bridge location information Metrics Settings Our bridge tracks and analyzes information locally These graphs help the installer understand what is going on with the system and how it can be optimized Bridge Settings Configuring the Bridge 47 102 ...

Page 48: ... uploading historic videos that have been saved locally to the bridge Fig 26 Bridge bandwidth utilization Bandwidth Measured This graph shows the average upload bandwidth speed between the bridge and the cloud The data is col lected as actual video is being sent to the cloud and it is a very good representation of the available band width Fluctuations in bandwidth are also shown and this informati...

Page 49: ...ter several days showing a sus tainable amount of data uploaded vs recorded Fig 28 Bridge storage activity Disk Space This shows the total available space on the attached storage The useable data is limited to 80 of the total capacity to prevent fragmentation and allow additional headroom if settings change Fig 29 Bridge disk utilization Bridge Settings Configuring the Bridge 49 102 ...

Page 50: ... show the selected layout on the video output of the bridge s HDMI or Display Port connectors Select the lay outs you wish to use check Local Display on Monitor and press Save Changes Each camera s preview size and quality in the camera settings determines the size and quality of the preview shown on the local display Fig 30 Bridge local display settings 50 102 ...

Page 51: ...51 102 11 User Management ...

Page 52: ...User Management Managing Users Managing Users User management appears for those with Admin or User Admin permissions Fig 31 User management 52 102 ...

Page 53: ...dress and choose a password The email link is only valid for 72 hours and can be resent if needed Fig 32 Adding a user Deleting Users You may remove users by clicking on the trashcan icon A dialog will ask you to confirm this action Once users are deleted their account cannot be recovered They need to be re created as a new user if they need access again Fig 33 Deleting a user User Management Mana...

Page 54: ...ser access can be controlled using this screen Disabled users will no longer be able to log into the MOBOTIX Cloud VMS You can also set the time period of the day that users can log in and the actions that users can take Fig 34 User access 54 102 ...

Page 55: ...b account Management of all users in a sub account Ability to add delete and modify all users including admins only available to master users n Edit All and Add This refers to devices only ability to add edit delete bridges and cameras View Pre views and Metrics are enabled automatically with this permission n Edit Master Users Management of master users who are not admin users Ability to add dele...

Page 56: ... Per User Settings Cameras It is possible to restrict access to cameras on a per user basis This is accomplished in the User Settings dia log on the Cameras tab shown below To hide cameras from a user drag them from the Access to the No Access side Fig 35 Restricted cameras 56 102 ...

Page 57: ...cting access on a per camera basis you can also restrict or grant access to cameras based on layouts This screen allows you to indicate which layouts a user can access Fig 36 Restricted layouts User Management Managing Users 57 102 ...

Page 58: ...User Management Managing Users 58 102 ...

Page 59: ...59 102 12 History Browser ...

Page 60: ...normally move the image one second forwards or backwards n The and buttons will move the image from one key image to the next forward or backward When the system is recording full video normally due to motion detection it will select key images in the video These key images are normally in the middle of the video and allow you to see an important part of a motion event For example if you are tryin...

Page 61: ... an entry for the video and will also indicate when the video is ready to download The online notification indicator will also appear in the upper right when the video is ready for downloading Fig 38 Online notification indicator History Browser Overview 61 102 ...

Page 62: ...e full video segment under the cursor or the selected region Zooming the Image You can zoom the video image when looking at preview or full video Press the mag nifying glass to do so Now Mode The Now button will move the cursor to the current time It will continually update the timeline with data and attempt to keep the cursor at the latest image 62 102 ...

Page 63: ...40 The History Browser Selecting Portions of Video The History Browser allows you to select a section of video using Shift click for the beginning and Shift click for the end of your selection The selected region will appear in yellow You can download or play the selected portion of the video Fig 41 Selecting a portion of video to download or play History Browser Overview 63 102 ...

Page 64: ...allery Viewer The mode is selected from the drop down shown next to the zoom buttons n The time based mode shows an image at a fixed time variation Note the black vertical bars added to the history browser time display These bars indicate when the images above are selected from The center image is at the red cursor n The motion event mode will select the key frame from each motion event n The reco...

Page 65: ...ack hoodie is in the room Fig 43 History Browser with no video selected After playing the video we see that he comes into the room at 03 33 47 682 PM and leaves the room at 03 37 18 424 PM By holding Shift we can click and drop a start pin We can drop the end pin the same way The area between the pins is highlighted you can remove the highlighted area by clicking any where inside the highlighted a...

Page 66: ...8 Hr 2 Hr 10 Min or 1 Min as shown in Fig 45 History Browser zoom level The darker gray and lighter colors each indicate whatever time span is selected by the zoom The dates at the bottom also show weekdays in lighter color and weekends in darker gray The darkest gray is future Fig 45 History Browser zoom level 66 102 ...

Page 67: ...ton while moving it left and right Fig 46 History Browser scrolling by time You may also scroll through dates by clicking holding and dragging on the dates at the bottom of the history browser See Fig 47 History Browser scrolling by dates Fig 47 History Browser scrolling by dates History Browser Using the History Browser 67 102 ...

Page 68: ... historic video as shown in Fig 48 History Browser calendar Fig 48 History Browser calendar Popup Time Selector To jump directly to a specific hour minute and second in the History Browser click directly on the time dis play to access the popup as shown in Fig 49 History Browser time selector Fig 49 History Browser time selector 68 102 ...

Page 69: ...ld to get con tinued advance of frames Fig 50 History Browser Previous and Next frame Previous and Next Video The Previous Video and Next Video buttons are shown in History Browser Previous and Next video p 69 The History Browser is advanced to the start of the next or previous dark blue area marked as full video recording Fig 51 History Browser Previous and Next video History Browser Using the Hi...

Page 70: ...r isolated door entryway They are also used when sending alerts Pressing either button and holding down will advance to the next or previous key images successively Fig 52 History Browser Previous and Next key image Marking an Area Fig 53 History Browser Mark an area illustrates how to mark an area for playback or download whether it is a part of a recorded area or across several areas Shift click...

Page 71: ... ready for downloading Fig 54 History Browser Download and Play Zooming Click on the Zoom in button at the lower right to enlarge the preview of full video of the History Browser Zooming out past the original image size will open the Gallery Viewer Fig 55 History Browser zoom Using the Gallery Viewer The Gallery Viewer is opened automatically when zooming out of the History Browser You can also op...

Page 72: ... The time span between images depends on the current zoom level n 8 Hr zoom will show one frame every four hours n 2 Hr zoom will show one frame every hour n 10 Min zoom will show one frame every five minutes n 1 Min zoom will show one frame every 30 seconds Choosing Key Images will show only the key images Choosing Videos will show the first key image in a recorded video segment Click on a single...

Page 73: ...Fig 58 Gallery Viewer choose display History Browser Using the Gallery Viewer 73 102 ...

Page 74: ...History Browser Using the Gallery Viewer 74 102 ...

Page 75: ...75 102 13 Motion Alerts and Regions of Interest ...

Page 76: ... Having constant motion makes it difficult to quickly find the item you are looking for In this scene there is a TV in view of the cameras that will appear as constant motion As you can see from the blue streak across the timeline it is difficult to find when people walked through the area We want to mask out the TV from triggering motion Fig 59 Field of view without motion tuning 76 102 ...

Page 77: ... you can see the TV is triggering motion We can remove that by creating a new region and dragging a box around the TV We will name the region and enable the Disable Motion checkbox When finished hit Apply The Motion tab should now have a named region over the TV in the preview image Fig 61 Motion detection exclusion zone settings Motion Alerts and Regions of Interest Exclusion Zones 77 102 ...

Page 78: ...ine with the TV masked out It is significantly easier to find motion events Fig 63 History Browser tuned for motion detection Creating Notifications This example illustrates setting up email notifications on a door We want to get an email notification whenever someone enters or leaves The initial image is shown below 78 102 ...

Page 79: ...w region place it over the door and walkway to the door and name it Entry Exit Fig 65 Motion settings Check the Alert checkbox Select the time range in which you would like this alert to be active Motion Alerts and Regions of Interest Creating Notifications 79 102 ...

Page 80: ...ert Who Lastly specify if this should be considered a High or Low alert Every user can choose in their profile if they would like to be notified on Low and or High alerts Fig 68 Alert level After saving the region and pressing Apply the motion zone is highlighted on top of the preview image and the summary is listed 80 102 ...

Page 81: ...Fig 69 Alert summary Finally this is an example of an email notification Motion Alerts and Regions of Interest Creating Notifications 81 102 ...

Page 82: ...l alert example Notice that you can click the link in the email to be taken to that moment and begin playback in the History Browser If you are not logged in you will be prompted to login There is also a link that takes you to the notification settings for your user 82 102 ...

Page 83: ...83 102 14 Bandwidth Considerations ...

Page 84: ...andwidth example 1 In the above example the Bandwidth tab shows how much bandwidth the bridge is using over time The Bandwidth Measured tab shows the available upload network bandwidth to the bridge also over time Note the Storage tab it has both positive and negative If there is enough bandwidth there should be more neg ative than positive Positive shows the buffering of video on the bridge Negat...

Page 85: ...be transmitted The only solution is to either give more Internet bandwidth or adjust the video quality down If it continues at this rate without intervention then video will be purged and lost before it can be uploaded Fig 73 Bandwidth example 3 Notice the Disk Space tab where the disk space usage has increased slowly over the past few days You can see that the bandwidth has been not been as high ...

Page 86: ...ess that keeps regular daily hours then one such way is to set the business hours up via the user s account settings Fig 74 User account settings Open the Days tab next Fig 75 Account settings for days Here you can set the Work hours of the business In this example it is set from 8 00am to 5 30pm By doing this you will be able to maximize the available bandwidth outside of business hours To do thi...

Page 87: ...andwidth per camera so a four camera system that has 1600 kbps of bandwidth upload should work quite well This of course depends on what we call the duty cycle of the camera The duty cycle is the percentage of time from 0 to 100 that motion triggers recording So a camera with a duty cycle of 50 means that the high resolution video is buffered on the bridge half of the time There needs to be enough...

Page 88: ...ngle live stream between the bridge and our cloud are required This allows getting more cameras on the same bandwidth In addition full res olution video streams can be watched live or through our history browser Our bandwidth management gets the most out of available bandwidth Example 1 We have a low bandwidth customer who has successfully deployed eight HD cameras on our system on a 1 5 Mbps conn...

Page 89: ...ound bandwidth n On demand bandwidth Real time bandwidth is what the bridge and cameras use to send and receive metadata and preview images By default we set it to 50 kbps and recommend adjusting to 100 kbps or until image updates are smooth Fig 78 Camera settings resolution Background bandwidth is how we refer to background video uploading When video is saved to the bridge it goes into a queue an...

Page 90: ...width is the highest priority and will utilize all the bandwidth of real time and background settings When something is requested from the bridge that has not been uploaded yet it will be imme diately pulled from the bridge and sent to the client This is the case for live video Our cloud will also transcode the video into other formats depending on the client s request Live streaming has a couple ...

Page 91: ...91 102 15 Maps ...

Page 92: ...licking a camera on the map brings up the preview video of the camera Once the preview is visible the same controls are available as viewing cam eras from the Layouts or Cameras page Fig 81 Map example Camera Preview Multiple floors can be setup with separate views or viewed all at once The drop down menu in the upper right corner of the map allows selecting a specific floor or All Floors 92 102 ...

Page 93: ...the latitude and longitude By default the cameras are added to the 1st floor Changing the number will move the camera to that floor You can set floors from 10 to 100 The easiest way to add cameras is to go to the Map click the Map drop down button at the top left and select Edit Fig 84 Map edit This will add a red outline to the map indicating you are in Edit mode A new set of buttons will appear ...

Page 94: ...p down which will present a list of the available cameras Select the camera and it will be added to the map Fig 86 Camera on map To move the camera click and drag the circle directly on the camera To change the direction and range of the camera click and drag the circle farthest away from the camera Add additional cameras and floors then click the green Save button Your changes will be saved When ...

Page 95: ...by map placement Additional changes can be made such as moving the camera between floors in the camera settings To remove a camera from the map delete the street address latitude and longitude in Camera Settings Location Maps Using Maps 95 102 ...

Page 96: ...Maps Using Maps 96 102 ...

Page 97: ...97 102 16 System Alerts and Notifications ...

Page 98: ...ged into the MOBOTIX Cloud system open the user profile by clicking your name in the upper right corner Select My Profile and go to the Notifications tab Fig 88 User My Profile Check System for Notify on Alerts as shown in Fig 89 My Profile notifications Fig 89 My Profile notifications You may also select High and or Low alerts for motion alerts Select When to receive and the method you want to us...

Page 99: ...ors are turned on in the history browser as shown in Fig 90 Timeline colors This is very helpful for troubleshooting the system Offline Off Video Motion Internet Offline Fig 90 Timeline colors System Alerts and Notifications Using System Alerts and Notifications 99 102 ...

Page 100: ...System Alerts and Notifications Using System Alerts and Notifications 100 102 ...

Page 101: ...101 102 17 Technical Specifications ...

Page 102: ...set 3 5 mm n 1x IR Remote Control for future usage Encryption n TLS Version 1 2 n AES 256 proprietary algorithm n HTTPS Power Supply External Power Supply Power Requirements 100 240 V AC typ 10 Watt Cooling Fans None Dimensions W x H x D 127 x 45 x 127 mm 5 x 1 75 x 5 in Hard Disk 1x 2 5 SATA 1 TB included Net Storage 800 GB for 2 days on premise buffering Temperature Range 0 to 35 C 32 to 95 F Hu...

Reviews: