


FGC100 User Manual
11
5.1
Calibration of the spectrum measurement and the total flux
measurement
Follow these steps:
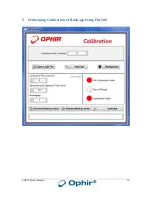
To calibrate the FluxGage click ‘Calibration’ on the top banner of the FluxGage software.
In the setting area, enter the total luminous flux of the FGC100. The value is provided
with the Disk-On-Key included in the FGC100.
Click ‘Open Light File’ and select the spectral calibration file provided with the Disk-On-
Key included in the FGC100.
If the file is loaded correctly, the ‘calibration file valid’ indicator will turn green.
Turn on the FGC100 lamp unit.
Press ‘Autoset’ and wait for the operation to complete.
In the setting area, select 30 averages.
Turn the FGC100 lamp unit off.
Press ‘Background’ and wait for the operation to complete.
Turn the FGC100 lamp unit on, and allow enough time to reach thermal stabilization
(~30minutes).
Press ‘Calibrate’ and wait for the operation to complete.
At the top of the screen, the measured flux of the calibration source will appear. It
should match the value entered in the settings area.
Click on the top right corner to exit the window.
5.2
Calibration of the total flux measurement only
Follow these steps:
To calibrate the FluxGage click ‘Calibration’ on the top banner of the FluxGage software.
In the setting area, enter the total luminous flux of the FGC100. The value is provided
with the Disk-On-Key included in the FGC100.
Press the push button to turn the FGC100 lamp unit on.
Press ‘Autoset’ and wait for the operation to complete.
In the setting area, select 30 averages.
Press the push button again to turn the FGC100 lamp unit off.
Press ‘Background’ and wait for the operation to complete.
Press the push button to turn the FGC100 lamp unit on, and allow enough time to reach
thermal stabilization (~30minutes).
Press ‘Calibrate’ and wait for the operation to complete.
At the top of the screen, the measured flux of the calibration source will appear. It
should match the value entered in the settings area.
Click on the top right corner to exit the window.
Summary of Contents for Ophir FluxGage FGC100
Page 1: ...Ophir Optronics Solutions Ltd FGC100 Calibration Unit FGC100 User Manual FluxGage FluxGage...
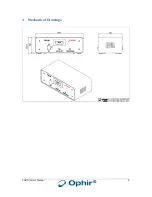
Page 6: ...FGC100 User Manual 6 3 Mechanical Drawings...
Page 8: ...FGC100 User Manual 8 Figure 5 FGC100 connected to FuxGage...
Page 10: ...FGC100 User Manual 10 5 Performing Calibration of FluxGage Using FGC100...