39
39
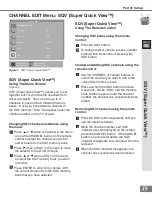
CHANNEL EDIT Menu: SQV (Super Quick View™)
SQV (Super Quick View™)
Using The Menu Screen
(Figure 1)
SQV (Super Quick View™) allows you to put
together a list of your favorite channels from
Ant-A and Ant-B. You can store up to 6
channels in each of the 9 different memory
banks. Once you have added a channel to
the SQV memory, “SQV” will appear under the
channel number on the TV screen.
Changing SQV channels and banks using
the menu:
1
Press or when at Channel in the menu
or use the CHANNEL button on the remote
control to select the channel you wish to
add or delete from a SQV memory bank.
2
Press when at SQV in the menu to move
the selector to the On/Off choice.
3
Press or when at SQV in the menu
to select the SQV memory bank you wish
to modify.
4
Press ENTER to add (On) or delete (Off)
the current channel from the SQV memory
bank that you have selected.
S
Q
V (
S
up
er Q
uic
k V
ie
w
™
)
ENTER for menu or to start
MENU to return
or change option
ENTER to confirm
CANCEL to cancel
ADJUST to select
MAIN MENU
CHANNEL EDIT menu
Antenna
: Ant-A
Channel
: 002
Memory
: Added
Name
: KCBS
SQV
: SQV1
Off
Figure 1.
SQV (Super Quick View™)
SQV (Super Quick View™)
Using The Remote Control
Changing SQV banks using the remote
control:
1
Press the SQV button.
2
To change memory banks, press a number
button within 5 seconds of pressing the
SQV button.
Viewing and Adding SQV channels using the
remote control:
1
Use the CHANNEL or number buttons to
select the channel you want to add to the
current SQV memory bank.
2
Press and hold the SQV button for about
3 seconds. When “SQV” and the memory
bank number appear under the channel
number, the channel has successfully been
added.
Removing SQV channels using the remote
control:
1
Press the SQV button repeatedly until you
see the desired channel.
2
While the channel number and SQV
indicator are still displayed on the screen,
press the CANCEL button. If the CANCEL
button is not pressed before the SQV
indicator disappears, the channel will not be
removed.
3
When the SQV indicator disappears, the
channel has successfully been removed.
Part lll: Setup
Summary of Contents for VS-50111, VS-60111, WT-42311,
Page 7: ...7 7 Introduction Thank You Letter 8 Unpacking Your New TV 9 Special Features 9...
Page 10: ......
Page 24: ......
Page 52: ......


