
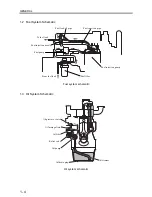
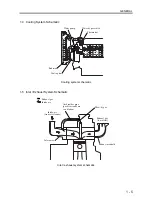
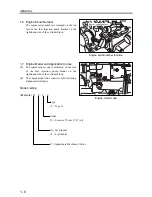
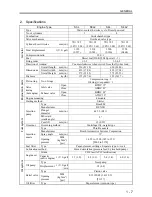
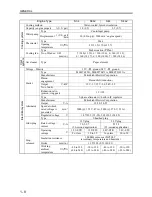


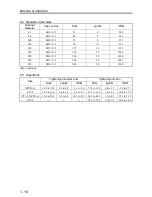


GENERAL
1 - 9
3. Disassembly
/
Reassembly Notes
This Service Manual specifies various procedures
recommended by Mitsubishi Heavy Industries, Ltd. for
servicing Mitsubishi diesel engines. These procedures
include, wherever appropriate, required special tools
and related safety precautions.
The instructions provided in this manual, however,
cannot fully guarantee safety as potential risks beyond
ordinary imagination are hidden everywhere.
When conduct any work, the following points should
also be observed in addition to the instructions this
manual.
3.1 Disassembly
(1)
Use tools and equipment that are appropriate for
the work being carried out.
(2)
Whenever necessary, use workbenches to work
on or sort parts out. Disassemble in accordance
with the disassembly sequence given in the
manual.
(3)
As parts are disassembled, place them neatly in
the order of removal to eliminate missing parts
on reassembly.
(4)
During disassembly, note the assembly marks.
Remember to respect these marks on reassembly.
Whenever appropriate, put additional assembly
marks to aid reassembly.
(5)
Before and during disassembly as well as during
subsequent washing, carefully check for any
abnormality or other fault which otherwise may
likely remain unnoticed afterwards.
(6)
Pay sufficient attention to ensure safety,
especially when lifting or carrying heavy
components and parts. (Use a jack or a chain
block as required.)
3.2 Reassembly
(1)
Parts excluding oil seals, O-rings, rubber sheets,
etc. should be thoroughly washed in wash oil and
completely dried using compressed air.
(2)
Use appropriate tools and equipment.
(3)
Use good-quality oil and grease. Never fail to
apply oil, grease, sealant and adhesive to the
relevant locations if so instructed in the manual.
Summary of Contents for diesel engines
Page 5: ......
Page 33: ...SERVICE STANDARDS 1 20 ...
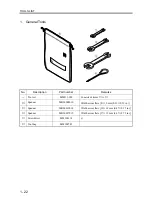
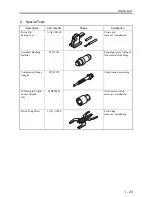
Page 34: ...1 General Tools 1 22 2 Special Tools 1 23 TOOLS LIST ...
Page 37: ...TOOLS LIST 1 24 ...
Page 41: ...OVERHAUL TIMING 1 28 ...
Page 46: ......
Page 47: ......
Page 61: ...ENGINE MAIN PARTS DISASSEMBLY 2 16 ...
Page 99: ...FUEL SYSTEM REMOVAL 3 8 ...
Page 115: ...FUEL SYSTEM DISASSEMBLY INSPECTION AND REASSEMBLY 3 24 ...
Page 119: ...FUEL SYSTEM INSTALLATION 3 28 2 Governor Installing the governor Installation sequence ...
Page 123: ...FUEL SYSTEM INSTALLATION 3 32 ...
Page 131: ...OIL SYSTEM DISASSEMBLY INSPECTION AND REASSEMBLY 4 8 ...
Page 143: ...COOLING SYSTEM DISASSEMBLY INSPECTION AND REASSEMBLY 5 8 ...
Page 150: ......
Page 151: ......
Page 153: ...INLET AND EXHAUST SYSTEMS REMOVAL 6 4 ...
Page 159: ...INLET AND EXHAUST SYSTEMS INSTALLATION 6 10 ...
Page 160: ...1 Starter 7 2 2 Alternator 7 3 3 Stop Solenoid 7 4 4 Glow Plug 7 5 ELECTRICAL SYSTEM REMOVAL ...
Page 165: ...ELECTRICAL SYSTEM REMOVAL 7 6 ...
Page 189: ...ELECTRICAL SYSTEM INSTALLATION 7 30 ...
Page 207: ...MISCELLANEOUS 9 4 ...