background image

760BPX Premium 

Original Instructions Version June 16

760BPX_2805161

22

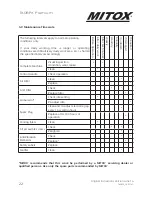
5.9 Maintenance Timescale

The following intervals apply to normal operating 
conditions only. 

If  your  daily  working  time  is  longer  or  operating                        
conditions are difficult (very dusty work area, etc.), shorten 
the specified intervals accordingly.

Bef
ore Operation

After daily w

ork

After each re-fuel

W

eekly

Monthly

Annually

If pr

oblem

If damaged

If required

Complete Machine

Visual inspection 
(Condition, wear, leaks)

*

*

Clean

*

Control Handle

Check operation

*

*

Air Filter

Clean

*

*

*

Replace

*

*

Fuel Filter

Check

*

*

Replace filter

*

*

Carburettor*

Check idle setting

*

Re-adjust idle

*

Spark Plug

Clean and re-adjust electrode gap 
every 10 working hours.

*

Replace after 100 hours of       
operation

*

Cooling Inlets

Clean

*

*

All accessible screws 

Check

*

*

Retighten

*

*

Anti-Vibration 
Elements

Check

*

*

*

Replace*

*

Safety Labels

Replace

*

Muffler

Clean

*

*MITOX® recommends that this work be performed by a MITOX®  servicing  dealer  or       
qualified persons. Use only the spare parts recommended by MITOX
®.

Summary of Contents for 760BPX Premium

Page 1: ...ructions Version June 16 760BPX_2805161 www mitox co uk Operator s Manual user manual maintenance instructions and spare parts 760BPX Premium Backpack Blower Read this manual carefully before operatin...

Page 2: ...ce and longest lifespan of your machine If this product is sold this manual should be passed on to the buyer This MITOX product is a 2 stroke fast running power tool and is designed to be used in a do...

Page 3: ...before using the machine The blower operator must make sure that no bystanders or animals come nearer than 15 metres If you are using the machine every day in normal conditions you can be ex posed to...

Page 4: ...760BPX Premium Original Instructions Version June 16 760BPX_2805161 4 Component Location 22 1 2 3 4 5 6 7 13 12 11 10 10 8 9 14 15 16 17 20 18 19 21...

Page 5: ...ver Throttle setting On Off switch and cruise control 9 Throttle Trigger Spring loaded to return to idle when released 10 Lock knob To adjust control handle angle access air filter 11 Angle tube Chang...

Page 6: ...hem illegible or difficult to read If the warning labels provided with this product become damaged peel off or otherwise become illegible or difficult to read order new labels from your authorised MIT...

Page 7: ...hol suffering from exhaustion or lack of sleep suffering from drowsiness as a result of having taken medication or at any other time when your judgement might be impaired or that you might not be able...

Page 8: ...e engine before making adjustments or when coming close to the cutting head Before Starting Work Carefully check the work area and remove any obstacles Within a perimeter of 15 metres of the work area...

Page 9: ...uring Operation When using this product grip the handles firmly with both hands place your feet slightly apart so your weight is evenly distributed across both legs and always maintain a steady even p...

Page 10: ...and unleaded petrol Clean dirt from around the fuel cap before removing it and use a filtered funnel to fill the fuel tank up to 80 of its capacity Replace the fuel cap and tighten securely If any sp...

Page 11: ...l co uk for more information Fuel Storage Without Ethanol Shield Mixed 2 stroke fuel that has been left unused for one month or more may damage the carburettor and result in the engine failing to star...

Page 12: ...moving the machine and its packaging always making use of suitable equipment 1 1 Connecting the flexible tube Fig 1 Insert the angle tube 11 into the flexible hose 3 to the end Turn the lock screw clo...

Page 13: ...ntermediate tube 6 step 1 Rotate the intermediate tube clockwise to the end approximately 90 degrees step 2 Remove the tubes in verse for cleaning maintenance transportation or storage NOTE Lubricate...

Page 14: ...position Rotate the control handle by loosening the lock knob to acquire the most comfortable position then tighten the lock knob securely Fig 6 NOTE Ensure the teeth 2a on the control handle and cla...

Page 15: ...l the screa on the machine are tightly fastened Check the air filter is clean Check that vibration absorbers are fine Prepare accessories and make sure they are correctly mounted Fill with fuel as ind...

Page 16: ...SED position fig 10 3 Press the primer bulb 19 7 to 10 times to prime the carburettor fig 11 4 Hold the machine firmly with left your hand on the hand grip 1 in order not to lose control of the machin...

Page 17: ...choke to the OPEN position Remove the spark plug and dry it Pull the recoil starter handle slowly several times to drain the fuel from the combustion chamber Wait until the fuel evaporates and refit t...

Page 18: ...material to be removed it is seldom necessary to use full throttle and many work procedures can be done at half throttle If necessary dampen the surface to be cleaned in order to avoid creating too m...

Page 19: ...ills and tools 5 1 Storage After every working session clean the machine thoroughly to remove all dust debris and repair or replace any faulty parts The machine must be stored in a dry place away from...

Page 20: ...ve the filter to dry in the open air Do not use petrol or other solvents Clean the paper filter with pressurised air Refit the sponge filter paper filter and cover and tighten the lock knob Make sure...

Page 21: ...using the throttle trigger it is recommended to adjust the carburation settings This operation must be performed by an authorised MITOX dealer 5 8 Long Periods of Non use IMPORTANT If the machine wil...

Page 22: ...f damaged If required Complete Machine Visual inspection Condition wear leaks Clean Control Handle Check operation Air Filter Clean Replace Fuel Filter Check Replace filter Carburettor Check idle sett...

Page 23: ...cedure Follow instructions in Chapter 3 Dirty Spark Plug Incorrect distance between electrodes Check Spark Plug See Chapter Air Filter Clogged Clean or replace the filter see chapter 5 Carburation Pro...

Page 24: ...tion Speed min 1 7300 Spark Plug Bosch USR7AC Mixture Petrol 2 Stroke Oil 40 1 Fuel Tank Capacity ml 2100 Acoustic Power Level Guaranteed dB A 112 Vibration Level Measurement Uncertainty m s m s 2 02...

Page 25: ...760BPX Premium Original Instructions Version June 16 760BPX_2805161 25 8 Notes...

Page 26: ...760BPX Premium Original Instructions Version June 16 760BPX_2805161 26 760BPX Premium Engine Parts Drawing...

Page 27: ...KE MANIFOLD 1 43 MIF76 0101 0007 AIR INTAKE GASKET 1 44 MIF76 0103 0004 PISTON PIN CIRCLIP 2 45 MIF76 0103 0005 RETAINING RING 2 ID No Drawing Number Description QTY 46 MIF76 0103 0006 NEEDLE BEARING...

Page 28: ...760BPX Premium Original Instructions Version June 16 760BPX_2805161 28 760BPX Premium Hose Handle Parts Drawing...

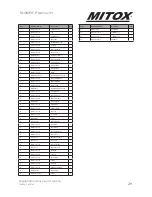
Page 29: ...11 SCREW M5X35 1 21 MIF76 0112 0300 EARTH WIRE ASSY 1 22 MIF76 0112 0400 THROTTLE CABLE 1 23 MIGB T39 M5 SQUARE NUT M5 1 24 MIF76 0112 0002 FIXING RING 1 25 MIF76 0112 0001 HANDLE STEM 1 26 MIF76 0112...

Page 30: ...16 760BPX_2805161 30 ID No Drawing Number Description QTY 1 MIDECAL760BPX 1 RECOIL DECAL 760BPX 1 2 MIDECAL760BPX 2 AIR FILTER COVER DECAL 1 3 MIDECAL760BPX 3 SAFETY DECAL 760BPX 1 4 MIDECAL760BPX 4 C...

Page 31: ...nd 2005 88 EC Noise Directive for outdoor equipment use The conformity assessment procedure followed was in accordance with EN ISO 15503 2009 A2 2015 EN ISO 14982 2009 Notified Body Intertek Testing S...

Page 32: ...does not cover failure due to Insufficient maintenance Incorrect fuel mixture and stale fuel Abnormal use or accidental damage Incorrect assembly adjustment or operation of the product Spare parts th...

Reviews: