background image

39

Inter-Tel

®

 Attendant Console User Guide

USING CONSOLE

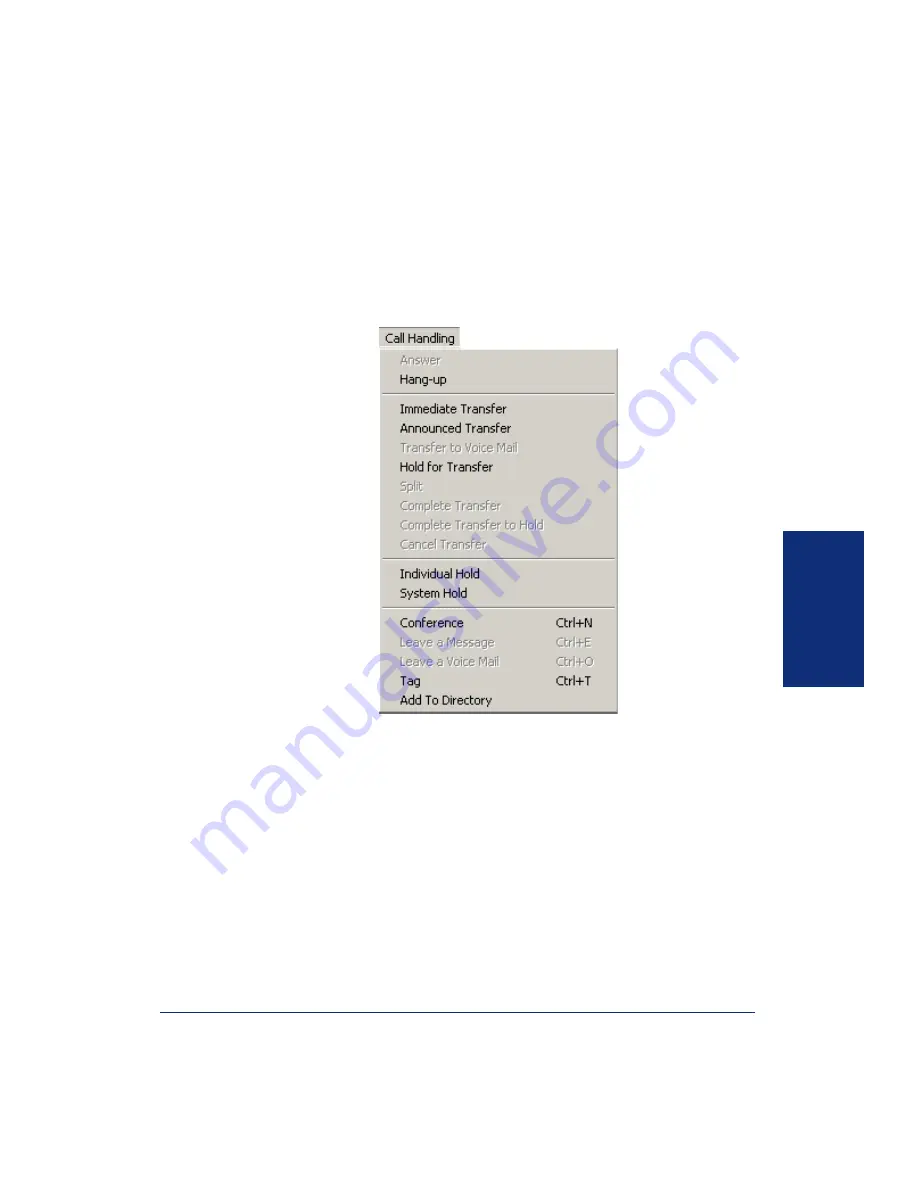
Call Handling Drop-Down Menu

The Call Handing drop-down menu, shown below, contains common commands used
during calls. This menu is also available by right clicking over the Call List or using
the Toolbars (see 

page 61

 for details on toolbars). The commands and descriptions are

described in the following pages. For more details on how to handle calls, see refer-
ence pages listed in the table. 

Summary of Contents for Inter-Tel

Page 1: ...User Guide Inter Tel Attendant Console M I T E L ...

Page 2: ......

Page 3: ... select the Hang Up icon TO PLACE A CALL ON HOLD Press F10 OR select the Hold icon Press Answer to remove the call from Hold TO PLACE A CALL ON SYSTEM HOLD Select the Sys Hold icon TO TRANSFER A CALL Select the destination number in the directory Press ENTER to transfer the call to the number TO TRANSFER TO VOICE MAIL Select the destination number in the directory Select Voice Mail in the director...

Page 4: ...he number of the messages from the messaging station NOTE If a station to station message is left more than once between the same two extension numbers the message count will only display 1 Highlight the message and click Reply OR double click on the message If the called station is unavailable does not answer the call is busy or is in do not disturb the message remains in the list and you can try...

Page 5: ...If you copy the wrong call into the Conference tag list remove it by high lighting it in the Conference Setup list and selecting Remove Call This does not affect the Call List only the Conference Setup list TO CONNECT A CONFERENCE When you have built your Conference list you are ready to connect the confer ence call Select Begin on the Conference dialog At any time during the conference you can ad...

Page 6: ...4 NOTES ...

Page 7: ...ddi tional hardware and or specific software For sales service or technical support contact your local authorized Inter Tel provider Comments about this user guide or other technical documentation should be directed to Inter Tel s Technical Publications Department at Tech_Pubs inter tel com All products and services mentioned in this publication are the trademarks service marks registered marks or...

Page 8: ......

Page 9: ...ages In no event will Inter Tel Integrated System s liability for any damages to you or any other person ever exceed the lower of suggested list price or actual price paid for the license to use the software regardless of any form of the claim THIS WARRANTY IS IN LIEU OF AND EXCLUDES ALL OTHER WARRAN TIES EXPRESS OR IMPLIED INCLUDING BUT NOT LIMITED TO ANY IMPLIED WARRANTY OF MERCHANTABILITY OR FI...

Page 10: ...ftware covered by this license Software means the computer programs accompanying this License including but not limited to codes techniques software tools formats designs methods processes know how and ideas and any and all copies modifications upgrades enhancements and new releases thereof made or acquired by You and any and all manuals and other printed materials accompanying this License or the...

Page 11: ... load the Software onto any file server or network b You may not sublicense assign or transfer Your rights under the Agreement without the prior written permission of Inter Tel c You may not use copy alter or transfer electronically or otherwise the Inter Tel Software program s or documentation except as expressly allowed in this Agreement d You may not translate reverse engineer disassemble or de...

Page 12: ... You further acknowledge that the Program and information relating thereto constitute valuable trade secrets of the Company You agree to comply with the terms and conditions of this Agreement and agree to treat the Program as the confidential and proprietary information of the Company You shall be solely responsible for the supervision management and control of your use of the Program and related ...

Page 13: ... OR INDIRECTLY ARISING FROM USE OR INABILITY TO USE THE SOFTWARE SEPARATELY OR IN COMBINATION WITH OTHER PRODUCTS IN NO EVENT SHALL THE TOTAL LIABILITY OF INTER TEL DAMAGES EXCEED THE AMOUNT PAID BY YOU FOR THE SOFTWARE Entire Agreement This Agreement constitutes the entire agreement between You and Inter Tel and supersedes any and all prior agreements between Inter Tel and You with regard to the ...

Page 14: ......

Page 15: ...ftware 9 Starting the Attendant Console Application 9 Logging On 9 Logging Off 10 Performing a System Refresh 11 Setting Attendant Console Properties 12 User Tab 12 Transfer Tab 15 Program Tab 17 Locations Tab 19 Night Mode Tab 20 Connection Tab 22 Warnings Tab 25 Diagnostics Tab 26 USING ATTENDANT CONSOLE 29 Main Attendant Console Screen 31 Call List 32 Drop Down Menus 33 Console Drop Down Menu 3...

Page 16: ...or Database Programming Planning Sheets 105 TROUBLESHOOTING 109 Troubleshooting OAI Connections 109 Frequently Asked Questions about OAI Configuration 110 Troubleshooting the Installation 113 Error Messages 114 Connection Errors 114 Frequently Asked Questions 124 Attendant Console Setup Options 124 Screen Will Not Pop Up 124 Directories 124 Muting Your Phone Microphone 125 Volume 125 Conference Ca...

Page 17: ...icrosoft Windows XP Service Pack 2 or higher Microsoft Windows Vista ABOUT THIS USER GUIDE This user guide provides all of the information you will need to use the Attendant Console and its features Getting Started includes installation instructions that tells how to set up your Attendant Console Using the Attendant Console includes basic call handling instructions and other information you need t...

Page 18: ...sole to simplify programming various Attendant Console configuration options Automatic System OAI Server Discovery see pages 23 Automatically finds OAI Servers on your LAN Customized Toolbar Allows you to choose toolbar buttons that are to be dis played on the Toolbar see page 62 Import Export User Setting Simplifies programming configuration by importing exporting existing user settings see pages...

Page 19: ...t Console 5 Attendant Console Database Programming 5 CT Gateway 6 TCP IP Connections 6 Software Security Key 6 Installing the Attendant Console Software 7 Upgrading the Attendant Console Software 9 Starting the Attendant Console Application 9 Logging On 9 Logging Off 10 Performing a System Refresh 11 Setting Attendant Console Properties 12 User Tab 12 Transfer Tab 15 Program Tab 17 Locations Tab 1...

Page 20: ...ware Requirements Attendant Console v3 1 requires the following hardware A digital Endpoint AgentSet IP PhonePlus or IP SoftPhone A headset recommended but not required A PC compatible computer with the following specifications 100 MHz or higher Pentium processor 200 MHz or higher is recom mended 24 MB of RAM 25 MB available hard disk space 32 MB is recommended A CD ROM drive for installation from...

Page 21: ...ndpoint if using a headset not a require ment In Station Programming your endpoint should have the Headset Connect Tone option enabled If the network has multiple Voice Processing Units they must have remote mail boxes on the system where the Attendant Console is located to allow the Atten dant Console user to leave voice mail messages for all mailboxes through the mailbox associated with the Atte...

Page 22: ...k For TCP IP to work on your computer it must be configured with IP addresses subnet masks and a default gateway for each network adapter on the computer To determine if TCP IP is installed on your computer check with your Network Administrator Software Security Key The software key is a small security device that must be attached to your PC s par allel port or USB port to fully enable the Attenda...

Page 23: ... off the power switch on your system s PC 2 Attach the appropriate end of the software key to the parallel port on the back of your PC NOTE You may use the same installation CD for more than one PC However each PC must have its own software security key 3 Restart the computer 4 Insert the Attendant Console CD ROM into the drive 5 From the Windows Start menu select Run 6 Use the Browse button to lo...

Page 24: ...ually a 1 NOTE Areas that use 10 digit dialing for local calls should leave the Toll Digit s field blank 11 Click Next The software installation will continue loading files 12 After all files have been installed the Attendant Console will display a window asking if you want to add a shortcut for the Attendant Console to the Windows Start Menu or the desktop and if you want to launch the Attendant ...

Page 25: ...t Inter Tel Atten dant Console The log on dialog box displays Logging On You must log on to the Attendant Console before use If you do not have previously saved settings you can create a new user or log on as Default The default user has the default features and settings IF YOU ARE A NEW USER Click Add User This allows you to set and save your own custom features and settings for use during anothe...

Page 26: ...ff the previous user TO LOG ON AS A DIFFERENT USER 1 Select a different user from the list 2 Click Log On or Add User from the Attendant Console dialog box NOTE If the Attendant Console does not start immediately click Options and check the settings under the Connection Tab For further information see page 114 or the Troubleshooting chapter TO REMOVE A USER FROM THE LIST OF NAMES Select the desire...

Page 27: ...ated in your Attendant Console NOTE If the Console is running when changes are made in the Database Program ming the information is automatically updated and a refresh is not required Perform a manual refresh only in do not disturb or night mode as the Attendant Console does not remain functional Do not perform a refresh during peak hours as it may slow down the telephone system Select System Refr...

Page 28: ...op down menu see page 33 for information on drop down menus or from the initial start up win dow The Options window includes options for User Transfer Program Locations Night Mode Connection Warnings and Diagnostics preferences User Tab The User tab shown below allows each Attendant Console user to set the following options for their username ...

Page 29: ... include waiting hunt group calls connected or holding calls A recall from hold will not automatically forward but will contribute to the maximum count Forward Destination Enter the extension number that you wish to receive your forwarded calls Hot Dialing Enables the number to be dialed automatically if the number entered in the Number or Name search box matches a number in the current Group You ...

Page 30: ... call rings in or pops up the Attendant Console screen if the program is minimized If you are using the Windows 2000 operating system this feature may not work Instead the Attendant Console icon will flash in the task bar Show hunt group calls for ACD hunt groups that I am logged in to Calls to the ACD hunt group that you are logged in to are displayed in the Directory List Allow hold to toggle ho...

Page 31: ...ns are Announced Transfer or Immediate Transfer Announced Transfer Places a call to the destination so you can announce the transfer This is the default transfer mode Immediate Transfer Transfers the call immediately with no announce ment Perform immediate transfers to hunt groups This check box is enabled only if the Default Transfer Type is Announced The transfer call to a hunt group overrides t...

Page 32: ...lt transfer type and always performs the announced transfer Transfer to voice mail if transfer destination is in DND The transfer call to a station in do not disturb goes to a voice mail Normally you cannot complete a transfer to an extension in do not disturb Hang up to complete transfer You can use the Hang Up button to complete a transfer If it is unchecked you must use the Complete Transfer bu...

Page 33: ...e system Allows you to get mail box information from the telephone system The Console provides a way for you to ignore the telephone system mailbox information and allows you to manually set the station s Has Mailbox flag Automatic Logon Automatically logon to the Console as Allows you to log on to the Con sole application automatically as the user selected from the drop down when you start the ap...

Page 34: ...3000 and the default setting is 20 Offline Devices Visibly differentiate between plugged and unplugged stations hunt groups If you check one or both boxes in the Offline Devices group box unplugged stations and hunt groups will be displayed with a slash in a circle overlayed on top of their normal status icon images When stations and hunt groups are unplugged the functionality of these devices rem...

Page 35: ...cation column appears in the Directory and it shows locations of all the stations Node Number and System Location Display all the nodes that the Attendant Console is communicating with and their locations Custom Location Allows you to add the specific description of the system loca tion To enter a custom description for the node Select the desired entry and click Edit You can enter up to fifty cha...

Page 36: ...n and on and off All users have the ability to view the night mode status but does not be allowed to put nodes in or out of night mode The Night Mode tab shown below allows an Administrator to configure what will happen when the nodes are put in Night Mode This tab also shows the night mode status of each node for all users ...

Page 37: ...e operator s node is put in and out of night mode Put selected nodes in night mode Allows you to choose what nodes to put in and out of night mode from a list The list will contain all the nodes that the Attendant Console is communicating with and their locations To select the desired nodes Check Put selected nodes in night mode the Node list becomes editable as shown below Check the desired nodes...

Page 38: ...ected NOTE If you do not know which node your endpoint is connected unplug and replace your endpoint s line cord The endpoint shows CKT WW XX YY ZZ on the second line of the LCD display The number to the left of the colon WW is the node number of your endpoint Station Password Enter the station password programmed for your station At default this is your extension number NOTE You can also use your...

Page 39: ...s that belong to it If the primary CPU fails then the backup CPU automatically takes over however the applications connected to the primary CP Server will just hang unless they have provisions for connecting to the secondary CPU To add OAI Servers to the OAI Server List You can add OAI Servers to the OAI Server list by clicking one of the following buttons NOTE Any OAI Server except Axel Office Se...

Page 40: ...d Description IP Address Enter the IP address of your OAI Server TCP Port Enter the port number of the OAI Server OAI Password Enter the password required by the OAI Server if applicable The password may contain up to 15 characters that are case sensitive and include any characters i e numerical alphabetical and symbols Asterisks appear in place of the characters as the password is typed NOTE Axel...

Page 41: ...refresh Resetting my call statistics Deleting an Attendant Console user Setting a possible invalid forward destination Deleting a custom group Deleting a custom directory entry Deleting a custom directory entry that is a member of a custom group Hiding a member of a custom group Deleting OAI connection entries Logging on as a user other than the user set for automatic logon To enable a warning mes...

Page 42: ...ill be erased and a new one started System Information Indicates the Attendant Console system information Connection Status Allows you to see the communication status for each node Node Number and Location Display all the nodes that the Attendant Con sole is communicating with and their locations Communication Status Communicating A node is communicating with the Console Not Communicating A node i...

Page 43: ...ce the Console will make two 500 KB files NOTE If there is less than 5 MB of free disk space the oldest log file will be deleted until there is at least 5 MB available If there is only one log file the Console will stop logging If you enter the total log file size and that number is more than 5 of the available disk space a warning message will appear Save Log Files The Console automatically compr...

Page 44: ...ou to initially save the zip files onto your hard drive and then later be able to transfer the zip files onto floppy disks The default direc tory and base file names for spanned zipped files are the same as for the normal zipped log files with the exception of the file extension The initial file name will be zip but subsequent zip files will contain the extensions in the form of z02 z03 and so on ...

Page 45: ...eys and modify the display to suit your needs These features are also described in the Quick Reference Guide located at the front of this book Main Attendant Console Screen 31 Call List 32 Drop Down Menus 33 Console Drop Down Menu 33 Log Off 34 Import Settings 34 Export Settings 36 Night Mode 37 System Refresh 38 Options 38 Configuration Wizard 38 Exit 38 Call Handling Drop Down Menu 39 Directory ...

Page 46: ...nced Transfer 85 Transferring to Voice Mail 85 Canceling a Transfer 86 Transferring a Call with Hot Dialing 86 Transferring a Call without Hot Dialing 87 Split between the Announcement Call and Transfer Party 87 Canceling a Transfer 88 Putting Calls on Hold 88 Conference Calls 89 Building a Conference 89 Connecting a Conference 90 Adding a Call to the Conference 90 Inter Station Messages 91 Leavin...

Page 47: ...esired position then release For more details on each area refer to the following pages 1 Action Bar Shows the status of the current operation For example if you are dialing it displays Dialing 2 Drop Down Menus See page 33 for more details 3 Toolbars See page 61 for more details 4 Call List See page 32 for more details 5 Shortcut Buttons See page 55 for more details 6 Directory List See page 43 f...

Page 48: ...ne number or extension that you dialed For incoming calls it shows the number the caller dialed to reach you Elapsed Shows the elapsed time since you received the call By default the Call List is sorted according to elapsed time with the oldest call at the top of the list New calls are always added to the bottom of the list Type Indicates whether the call is an intercom call IC an outside call CO ...

Page 49: ...that you are logged into DROP DOWN MENUS There are drop down menus on the main screen for access to various features Several of these menus can be accessed by selecting the right mouse button These functions are also available through keyboard commands or shortcut buttons see page 58 Many of the keyboard alternates are listed to the right of the desired option on the menu As with most Windows appl...

Page 50: ... version of the Console and the importing file must be the same 1 Click Browse and select a data file czp you wish to import The username that was used when the file was created will be displayed in the edit box You may change the username for whom the settings are being imported for or leave it as shown in the Enter a username edit box 2 Check the settings you wish to import from the list and cli...

Page 51: ...tly logged on the Console will display the following dialog asking whether you wish to log on as the newly imported user If you import group settings and there are groups that already exist in the Console the Console will display the following dialog asking whether you wish to preserve replace or merge the existing group entry ...

Page 52: ... data file 1 Select a data file czp and its location you wish to export in the dialog below By default the Console exports the file to the My Documents folder 2 Click OK to proceed 3 The next dialog shown below asks you if you would like to go to the folder where the data file is saved Click Open Folder to open the folder or Close to exit ...

Page 53: ...de Off Turns off night mode View Displays the Night Mode Status dialog box as shown below This shows the night mode status for each node with which the Attendant Console is commu nicating From this screen you can also put individual nodes in and out of night mode Configure Displays a dialog shown below that allows you to configure the nodes you want to take in and out of night mode See page 20 for...

Page 54: ...Console database and telephone system may be out of sync A system refresh must be performed in order to sync the Console database with the telephone system Refer to Performing a System Refresh on page 11 for more details Options Sets the Attendant Console properties See page 12 for more details Configuration Wizard Helps simplify programming various Attendant Console configuration options The wiza...

Page 55: ...wn below contains common commands used during calls This menu is also available by right clicking over the Call List or using the Toolbars see page 61 for details on toolbars The commands and descriptions are described in the following pages For more details on how to handle calls see refer ence pages listed in the table ...

Page 56: ...at is waiting to be trans ferred 87 Complete Transfer Completes an announced transfer call 86 Complete Transfer to Hold Completes an announced transfer call and places it on hold at the transfer destination 86 Cancel Transfer Cancels a call transfer with announcement It dis connects the announcement call and reconnects the call waiting to be transferred 86 Individual Hold Places the connected call...

Page 57: ...ows you to associate a name with the selected outside call 83 Add to Directory Adds the selected call to your custom directory 73 68 Adjusts the volume level on your phone 54 Allows you to change the appearance of the direc tory list 65 Click this button then place the help pointer over the portion on the Attendant Console where you need help COMMAND MENUS TOOLBARS DESCRIPTIONS REF PG ...

Page 58: ...ectory List COMMANDS DESCRIPTIONS REF PAGE Call Places a call to the selected directory entry 82 Voice Mail Calls the voice mailbox of the selected entry If no entry is selected it calls the general delivery mailbox 91 Message Leaves a silent message indication at the selected station 91 Set DND Enables or disables do not disturb mode for the selected station 47 Set Forward Enables or disables cal...

Page 59: ...e columns Simply drag column headers to the desired position as shown below To display extended information The Console provides extended information for stations and hunt groups in a yellow ToolTip popup screen as shown above To access to this screen do one of the follow ing methods Highlight the desired directory entry and press Shift Enter Highlight the desired directory entry and click details...

Page 60: ... lighted station To look for a first name beginning with Ja you can type a comma and then the first letters of the name Ja NOTE This is reversed if you rearrange the columns so that the First name appears before the Last name In that case you would enter the first name before the last name Jamie Smith or a comma followed by the last name Smith You can also type only the initial character of the na...

Page 61: ...e column and the Speed Dial Bin number in the First name column Status Displays status of the stations If a station is idle the status column is blank otherwise its status is listed If an extension is in more than one state all states are listed The Attendant Console always lists the forward path then the do not disturb message followed by the status See next page for status pictures Location Disp...

Page 62: ...that the Attendant Console cannot identify The white phone is a custom entry that the Attendant Console recognizes as a station but for which it cannot supply the status it may be on another node The magnifying glass represents a hunt group The telephone poles are trunk groups The yellow book with a pen represents outside telephone num bers other than speed dial numbers The yellow book represents ...

Page 63: ...es The DND messages 00 20 shown in the Message drop down list box above may vary depending on how the DND messages were programmed in each node Set Forward You can place any station in the directory in call forwarding mode 1 Highlight the desired entry in the directory 2 Select Set Forward The screen shown on the right appears 3 Select the Forward type from the scroll box The forward options are F...

Page 64: ...nhighlight those entries that are to be hidden 4 Click Hide Entry To display a hidden entry in the Directory 1 Select Hidden Entries in the Tools drop down menu 2 Check Show hidden entries only to view all the hidden entries 3 Highlight the entry in the Hidden Directory Entries list To select all entries press CTRL A NOTE To select all but a few entries press CTRL A to select all and then while ho...

Page 65: ...t a custom entry 1 Highlight the custom entry to be edited in the Directory List 2 Select Custom Entry and Edit from the Directory drop down menu The Attendant Console displays the Edit Directory dialog similar to the one shown above with the name and phone number fields filled in If you want any Attendant Console user to be able to use this entry check the Everyone can use this box 3 Click OK to ...

Page 66: ... and later and Inter Tel 5000 1 0 and later the Console receives mailbox information from the System If the Get mailbox information from the telephone system check box in the Program tab of the Options menu is not checked you can change the Has Mailbox option Transfer Type Allows you to set the transfer type for each directory entry Each station can be set to use the default transfer type to use i...

Page 67: ...id database programming password can program the first name last name extension username attendant and administrator flag If you are not an Administrator these fields will be grayed out If you made changes to the system entry click OK You are then prompted to enter the database programming password as shown below NOTE Without a valid password an Administrator will not be able to change the sys tem...

Page 68: ...ser Guide Sample Properties for Custom Entries Everyone can use this Allows any Console user to be able to use this entry Mailbox only Allows you to add an unassociated mailbox as a custom entry Sample Properties for Hunt Groups Smith ...

Page 69: ...53 Inter Tel Attendant Console User Guide USING CONSOLE Sample Properties for Trunk Groups and Voice Mails Sample Properties for Speed Dial Bins ...

Page 70: ...one microphone so that the calling party does not hear you Adjusting the Volume Do one of the following Select Up or Down from the Volume drop down menu OR Press CTRL P to increase the volume or CTRL W to lower the volume To save your volume settings Select Save from the Volume drop down menu Muting the Microphone To mute or unmute the microphone Select Mute from the Volume drop down menu OR Press...

Page 71: ...s a sequence of actions or dials a series of digits representing fea ture codes the currently selected directory entry or custom digits Each action can be one of the following Dial the selected directory entry Dial custom digits Dial a feature code Perform a telephone feature transfer hang up answer Activate a specific tab or group Tag a call Pause for one second To display the shortcut buttons in...

Page 72: ...elected directory entry or custom digits Each action can be one of the following Dial the selected directory entry Dial custom digits Dial a feature code Perform a telephone feature transfer hang up answer Activate a specific tab or group Tag a call Pause for one second SHORTCUT BUTTON SHORTCUT KEY DESCRIPTION Immediate Transfer CTRL 1 Transfers a call without an announce ment Annc Transfer CTRL 2...

Page 73: ... View drop down menu 2 If you prefer not to show the Welcome page again check Do not show this Welcome page again To continue click Next NOTE If you would like to reinstate the Welcome page select Setup Shortcuts from the Shortcuts drop down menu click Back and uncheck the Do not show this Welcome page again 3 Select a shortcut you would like to program from any of the function keys F2 F12 the key...

Page 74: ...ilable F4 Split F5 available F6 Cancel Transfer F7 Transfer to Voice Mail F8 Complete Transfer F9 Answer F10 Hold F11 available F12 Hang up Keypad Keys keypad Immediate Transfer keypad Split keypad Cancel Transfer keypad Complete Transfer Button Panel 1 Button 1 Imm Transfer Button 2 Annc Transfer Button 3 Dial Button 4 Reverse Transfer Button 5 At Lunch Button 6 Gone Home Button 7 DND Off Button ...

Page 75: ...ctions are reached the Add button becomes disabled grayed out To delete an action Select the action to be removed from the Shortcut Actions list and click Remove 6 If the action you added requires more information a dialog will prompt you to enter the necessary information For example when you select DND set from the All Actions list the following screen appears 7 After adding the shortcut actions...

Page 76: ...o choices Exit the shortcut setup wizard Closes the wizard and returns to normal Attendant Console operation Setup another shortcut Takes you back to the first step The Finish button changes to the Next button 9 After selecting one of the above selections click Finish to complete the pro gramming or Cancel to finish it without changing ...

Page 77: ...n select toolbars shown below to be displayed on the main screen You can change their position using the Customize Toolbar menu You can click buttons to perform various call handling tasks adjust volume and access Help The commands and descriptions are described on page 39 To display toolbar s Select Toolbar from the View drop down menu To customize toolbar s Select Customize Toolbar from the View...

Page 78: ... click Add The toolbar will be inserted above the highlighted button in the Current toolbar buttons list box To change the order of the button s Highlight the button to be moved in the Current toolbar buttons list box and click Move Up or Move Down To remove a toolbar Highlight the button to be removed in the Current toolbar buttons list box and click Remove To remove text labels from the toolbar ...

Page 79: ... the FWD area is grayed put When forwarded the status area turns blue blue is used in the directory to signify for ward If you right click on the status area a menu appears that allows you to turn forwarding on or off for your station as shown below MSG Message Received When there are messages the status area turns green You can either double click the MSG area to display the Mes sages dialog or y...

Page 80: ...If you are an Administrator you can turn the Night Mode On and Off from this screen by clicking the Night On or Night Off button You can also right click the status area to display a menu that will allow you to turn on night mode turn off night mode view the current night mode status and configure how night mode is enabled and disabled as shown below Selecting Configure will display the Night Mode...

Page 81: ...nding order based on the column selected By default the list is sorted by last name You can also sort columns by clicking on the column header you want to sort by NOTE You cannot sort the directory while searching For example if you type 123 in the Number or Name field the directory will automatically be sorted by number Show Index Buttons Allows you to search the directory using the alphabet inde...

Page 82: ...mode the location is displayed in the ToolTip popup screen Shortcut Panels 1 4 The shortcut panels display up to 40 customized shortcut buttons on the Console main screen The panels can be docked on the left or right of the screen or floated any where on the screen Each shortcut panel contains 10 shortcut buttons To customize a shortcut button see page 55 To display the shortcut panels in the Main...

Page 83: ...screen appears The options in the menu allow you to program and or operate various features Customize Directory When you select Customize Directory or press CTRL S from the Tools drop down menu the following screen appears Custom entries are useful for specifying guests or for people who share a phone or frequently called CO numbers ...

Page 84: ...t saving changes To edit a custom entry 1 Highlight the custom entry to be edited in the Directory List 2 Click Edit from the Custom Directory dialog The Attendant Console displays the Edit Directory dialog similar to the one shown above with the name and phone number fields filled in If you want any Attendant Console user to be able to use this entry check the Everyone can use this box 3 Click OK...

Page 85: ...ry Entries and Directory Entries in Group Display sta tion user s last and first names extension numbers and the locations of stations Device Count Displays the number of the stations available in the Group at the bottom of the screen To create groups 1 Click New The screen on the right appears 2 Enter the name of the group in the text area of the dialog box 3 Check Everyone can use this if you wa...

Page 86: ...me and click Remove NOTE To select all but a few entries press CTRL A to select all and then while holding down CTRL and using the mouse click to unhighlight those entries that are not to be deleted To remove all entries from the list click Remove All To change group properties 1 Select the group that you want to change from the scroll box 2 Click Edit The screen shown on the right appears 3 Edit ...

Page 87: ...nd using the mouse click to unhighlight those entries that are to remain hidden 2 Click Unhide To hide an entry 1 Select Show all entries and highlight the desired entry you want to hide NOTE To select all but a few entries press CTRL A to select all and then while holding down CTRL and using the mouse click to unhighlight those entries that are not to be hidden 2 Click Hide NOTE If the descriptio...

Page 88: ...f whether the call is originated from another extension or the outside number The logs are listed in the order they were disconnected Your Attendant Console s setup determines how many calls are stored in the log see page 26 The range is 0 3000 You can place calls from the Call Log remove entries or move entries to your Direc tory as described below To dial a number using the Call Log do one of th...

Page 89: ...ntries by clicking the entries while holding down CTRL NOTE To select all but a few entries press CTRL A to select all and then while holding down CTRL and using the mouse click to unhighlight those entries that are not to be removed Click Remove To remove all Call Log entries Click Remove All To move a Call Log entry to your Directory Highlight the entry Click Add To Directory ...

Page 90: ...counted This also does not include calls that automatically forwarded Calls Placed on Hold Shows the number of the IC and CO calls placed on individual hold It does not include calls placed on transfer hold If a call is placed on hold multiple times it is counted multiple times Calls that Recalled Shows the number of IC and CO calls that recalled from hold It does not include calls that recalled f...

Page 91: ...g Average Hold Time Shows the average time IC and CO calls were on indi vidual hold not including time that they are recalling from hold Total Talk Time Shows the total time the Attendant Console was connected to both IC and CO calls Reset Statistics Daily Unless you check this box to clear the statistics screen at midnight each day the statistics are gathered until you clear them as described bel...

Page 92: ...Stats For Microsoft Windows XP the path is C Documents and Settings All Users Application Data Inter Tel Inter Tel Attendant Console Stats For Microsoft Windows Vista the path is C ProgramData Inter Tel Inter Tel Attendant Console Stats The saved statistics are categorized by month There are two statistics files one for the current month and one for the previous month The files are named this_mont...

Page 93: ...This screen indicates the status of conference setup You cannot build a conference call using this screen To build a conference refer to Building a Conference on page 89 Dial Pad When you select Dial Pad or press CTRL D from the Tools drop down menu the following screen appears This allows you to use dial pad on the screen The dial pad can float anywhere on the screen ...

Page 94: ...t included on the main Attendant Con sole The Feature Codes list is an alphabetical listing of telephone system feature names and feature codes To use a system feature code do one of the following 1 If the feature code will require additional digits enter them in the Number box Or to use the entry highlighted in the Directory check Use Directory 2 Highlight the desired feature code in the list and...

Page 95: ...screen appears This dialog provides informa tion on any messages that are waiting at your station It tells you the source of the messages time and date stamp and the number of the messages See page 92 for details on how to respond to a message NOTE If a station to station message is left more than once between the same two extension numbers the message count will only display 1 ...

Page 96: ...ed page zone and press ENTER or click Begin Page OR Double click on the desired page zone 2 Make your announcement before the Paging timer expires then hang up Database Programming Any Administrator station can perform database programming using the Attendant Console The following fields are programmable using the Attendant Console Data base Programming Station information for individual stations ...

Page 97: ...ou to send comments to Inter Tel If you would like to send feedback to Inter Tel enter the required information in the form and click Send Clear Form Clears all the fields Print Form Launches Notepad and automatically prints the form Send Sends the feedback form to Inter Tel Product Registration Displays the Product Registration form If you would like to perform online registration enter the requi...

Page 98: ...ndant Console cannot make a call 2 Place a call in one of the following ways Press ENTER or click Call when the call is highlighted in the Directory OR Double click on the entry in the Directory To place a call to a voice mailbox Click Voice Mail in the Directory Answering Calls Incoming calls appear in the Call List in the order received with the oldest call at the top of the list To answer a cal...

Page 99: ... in the Call List and then do one of the following Press CTRL T OR Click Tag Call from the Toolbar OR Select Tag from the Call Handling drop down menu When the edit box displays type the name Tag you wish to associate with the call and press enter Hanging Up Hang Up ends an operation or disconnects a call the same as hanging up the handset on your phone To hang up do one of the following Click Han...

Page 100: ...nd enable Hot Dialing Immediate Transfer To transfer a call immediately with no announcement do one of the following Press CTRL 1 OR Select the destination number in the Directory then click Transfer from the Tool bar OR Select Immediate Transfer from the Call Handling drop down menu To transfer a call immediately without answering Simply drag and drop the highlighted call in the Call List to the ...

Page 101: ...Hunt Group Voice Mail immediate transfer options and the Transfer Type options see pages 15 and 50 respectively Holding for Announced Transfer To place a call on transfer hold before announcing the transfer do one of the fol lowing Click Trans Hold from the Toolbar OR Select Hold for Transfer from the Call Handling drop down menu Then Complete transfer Transferring to Voice Mail Select the destina...

Page 102: ...y make the announcement call or immediately transfer the call to the number depending on your User Settings To end an announcement call and complete the transfer do one of the following Click Complete from the Toolbar OR Select Complete Transfer from the Call Handling drop down menu if you have Hangup To Complete Transfer Hold enabled press Hang Up or F12 OR Press the Complete Transfer function ke...

Page 103: ...F12 OR Press the Complete Transfer function key defaults to F8 To place the call on hold at the destination station do one of the following Click Comp Hold from the Toolbar OR Select Complete Transfer To Hold from the Call Handling drop down menu if you have Hold To Complete Transfer Hold enabled you can press Hold or F10 Split between the Announcement Call and Transfer Party While on an announcem...

Page 104: ... following Click Hold from the Toolbar OR Select Individual Hold from the Call Handling drop down menu OR Press the Hold function key defaults to F10 To return to the call on Individual Hold do one of the following Click Answer from the Toolbar OR Press the Answer function key defaults to F9 If you have Allow Hold To Toggle Hold enabled you can press Hold to take the call off hold System Hold If y...

Page 105: ...blishing a con ference is done in two steps building the conference and connecting the conference Building a Conference You can build a conference from calls that are either connected or on individual hold in the main Call List You cannot add ringing calls 1 Highlight the desired call in the Call List Do one of the following Press CTRL N this option is available only while you are on a call OR Pre...

Page 106: ...t only the Conference Setup list NOTE There is no active conference yet Connecting a Conference When you have built your Conference list you are ready to connect the conference call Click Begin on the Conference dialog The Attendant Console removes all entries from the Conference Setup list removes the individual calls from your Call List and adds the conference call as a connected call in the Cal...

Page 107: ...ectory Properties dialog see page 50 In the Axxess system versions 5 2 and later and Inter Tel 5000 1 0 and later the Attendant Console receives mailbox information from the System If the Get mail box information from the telephone system check box on the Program tab of the Options frame is not checked you can change the Has Mailbox option When calling a station if you hear a busy signal do not di...

Page 108: ...ge When you have responded to a message the Attendant Console removes that message from the message list However if you do not save or delete a voice mail message the Voice Processing Unit will restore the message indications If the called station is unavailable does not answer the call is busy or is in do not disturb the message remains in the list and you can try again later or leave your own me...

Page 109: ...cted to a call Press ALT SHIFT 1 to dial SPCL Then do one of the following Dial the digit s by pressing the buttons on the Attendant Console Dial Pad To display the Dial Pad Select Dial Pad from the Tools pull down menu or press CTRL D OR Press and hold ALT while typing the number you want to dial i e 385 for the Record A Call feature in the Number or Name text box NOTE In addition you can press A...

Page 110: ... you to dial 1 to select a technical support group To dial digit s while you are connected to a call do one of the following Dial the digit s by clicking the buttons on the Attendant Console Dial Pad To display the Dial Pad Select Dial Pad from the Tools pull down menu or press CTRL D OR Press and hold ALT while typing the number you want to dial NOTE In addition you can press ALT SHIFT 3 to dial ...

Page 111: ...programming 1 Select Database Programming from the Console drop down menu The fol lowing screen appears 2 Click Yes to continue You are then prompted to enter the database programming password as shown in the screen on the right Enter the password up to eight dig its and click OK If there is no password simply click OK 3 After you enter a valid password the Attendant Console will retrieve data fro...

Page 112: ...tem Programmer dialog The following screen appears Enter the current password if any in the Old Password text box Then enter the new password twice once in the New Password text box and once in the Confirm New Password text box These two entries must match exactly If they do not you will see an error message and the password will remain unchanged The password may contain up to eight digits and inc...

Page 113: ...ging column headers to the desired position KEYS DESCRIPTIONS ESC Cancels the current change ENTER Applies the current change TAB Applies the current change and moves one cell to the right If you are in the last column it moves to the first cell of the next row SHIFT TAB Applies the current change and moves one cell to the left If you are in the first column it moves to the last cell of the pre vi...

Page 114: ...ber list to locate the station you want to program 2 Highlight the station you wish to program and double click on the Descrip tion or Username field A text box appears in the field 3 Enter new information or edit the existing information Then press ENTER to save your change To close the text box without changing the informa tion press ESC Extension Numbers The extension number for any station can...

Page 115: ...you will see an error message that tells you that it is an invalid extension To clear the error message click OK The attendant extension returns to its pre vious setting and you can enter a new number Administrator Stations You can program a keyset station to be an Administra tor station or you can remove its Administrator status You cannot program this for your own station or a single line statio...

Page 116: ...sed when a station is physically relocated within the same node and you want to update the database programming NOTE The Swap feature is available on nodes that are running OAI protocol ver sion 6 1 or later 1 Highlight the station you would like to swap with in the Station tab shown below and click Swap The screen shown on the next page appears ...

Page 117: ...dant Console User Guide USING CONSOLE 2 The dialog contains only the devices that the Console can swap with i e you cannot swap a keyset with a single line 3 Highlight the station you would like to swap with and click OK ...

Page 118: ...ight option button Move the desired toll restrictions from the Exclude Toll Restriction list to the Include Toll Restriction list as follows Highlight a toll restriction in the Exclude list and click Add to move it to the Include list Highlight a toll restriction in the Include list and click Remove to move it to the Exclude list Click Add All to move all restrictions to the Include list Click Rem...

Page 119: ...up to 16 char acters When the system has a programmed Primary and Secondary Language the sys tem has default messages in both languages Available languages are American English British English Spanish and Japanese NOTE The Attendant Console can be used to program only the Primary Lan guage messages To enter Japanese characters you must use your keyset The default Do Not Disturb and Reminder messag...

Page 120: ...messages in the Console Database Programming will override any existing messages in a network 1 Highlight the desired message as shown above and click Edit DND or Edit Reminder below the list The following screen appears 2 Enter the new message in the text box Click OK to save your changes and exit to the previous screen Or click Cancel to exit without saving changes ...

Page 121: ...MMING PASSWORD ___________________________ STATION PROGRAMMING For each station to be programmed record the following infor mation CHANGING STATION EXTENSION NUMBERS Description Username Extension Number This station s attendant Administrator station Yes or No Toll restriction classes of service OLD EXTENSION NUMBER NEW EXTENSION NUMBER ...

Page 122: ...NG UNTIL MESSAGE 04 IN MEETING MESSAGE 05 ON VACATION TIL MESSAGE 06 ON VACATION MESSAGE 07 CALL ME AT MESSAGE 08 AT THE DOCTOR MESSAGE 09 ON A TRIP MESSAGE 10 ON BREAK MESSAGE 11 OUT OF TOWN TIL MESSAGE 12 OUT OF OFFICE MESSAGE 13 OUT UNTIL MESSAGE 14 WITH A CLIENT MESSAGE 15 WITH A GUEST MESSAGE 16 UNAVAILABLE MESSAGE 17 IN CONFERENCE MESSAGE 18 AWAY FROM DESK MESSAGE 19 GONE HOME MESSAGE 20 OUT...

Page 123: ...MESSAGE 04 CANCEL MEETING MESSAGE 05 APPOINTMENT MESSAGE 06 PLACE CALL MESSAGE 07 CALL CLIENT MESSAGE 08 CALL CUSTOMER MESSAGE 09 CALL HOME MESSAGE 10 CALL CORPORATE MESSAGE 11 CALL ENGINEERING MESSAGE 12 CALL MARKETING MESSAGE 13 CALL ACCOUNTING MESSAGE 14 CANCEL DND MESSAGE 15 CANCEL CALL FWD MESSAGE 16 TAKE MEDICATION MESSAGE 17 MAKE RESERVATION MESSAGE 18 REVIEW SCHEDULE MESSAGE 19 LUNCH MESSA...

Page 124: ......

Page 125: ...g System OAI For best results perform the steps in order one at a time Never change more than one variable at a time when troubleshooting hardware Verify that you can see system call activity This is the easiest way to determine that System OAI is being received by the Console Verify that System OAI Events and System OAI Third Party Call Control Pre mium Features are enabled on all nodes for the A...

Page 126: ...er Call Processing Card CPC CP Server or Switch Transceiver for the Axxess system and a CS 5200 5400 5600 for the Inter Tel 5000 system as described above because there are limitations to the number of System Level II OAI applications For example in an Axxess system one Console can communi cate with one Switch Transceiver OAI Server In other words one Console can be serviced by one serial port The...

Page 127: ...0 5600 in the Inter Tel 5000 system requires the CT Gateway to unify the OAI streams from multiple nodes Q WHAT APPLICATIONS CAN RESIDE ON THE SAME PC CAN I PUT THE CT GATEWAY ON A CP SERVER OR CS 5200 5400 5600 A The CP Server or CS 5200 5400 5600 should never house any other software i e CT Gateway Voice Mail etc You may however load the CT Gateway and Switch Transceiver software on the same PC ...

Page 128: ...ive Busy state view multiple nodes perform basic database programming actions create unlimited key maps etc Q DO I NEED TO MATCH THE MAIN NODE S PAL UNITS OR LICENSING ON A REMOTE NODE IN AN AXXESS AND INTER TEL 5000 SYSTEMS A Yes Each node that it being used by the Transceivers CP Server must have the 60 Feature Units for Axxess version 5 3 and earlier and 30 units for Axxess ver sions 6 0 and la...

Page 129: ...e enabled on all nodes Verify that you have configured the Attendant Console TCP IP connection to the telephone system correctly For TCP IP to work on your computer it must be configured with IP addresses subnet masks and a default gateway for each net work adapter on the computer To determine if TCP IP is installed on your com puter check with your Network Administrator Refer to the telephone sys...

Page 130: ...t by selecting the Retry Now button from the start up window The help button will give more detailed information for each error message ERROR POSSIBLE PROBLEM FIX Cannot Assign Requested Address Attendant Console cannot con nect to the specified IP address Verify the IP address is the IP address of the OAI Server computer To do so select Options from the Console drop down menu On the Con nection t...

Page 131: ...P port by selecting Network Service under Serial Line Setup Wrong IP address Verify the IP address of the OAI Server To do so select Options from the Console drop down menu On the Connection tab select the OAI Server and click Edit The IP Address must be the address of the computer running the OAI Server The OAI Server can be the CT Gate way System OAI Switch Transceiver Axxess only or Call Proces...

Page 132: ...red for Level 2 System OAI Verify the telephone system serial port is config ured for hardware flow control and auto baud is disabled CT Server Switch Transceiver Axxess only CPC Call Pro cessing Server in an Axxess system or the CS 5200 5400 5600 in the Inter Tel 5000 sys tem not responding Restart the server The server closed the con nection In an Axxess system the Axel Office Server is already ...

Page 133: ...onded Verify if the IP address of the OAI Server is cor rect To do so select Options from the Console drop down menu On the Connection tab select the OAI Server and click Edit If the OAI Server is a CT Gateway the IP address must match the IP address in the CT Gateway Application Settings dialog Check the Attendant Console computer subnet mask An improper subnet mask can cause this error If you do...

Page 134: ...tion password on the Connection tab see page 22 Invalid OAI Password The OAI Password is incorrect Set the correct OAI password To do so select Options from the Console drop down menu On the Connection tab select the OAI Server and click Edit This password must match the pass word required by the OAI Server NOTE This password is case sensitive Network Dropped Con nection The OAI Server computer mi...

Page 135: ...able Network Sub system is Unavailable Windows cannot fulfill commu nication requirements of Atten dant Console because the underlying system is currently unavailable Verify that networking and TCP IP is correctly and fully installed on the Attendant Console computer You might need to reinstall network ing TCP IP or Windows to correct this problem No Buffer Space Avail able This indicates a shorta...

Page 136: ... error occurs due to one of two scenarios The computer is running too many programs that communi cate via the network Close some of the programs A program running on the com puter is using the network facili ties incorrectly and holding resources required by the Attendant Console Restarting the computer may temporarily solve this problem However if the program malfunc tions again Attendant Console...

Page 137: ...mmed Telephone system failure Tell them how to program the telephone system serial port in Database Programming The System OAI Server is a CT Gateway perhaps the Gate way is unable to communicate with the node due to a network error Refer to the CT Gateway help and user guide to determine how to correct the problem The OAI Server does not serve the correct node If the OAI Server is a Switch Transc...

Page 138: ...ystem In an Axxess system the Axel Office Server is incorrectly con nected to the telephone system Ensure the Axel Office Server is connected to the telephone system using a DB9 modular adapter part no 804 2545 and a reversing 8 wire mod to mod line cord part no 813 1682 In an Axxess system the Axel Office Server s bit rate is con figured incorrectly The bit rate configured in the Axel Office Serv...

Page 139: ...at IP address is already using the Axel Office Server To do this telnet to the Axel Office Server s configuration port telnet axel_ip_addr 4096 Select Connections from the Tools Setup menu Switch Transceiver CPC or Call Processing Server in an Axxess system or a CS 5200 5400 5600 in an Inter Tel 5000 system not responding Verify the Attendant Console is using the correct OAI password To do so sele...

Page 140: ...ation has received input from the user within a short but undocumented amount of time Windows 2000 prevents any other program from putting itself in the foreground Instead the program can only flash it s icon in the start bar Therefore if you are using another program like Microsoft Word and a call rings in Windows 2000 may prevent the Attendant Console from popping in front of Word but will inste...

Page 141: ...he conference to voice mail the system waits for you to enter the mailbox number If you do not enter a mailbox number before you hang up the conference will be connected to the voice mail unit and a conference party must enter the mailbox number after lis tening to the introductory voice prompts The conference parties can use their DTMF keypad keys to use the voice mail features A conference conve...

Page 142: ...in the telephone system not the clock on your PC If the time shown on your PC does not match the time shown on your phone s display it may appear that the reminder message is signaling you at the wrong time However it is actually signaling at the time you requested according to the telephone system clock shown on your phone Q WHY DOESN T THE ATTENDANT CONSOLE S ELAPSED CALL TIME MATCH THE TELE PHO...

Page 143: ...orted from the other nodes to your node and or have the mailboxes reprogrammed STATISTICS Q WHY DO MY STATISTICS SHOW MORE CALLS HANDLED THAN CALLS RANG IN A This is because handled calls count calls originated by the user Every time an IC or CO call leaves the operator it was handled unless it was on hold was ring ing or was a transfer announcement call When a conference is made each call in the ...

Page 144: ......

Page 145: ...tton 89 Conference call adding a call 3 Conference Calls 89 125 adding a call 90 troubleshooting 125 Conference tab 3 Connected Call conferencing 89 90 Connected call conferencing 3 Connecting a conference 3 90 Connection 19 Connection errors 114 Connection tab 22 Console drop down menu 33 Console main screen 31 Console menu 33 log on off 10 Console users logging on off 10 removing 10 CT Gateway 6...

Page 146: ...own menu 81 Help menu 33 Hidden entries 71 Hide entry 48 Hold 88 individual 88 system 88 Holding calls 88 How to handle calls 82 I Immediate transfer 84 Individual Hold button 88 Installing the Attendant Console Software 7 Intercom calls messages 105 Inter station messages 91 105 L Leaving a message 91 Locations 19 Locations tab 19 Log Off 34 Log On Off 34 Logging Off 10 Logging On 9 M Mailbox set...

Page 147: ...6 Shortcuts drop down menu 55 Shortcuts menu 33 55 Silent message 91 Software installation error messages 113 Software requirements 4 Software security key 6 Sorting and moving columns 97 Split between the announcement call and transfer party 87 Starting the Attendant Console application 9 Station description 124 Station off hook alarm 2 Station tab 97 Station username 124 Statistics 74 127 Status...

Page 148: ... Video card 4 View drop down menu 61 View menu 33 shortcut panels 55 Voice mail group lists 2 mailbox maintenance 2 Volume 125 Volume bar 31 Volume drop down menu 54 Volume menu 33 W Warnings tab 25 Welcome 1 Window tabs 31 Windows Operating Systems 1 ...

Page 149: ......

Page 150: ...Part No 835 2270 Issue 3 1 April 2008 A946 3381A ...

Reviews: