background image

10

Parking mode


This feature is not available on all models.

Your dash cam supports the parking recording function. The Parking mode is 

disabled by default. Before enabling the Parking mode, please check the memory 

storage allocation of your device. Select 

 > 

System

 > 

Storage Allocation

 to 

set a proper allocation for parking recording. Changing the allocation will erase the 

memory card, so save any videos or photos to your computer first.

You can enable the function by selecting 

 > 

Parking Mode

 > 

Detection

 > 

Smart Mode

 or 

Passive Powered Parking Mode

.


Smart Mode

: Supports recordings that are triggered by the G sensor and 

motion detection. Smart parking mode is activated automatically after ignition 

key is in off position or when the car stops moving for about 5 minutes, 

depending on Auto Entry settings. For this mode, you must use an additional 

power source  such as Mio Smart Box uninterruptible power cable which is 

sold separately.


Passive Powered Parking Mode

: Supports recordings after the G sensor 

detections are triggered. When this Parking mode is enabled, the system 

will enter the Parking mode automatically after the device is power off. This 

Parking mode is powered by internal dash cam battery and it should last 

up to 48 hours. It may be shorter depending on the amount of triggers and 

temperature.

When the Parking mode detection is enabled, the system will enter the Parking 

mode when the car stops moving for about 5 minutes. The screen will be turned 

off. To turn on the screen:

Summary of Contents for MiVue 82 Series

Page 1: ...MiVue TM 82x User Manual...

Page 2: ...Turning your Mio on and off 8 Recording in driving mode 8 Continuous recording 8 Event recording 9 Parking mode 10 Capture mode 11 Playback mode 11 Safety camera alerts 12 Adding a safety camera 13 U...

Page 3: ...ger 20 Playing the recording files 20 For more information 22 Caring for your device 22 About GPS 23 Regulatory information 24 CE 24 WEEE 25 Safety precautions 25 About charging 25 About the charger 2...

Page 4: ...avoid accidents personal injury or property damage A window mount is needed when using your Mio in a car Make sure that your Mio is placed in an appropriate place so as not to obstruct the driver s vi...

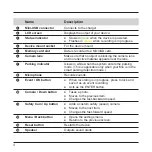
Page 5: ...ing indicator Glows in white when the system enters the parking mode This is applicable only when your Mio is in the smart parking detection mode Microphone Records sounds Event OK button When recordi...

Page 6: ...re to the centre of the memory card The memory card slot is not hot swappable Insert the memory card before powering on your Mio DO NOT remove the memory card during recording Turn the device off befo...

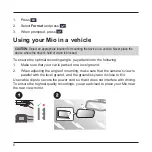
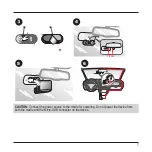
Page 7: ...e optimal recording angle pay attention to the following 1 Make sure that your car is parked on a level ground 2 When adjusting the angle of mounting make sure that the camera s view is parallel with...

Page 8: ...7 4 3 cm 5 6 CAUTION Connect the power source to the cradle for powering Do not power the device from both the cradle and the Micro USB connector on the device...

Page 9: ...led set timer recording is still in progress press any of the keys to turn on the screen again Occasionally you may need to perform a hardware reset when your Mio stops responding or if it appears to...

Page 10: ...mpact high speed driving an aggressive turn or an accidental crash during continuous recording the G sensor will prompt your Mio to start recording the event The event recording will save the duration...

Page 11: ...ng mode is activated automatically after ignition key is in off position or when the car stops moving for about 5 minutes depending on Auto Entry settings For this mode you must use an additional powe...

Page 12: ...h parking recordings it will automatically record over the oldest existing files in this category To exit the Parking mode and resume continuous recording press If movements are detected and recorded...

Page 13: ...legal reasons the safety camera function is not available in all countries You can receive alerts to warn you about the locations of safety speed cameras which will enable you to monitor your speed t...

Page 14: ...ording screen 2 The next time when you pass by the location you will receive alerts by the dash cam 3 To view the information of the custom safety camera select SafetyCam Custom SafetyCam and then sel...

Page 15: ...ones from all manufacturers Not all MiVue dash cam models support the MiVue Pro app or all its features The WIFI function allows you to connect the dash cam to your smartphone The WIFI function is dis...

Page 16: ...IFI and changes the WIFI password Sound Recording Sets if you want to include sounds in the recordings Driving Safety Calibration You are advised to calibrate the system constantly in order to be aler...

Page 17: ...depending on your driving status to remind you to drive more efficiently FCWS Select Beep or Voice to enable the Forward Collision Warning System FCWS function The system will alert you when the car...

Page 18: ...ry entering the parking mode automatically and motion detection functions Passive Powered Parking Mode Supports recordings that are triggered by the G sensor The Auto Entry and motion detection functi...

Page 19: ...adjust the brightness of the image G Sensor Sensitivity Sets the sensitivity level of the G sensor that allows automatic triggering of the event recording while continuous recording is in progress Sta...

Page 20: ...arts Language Sets the language Distance Unit Sets the preferred distance unit Storage Allocation The system provides 4 memory configurations to store the videos and photos Select the proper configura...

Page 21: ...ording files to your computer for backup and playback 2 Start MiVue Manager on the computer By default MiVue Manager shows the calendar and the file list on the right When a recording file exists you...

Page 22: ...ideo playback screen On the dashboard panel click to display the map screen The G sensor chart displays data in 3 axis waveform about the car s shift forward backward X to the right left Y and upward...

Page 23: ...of your device will ensure trouble free operation and reduce the risk of damage Keep your device away from excessive moisture and extreme temperatures Avoid exposing your device to direct sunlight or...

Page 24: ...explosive materials in the same compartment as your device its parts or accessories To discourage theft do not leave the device and accessories in plain view in an unattended vehicle Overheating may...

Page 25: ...the European Community Compliance with these directives implies conformity to the following European Standards EN 300328 EN 301489 1 17 19 EN 303413 EN 50498 EN 55032 24 EN 62368 1 EN 62479 IEC60950...

Page 26: ...ction point Safety precautions About charging Use only the charger supplied with your device Use of another type of charger may result in malfunction and or danger This product is intended to be suppl...

Page 27: ...Lithium Ion battery The battery can burst or explode releasing hazardous chemicals To reduce the risk of fire or burns do not disassemble crush puncture or dispose of in fire or water Use a specified...

Page 28: ...ror free MiTAC assumes no liability for damage incurred directly or indirectly from errors omissions or discrepancies between the device and the documents Note Not all models are available in all regi...

Page 29: ...MiTAC Europe Ltd www mio com...

Reviews: