Chapter 3 Cutting Data with Register Marks
86
l
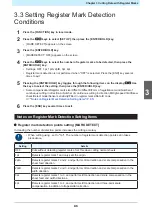
Scale compensation setting [DIST.REVI.]
• When cutting using , set [DIST.REVI.] to [OFF].
Setting
Details
OFF
Scale compensation is not input for register mark detection.
BEFORE
Scale compensation and trapezoidal correction
*1
values are entered before register
mark detection. (
"Detect register marks."(P. 89)
) The distance between register
marks is entered in advance, allowing high-speed movement between register marks
during register mark detection.
AFTER
Scale compensation and trapezoidal correction
*1
values are entered after register mark
detection. (
"Detect register marks."(P. 89)
) Settings can be completed more
quickly, as the distance between register marks is known due to register mark detection.
Specifying afterward allows setting in a shorter time.
*1. Differences in grit roller diameter may result in differences in feed rate between left and right sides of the
sheet. Trapezoidal correction is used to correct errors resulting from such differences in feed rate.
l
Register mark size setting [SIZE]
Setting
Details
4 to 40mm
Sets the length of one side of the register mark.
If the lengths of the horizontal and vertical lines of the printed register mark differ, this
sets the shorter line length.
Length of one side
l
Offset A and Offset B settings [OffsetA/OffsetB]
Setting
Details
±4 to ±40 mm
The origin is normally positioned as shown in the following figures.
However, the cutting position may shift in the same direction, depending on the
application used and the sheet being cut. If this occurs, alter the position of the origin.
Register mark: Type 1
Register mark: Type 2
Positive A direction
Positive A direction
Positive B direction
Positive B direction
Origin
Origin
[ERR37 MARK ORG] will appear if the origin position lies outside the effective cutting
range. If this occurs, set so that the register mark position is toward the center of the
sheet.
l
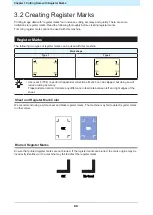
Register mark shape setting [FORM]
Setting
Details
Type 1
Type 2
Select one of two types of register mark shape.
Summary of Contents for CG-100AR
Page 39: ...Chapter 1 Before Using This Machine 39 2 Shut down the computer connected to the machine 1 ...
Page 76: ...Chapter 2 Cutting 76 ...
Page 98: ...Chapter 3 Cutting Data with Register Marks 98 ...
Page 131: ...Chapter 4 Helpful Tips 131 4 Press the END key several times to exit 4 ...
Page 132: ...Chapter 4 Helpful Tips 132 ...
Page 133: ...Chapter 5 Settings This chapter Describes the individual settings FUNCTION 134 SET UP 135 ...
Page 150: ...Chapter 6 Maintenance 150 ...
Page 158: ...Chapter 7 Options 158 ...
Page 178: ...Chapter 9 Appendix 178 ...
Page 182: ...MEMO ...


