Chapter 4 Helpful Tips
111
4.6 Divided Cutting [DIVISIONcut]
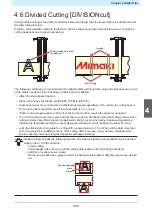
Setting divided cutting in the width (Y) direction allows data larger than the sheet width to be divided and cut.
(Divided cutting function)
Similarly, setting divided cutting in the feed (X) direction allows long data to be divided and cut, minimizing
cutting deviations due to sheet meandering.
Part protruding from sheet
is divided cut
Short cutting
Overlap
The following conditions are recommended for divided cutting with long data. Large discrepancies may occur
at the division positions if the following conditions are not satisfied:
• Attach the sheet basket (option).
• When using heavy roll sheets, set [SHEET TYPE] to [HEAVY].
• Some sheet types may not be able to withstand high-speed operations. If so, reduce the cutting speed.
• Three pinch rollers should be used if the sheet width is 1 m or more.
• If there is not adequate space in front of or behind the machine, reduce the speed or up speed.
• The roll sheet drawn out may reverse and be taken up due to vibrations during the cutting process when
cutting complex data. Motor alarms are particularly likely to occur when using high-speed operations.
Increase the feed offset setting to prevent high-speed operation. (Limit the speed to below 40 cm/s)
• Limit the total length of long data for cutting with a single division to 10 m. When cutting data more than
10 m long, divide into multiple sections. If the cutting data is too long, it may become distorted while
layered, possibly causing cutting discrepancies and paper jamming.
Divided cutting includes the following features. The following features are available only for divided
cutting in the Y (width) direction.
• Frame cutting:
Automatically cuts a frame to suit the cutting data together with the cutting data itself.
• Addition of overlap margin marks:
Marks can be added as a guide to assist in pasting sheets together after they have been divided
cut.
Frame
Overlap margin
mark
4
Summary of Contents for CG-100AR
Page 39: ...Chapter 1 Before Using This Machine 39 2 Shut down the computer connected to the machine 1 ...
Page 76: ...Chapter 2 Cutting 76 ...
Page 98: ...Chapter 3 Cutting Data with Register Marks 98 ...
Page 131: ...Chapter 4 Helpful Tips 131 4 Press the END key several times to exit 4 ...
Page 132: ...Chapter 4 Helpful Tips 132 ...
Page 133: ...Chapter 5 Settings This chapter Describes the individual settings FUNCTION 134 SET UP 135 ...
Page 150: ...Chapter 6 Maintenance 150 ...
Page 158: ...Chapter 7 Options 158 ...
Page 178: ...Chapter 9 Appendix 178 ...
Page 182: ...MEMO ...


