


CHAPTER 2
BASIC OPERATION
2-7
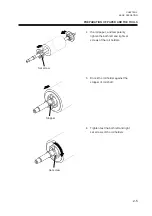
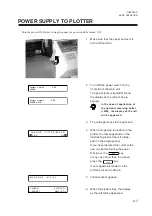
POWER SUPPLY TO PLOTTER
Turn the power ON. Before setting the paper, the power shall be turned ON.
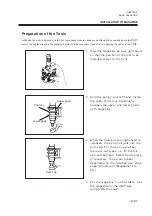
1
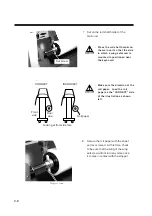
Make sure that the paper set lever is
at the UP position.
2
Turn ON the power switch on the
front side of the main unit.
The power lamp is lighted ON and
the display as the left will be ap-
peared.
• In the case of application of
the optional receiving buffer
(1MB), the display as the left
will be appeared.
3
The carriage moves to the right end.
4
When a magazine is loaded on the
plotter, the message shown in the
illustration given at the left will ap-
pear on the display panel.
If you have replaced the cutter with a
new one before turning the power
ON, press the
-F3+
key.
In any case other than the above,
press the
-F4+
key.
If no magazine is loaded on the
plotter, proceed to Step 6.
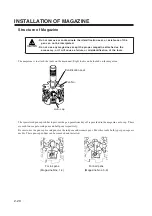
5
Initialize the magazine.
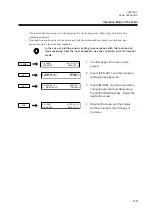
6
When the plotter stops, the display
as the left will be appeared.
<--CLEAR AUTO CUT-->
<--PEN SET HALF CUT-->
System Version X-XX
448KB + 1MB
System Version X-XX
448KB
C H A N G E C U T T E R B L A D E ?
Y E S N O
M A G A Z I N E I N I T I A L
Summary of Contents for cg-100AP
Page 16: ...xiv ...
Page 70: ...1 54 ...
Page 108: ...2 38 ...
Page 145: ...CHAPTER 4 SELF DIAGNOSIS FUNCTION 4 9 DEMONSTRATION PATTERN 1 2 Demonstration Pattern 1 ...
Page 146: ...4 10 Demonstration Pattern 2 ...
Page 173: ...CHAPTER 6 APPENDIX 6 13 Table of 82 special character codes supported ...
Page 179: ...D200310MAC 2 00 09061999 ...
Page 180: ... MIMAKI ENGINEERING CO LTD 1999 6 Printed in japan ...


