background image

Operating the tumble dryer

21

Examples of how to operate
the appliance

Option lists

Programme menu (single option list)

11:02

Shirts

Cottons

Express

Denim

Delicates

Programmes

Minimum iron

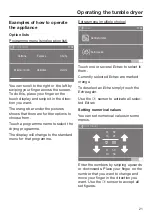
You can scroll to the right or the left by
swiping your finger across the screen.
To do this, place your finger on the
touch display and swipe it in the direc-
tion you want.

The orange bar under the pictures
shows that there are further options to
choose from.

Touch a programme name to select the
drying programme.

The display will change to the standard
menu for that programme.

Extras menu (multiple choice)

11:02

Gentle tumble

Anti-crease

Extras

OK

Touch one or several 

Extras

 to select it/

them.

Currently selected 

Extras

 are marked

orange.

To deselect an 

Extra

 simply touch the

Extra

 again.

Use the 

OK

 sensor to activate all selec-

ted 

Extras

.

Setting numerical values

You can set numerical values in some
menus.

OK

12    00

11       59

10       58

13       01

14       02

Clock display





Enter the numbers by swiping upwards
or downwards. Place your finger on the
number that you want to change and
move your finger in the direction you
want. Use the 

OK

 sensor to accept all

set figures.

Summary of Contents for PDR 908 HP Marine

Page 1: ...llation instructions Heat pump dryer Always read the operating instructions before setting up installing and commissioning the appliance This prevents both personal injury and damage to the appliance en GB M Nr 11 257 550 ...

Page 2: ...cting programme packages 26 Completing commissioning 27 1 Notes on correct laundry care 28 Washing 28 Drying 28 Understanding the care label symbols 28 2 Load the tumble dryer 29 3 Selecting a programme 30 Switch on the tumble dryer 30 Selecting a programme 30 4 Selecting programme settings 31 Main menu for a programme 31 Select the drying level 31 Selecting the duration timed programmes 31 Select...

Page 3: ...g intervals 51 1 Cleaning intervals for fluff filters 51 2 Cleaning intervals for the plinth filter 52 3 Cleaning interval for grille on bottom right heat exchanger for dissipating heat 53 Cleaning the fluff filters 54 Removing the fragrance flacon 54 Removing visible fluff 54 Cleaning the fluff filters and air flow openings thoroughly 55 Filter in the plinth 57 Removing the fluff filter 57 Cleani...

Page 4: ...eactivating the plinth filter 73 Service 74 Contact in case of malfunction 74 Optional accessories 74 Installation 75 Front view 75 Rear view 76 Locations 77 Side view 77 Steel plinth 77 View from above 77 Washer dryer stack 77 Transporting the tumble dryer to its installation site 78 Installation 79 Installing the tumble dryer on boats 79 Downtime after installation 79 Levelling the tumble dryer ...

Page 5: ...display 88 Visibility parameters 88 Display off status 89 Machine off status 89 Delay start 89 Memory 90 Temperature unit 90 Weight unit 90 Logo 90 Change code 90 Programme selection 91 Controls 91 Programme packages 92 Favourite programmes 93 Special programmes 93 Sort programmes 95 Prog colour allocation 95 Process technology 96 Anti crease 96 Drying levels 96 Further cooling 96 Cooling down tem...

Page 6: ... 99 Remote Update 99 SmartGrid 100 Machine parameters 101 Legal information 101 Payment system 101 Setting for payment systems 101 Time impulse 102 F back signal to pay system 102 Payment system lock 102 Clear paid signal 102 Debounce time 103 Pay system override time 103 Duration Cool air 103 Duration Warm air 103 FOC programmes 103 ...

Page 7: ...erials They also contain specific materials com pounds and components which were essential for their correct function and safety These could be hazardous to hu man health and to the environment if disposed of with your domestic waste or if handled incorrectly Please do not therefore dispose of your old appliance with your household waste Please dispose of it at your local com munity waste collecti...

Page 8: ...nstruc tions and warnings Miele cannot be held liable for damage caused by non compliance with these instructions Keep these operating instructions in a safe place and pass them on to any future owner When instructing other people how to use the tumble dryer they must be made aware of these safety and warning instructions Correct application This tumble dryer is only intended for drying fabrics wh...

Page 9: ...shown how to use it safely and recognise and understand the consequences of incorrect operation Children must not be allowed to clean or maintain the tumble dryer unsupervised Please supervise children in the vicinity of the tumble dryer and do not let them play with it Technical safety Before setting up the tumble dryer check it for any externally vis ible damage Do not install or use a damaged t...

Page 10: ...When installing this appliance it must be securely fixed to the floor Failure to do this could result in personal injury damage to the appli ance and damage to other objects and installations The electrical safety of this tumble dryer can only be guaranteed when correctly earthed It is essential that this standard safety re quirement is met If in any doubt please have the on site wiring sys tem in...

Page 11: ...ed in countries where this is applic able or it is switched off at the isolator switch See Installation Electrical connection See Installation and Technical data The accessibility of the plug must be always ensured in order to separate the tumble dryer from the mains All electrical work should be carried out only by a suitably qualified and competent person in strict accordance with national and l...

Page 12: ...ey do not impair the efficient functioning of the tumble dryer Damage to the tumble dryer by switching it on too soon This can damage the heat pump After setting up the tumble dryer wait for at least one hour before switching it on This tumble dryer contains fluorinated greenhouse gases F Gas They are hermetically sealed Designation of refrigerant R134a Amount of refrigerant 0 61 kg Global warming...

Page 13: ...rawn into the dryer can over time cause blockages Faults can then occur as well as the risk of fire The tumble dryer must not be used without the fluff filters in place or without the filter in the plinth without the bottom right grille if the fluff filters damaged and filter in plinth are damaged in any way In the event of a damaged filter switch the dryer off and re place the filter with a new o...

Page 14: ...the tumble dryer in a room where there is a risk of frost occurring At temperatures around freezing point the tumble dryer may not be able to operate properly There is a risk of damage if the condensed water is allowed to freeze in the pump or hoses The ambient room temperature should be between 2 C and 35 C If the water is drained externally through the drain hose instead of being collected in th...

Page 15: ... and other chemicals e g mops and floor cloths should be washed in hot water with extra detergent before being dried in the tumble dryer Items which have been splashed with hair lacquer hair spray nail varnish remover or similar substances When washing very heavily soiled items ensure that you use suffi cient detergent and select a high temperature If in doubt wash several times before drying Remo...

Page 16: ...on of rubber foam rubber or rubber like materials For example products made from latex foam rubber shower caps waterproof textiles rubberised articles and items of clothing and pillows with foam rubber filling Fabrics which contain damaged padding or fillings e g pillows jackets When damaged the filling can get out with the risk of it igniting in the dryer The programme ends when the cooling phase...

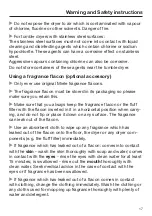
Page 17: ...he fragrance flacon or the fluff filter with the flacon inserted in it in a horizontal position when carry ing and do not tip or place it down on any surface The fragrance can leak out of the flacon Use an absorbent cloth to wipe up any fragrance which has leaked out of the flacon onto the floor the dryer or any dryer com ponents e g the fluff filter immediately If fragrance which has leaked out o...

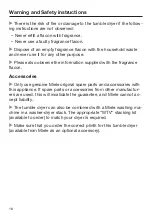
Page 18: ... supplied with the fragrance flacon Accessories Only use genuine Miele original spare parts and accessories with this appliance If spare parts or accessories from other manufactur ers are used this will invalidate the guarantee and Miele cannot ac cept liability The tumble dryer can also be combined with a Miele washing ma chine in a washer dryer stack The appropriate WTV stacking kit available to...

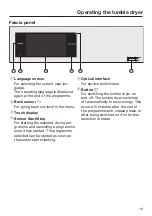
Page 19: ...Stop For starting the selected drying pro gramme and cancelling a programme once it has started The programme selected can be started as soon as the sensor starts flashing e Optical interface For service technicians f Button For switching the tumble dryer on and off The tumble dryer switches off automatically to save energy This occurs 15 minutes after the end of the programme anti crease phase or...

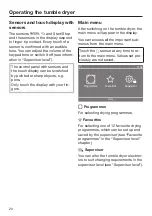
Page 20: ...with your fin gers Main menu After switching on the tumble dryer the main menu will appear in the display You can access all the important sub menus from the main menu Touch the sensor at any time to re turn to the main menu Values set pre viously are not saved 11 02 Programmes Favourites Supervisor Help Programmes For selecting drying programmes Favourites For selecting one of 12 favourite drying...

Page 21: ... to select the drying programme The display will change to the standard menu for that programme Extras menu multiple choice 11 02 Gentle tumble Anti crease Extras OK Touch one or several Extras to select it them Currently selected Extras are marked orange To deselect an Extra simply touch the Extra again Use the OK sensor to activate all selec ted Extras Setting numerical values You can set numeri...

Page 22: ...uch the numbers and confirm with OK Pull down menu The pull down menu can be used to display information e g about a drying programme 11 02 Cottons Status Time left h 2 27 Drying If an orange bar appears at the top of the screen in the middle of the display you can open the pull down menu Touch the bar and drag down with your finger Exiting a menu Touch the sensor to return to the previous screen ...

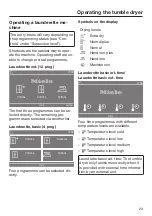
Page 23: ...mes are selected via another list Launderette basic 4 prog 11 02 Help Cottons Delicates Cottons Cottons Four programmes can be selected dir ectly Symbols on the display Drying levels Extra dry Normal plus Normal Hand iron plus Hand iron Machine iron Launderette basic int time Laundrette basic ext time 11 02 Help Four time programmes with different temperature levels are available Temperature level...

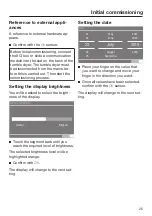
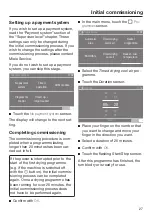
Page 24: ... you will need to define the settings for daily use of the tumble dryer Some of the settings can only be configured during the initial commissioning pro cess After that they must be changed by Miele Service These settings are also described under Supervisor level Switch on the tumble dryer Press the control The welcome screen will light up Setting the language You will be asked to select the langu...

Page 25: ...rightness You will be asked to select the bright ness of the display OK Display brightness Darker Brighter Touch the segment bars until you reach the required level of brightness The selected brightness level will be highlighted orange Confirm with OK The display will change to the next set ting Setting the date OK Date 21 22 24 25 2021 2020 2019 23 July August September June May 2018 Place your f...

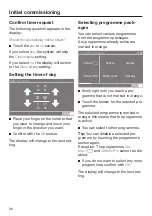
Page 26: ...Selecting programme pack ages You can select various programmes from the programme packages Any programmes already active are marked in orange 11 02 Cottons Cottons Express Cottons PRO Delicates Programme packages Label Standard Minimum iron OK Scroll right until you reach a pro gramme that is not marked in orange Touch the sensor for the required pro gramme The selected programme is marked in ora...

Page 27: ...en car ried out in full If the power is interrupted prior to the start of the first drying programme e g if the machine is switched off with the button the initial commis sioning process can be completed again Once a drying programme has been running for over 20 minutes the initial commissioning process does not have to be performed again Confirm with OK In the main menu touch the Pro grammes sens...

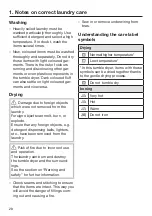
Page 28: ...om the laundry Foreign objects can melt burn or explode Ensure that any foreign objects e g detergent dispensing balls lighters etc have been removed from the laundry Risk of fire due to incorrect use and operation The laundry can burn and destroy the tumble dryer and the surround ings See the section on Warning and safety for further information Check seams and stitching to ensure that the items ...

Page 29: ...ening Do not overload the drum Overload ing can cause unnecessary wear and tear to the laundry and and cause a disappointing drying result It can also cause more creasing Socket for the fragrance flacon The Fragrance flacon chapter de scribes how to use the fragrance flacon If you are not using a fragrance flacon push the tab down completely see ar row so that the socket is closed Oth erwise fluff...

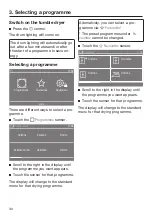
Page 30: ... Denim Delicates Programmes Minimum iron Scroll to the right in the display until the programme you want appears Touch the sensor for that programme The display will change to the standard menu for that drying programme Alternatively you can select a pro gramme via Favourites The preset programmes under Fa vourites cannot be changed Touch the Favourites sensor 11 02 Cottons Favourites Delicates Co...

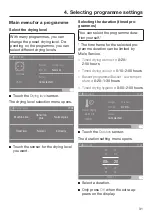
Page 31: ... sensor for the drying level you want Selecting the duration timed pro grammes You can select the programme dura tion yourself The time frame for the selected pro gramme duration can be limited by Miele Service Timed drying warm air 0 20 2 00 hours Timed drying cool air 0 10 2 00 hours Basket programme Basket Low temper ature 0 20 1 30 hours Timed drying hygiene 0 50 2 00 hours OK Overview not sel...

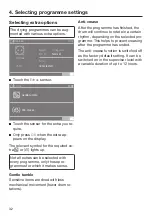
Page 32: ...mbol for the required ex tra or lights up Not all extras can be selected with every programme only those pro grammes for which it makes sense Gentle tumble Sensitive items are dried with less mechanical movement fewer drum ro tations Anti crease After the programme has finished the drum will continue to rotate in a certain rhythm depending on the selected pro gramme This helps to prevent creasing ...

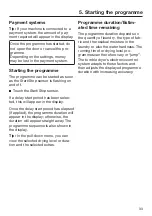
Page 33: ...Once the delay start period has elapsed if applied the programme duration will appear in the display otherwise the duration will appear straight away The programme sequence is also shown in the display Tip In the pull down menu you can view the selected drying level or dura tion and the selected extras Programme duration Estim ated time remaining The programme duration depends on the quantity of l...

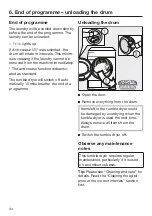
Page 34: ...ndard The tumble dryer will switch off auto matically 15 minutes after the end of a programme Unloading the drum Open the door Remove everything from the drum Items left in the tumble dryer could be damaged by overdrying when the tumble dryer is used the next time Always remove all items from the drum Switch the tumble dryer off Observe any maintenance notes This tumble dryer requires regular main...

Page 35: ...uired change the specified time and confirm with the OK sensor Deleting the timer The selected delay start period can be cancelled before the programme starts Touch the or sensor The selected delay start period will ap pear in the display Touch the Delete sensor Confirm with the OK sensor The selected delay start period is de leted Starting the timer Touch the Start Stop sensor The door will lock ...

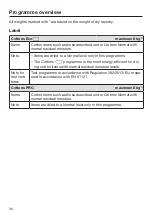
Page 36: ... level only in this programme The Cottons programme is the most energy efficient for dry ing cotton items with normal residual moisture levels Note for test insti tutes Test programme in accordance with Regulation 392 2012 EU meas ured in accordance with EN 61121 Cottons PRO maximum 8 kg Items Cotton items such as those described under Cottons Normal with normal residual moisture Note Items are dr...

Page 37: ...o not use Extra dry for jersey fabrics e g T shirts underwear baby clothes because they can shrink Hand iron plus Hand iron Machine iron Items Cotton and linen fabric Table linen bed linen starched laundry Tip To prevent laundry from drying out it should be rolled up until you are ready for ironing Minimum iron maximum 4 kg Normal plus Normal Hand iron Items Minimum iron fabrics made of synthetic ...

Page 38: ... 5 kg Normal Hand iron plus Use for Denim garments e g jeans jackets skirts shirts Woollens maximum 2 kg Items Woollen garments and fabric containing wool blends e g pullovers cardigans tights Note Wool and wool blend items are only fluffed up for a short time they are not dried completely Remove garments as soon as the programme has finished and leave to finish drying at room temperature Silks Ma...

Page 39: ...de of cotton synthetic or mixed fibre e g trousers jackets shirts Note Smoothes out creasing caused during the spin cycle in the wash ing machine The items are not dried fully Remove garments as soon as the programme has finished and leave to finish drying at room temper ature Also suitable for smoothing dry laundry in a set duration Automatic plus Max load 5 kg Normal plus Normal Hand iron plus U...

Page 40: ... maximum 8 kg Items Any item which only needs airing Basket programme Basket load 3 5 kg Basket programme Low temperature Basket load 3 5 kg Fabrics items You must follow the operating instructions for the dryer basket These programmes must only be used to dry or air items which are suitable for drying in a tumble dryer but which are not suitable for drying using mechanical action Note These progr...

Page 41: ...for drying in a tumble dryer Note This programme includes an additional proofing fixing phase Only use proofing agents that are stated by the manufacturer as being suitable for use on membrane textiles These agents con tain fluorochemical compounds Do not dry items which have been treated with proofing agents containing paraffin This substance is a fire risk Items are dried to a Normal level only ...

Page 42: ...ur when they are warm Allow bedding to air outside the tumble dryer after tumble drying Synthetic bedding maximum 2 kg Items Bedding suitable for drying in a tumble dryer duvets or pillows with synthetic fillings Note Items are dried to a Normal level only in this programme Large items Max load 4 kg Normal plus Normal Hand iron Machine iron Use for Robust larger items for the Cottons programme The...

Page 43: ...wels and flannels Note Items are dried to a Normal level only in this programme Minimum iron hygiene Max load 4 kg Use for Minimum iron fabrics made of synthetic cotton or mixed fibre Workwear overalls pullovers dresses trousers table linen tights Note Items are dried to a Normal level only in this programme Timed drying hygiene maximum 4 kg Items Jackets pillows sleeping bags and other padded ite...

Page 44: ...sidual moisture maximum 8 kg Cottons 25 residual moisture maximum 8 kg Minimum iron 20 residual moisture maximum 4 kg Items Hotel care home or hospital laundry that requires further pro cessing hand ironing machine ironing folding This includes cottons coloureds and minimum iron fabrics such as bedding and table linen or towels Note The residual moistures is absorbed by the fabric fibres which mak...

Page 45: ...r five special pro grammes and assign your own pro gramme names Enter these into the tables Load maximum 8 kg weight of dry items Example Special programme 1 Dry Res moisture programme Final residual moisture 6 Extra drying time 30 min Temperature 60 C 1 2 3 4 5 ...

Page 46: ...and safety for further information Cancelling a programme Touch the Start Stop sensor control A message will appear in the display asking if you wish to cancel the pro gramme Touch the Yes sensor control Reselecting a cancelled programme Open and close the door Select and start a new programme Adding laundry Open the door Risk of burns by touching hot laundry in the drum You could burn yourself Le...

Page 47: ... the Warning and safety instructions Only hold the fragrance flacon as il lustrated Do not hold it at an angle or tip it as the fragrance will leak out of it Hold the fragrance flacon securely so that you do not open it by mistake Pull off the protective seal Open the door of the tumble dryer The fragrance flacon is inserted in the upper fluff filter The socket is next to the recessed grip If you ...

Page 48: ...fragrance flacon as far it will go into the socket The markers and must line up with one another Turn the outer ring clockwise a little The fragrance flacon may slip out Turn the outer ring in such a way that the markers and line up ...

Page 49: ...grance will also be noticeable in the ambient air during the process The Timed drying cold air programme will not generally apply fragrance Closing the fragrance flacon After drying the fragrance flacon should be closed to prevent the fragrance from escaping needlessly Turn the outer ring anti clockwise un til the marker b is in position _ If you wish to dry without the fra grance occasionally rem...

Page 50: ... Fragrance flacons are available to or der from Miele or online The fragrance can leak out of the flacon Do not lay the fragrance flacon down If you are keeping the fragrance flacon in its original packaging do not store the packaging upright on its edge or upside down Otherwise the fragrance will leak out Always store in a cool dry place away from direct sunlight When purchasing new fragrance fla...

Page 51: ...fire Check the filter system and air duct area on a regular basis Clean the fil ter if you find any fluff deposits Damage caused by a missing or damaged filter system Too many fluff deposits in the filter system and tumble dryer will result in a risk of appliance malfunctions and a risk of fire Never use the tumble dryer without the filter system Always replace a damaged fluff filter immediately 1...

Page 52: ...in the dis play The surface of the filter in the filter in sert is visible after removing the fluff filter This filter surface must also be cleaned To clear the message Touch the OK sensor Damage caused by insufficient cleaning or by operation with a worn damaged filter in the plinth There is insufficient flow of air and heat in the heat exchanger due to clogging This requires a visit from the Ser...

Page 53: ... The grille on the bottom right can be re moved The heat exchanger for dissip ating heat is behind the grille Keep the room where the tumble dryer is located free from dust and fluff This will reduce the requirement to clean See Bottom right grille heat ex changer Also check and clean the filter in the plinth and the surfaces of the fluff fil ters To clear the message Touch the OK sensor ...

Page 54: ...the fragrance flacon as de scribed in Removing replacing the fragrance flacon under Fragrance flacons Removing visible fluff Remove any fluff after every drying cycle Tip You can also use a vacuum cleaner so that you can remove the fluff without touching it Open the door Pull the upper fluff filter forwards to remove it Remove the fluff see arrows Remove the fluff see arrows from the filter surfac...

Page 55: ...ove it Turn the yellow dial until it clearly en gages Pull the fluff filter forwards to remove it Use a vacuum cleaner with a long crevice nozzle attached to remove any visible fluff from the upper air flow openings Cleaning the fluff filters with water Rinse the filter surfaces through un der warm running water Wipe the smooth plastic surfaces of both fluff filters with a damp cloth to clean them...

Page 56: ...Cleaning and care 56 Push the lower fluff filter in com pletely and lock it with the yellow dial Push the upper fluff filter all the way in Close the door ...

Page 57: ...sidues that have got through the surfaces of the fluff filters Removing the fluff filter Reach behind the catch with your fin ger Open the fluff filter flap Use the handle to pull out the fluff fil ter at an angle forwards and to the right Pull the fluff filter out at an angle Pull the handle out of the fluff filter ...

Page 58: ...ning check the plinth filter in accordance with the description in Replacing the plinth filter The plinth filter must be per fectly functional and undamaged after cleaning Use a damp cloth to remove any fluff from the handle Replacing the plinth filter Filter wear caused by continuous tumble dryer use If the tumble dryer is in continuous use and is being cleaned regularly the plinth filter can beg...

Page 59: ...continu ous use White residues or residues of other col ours Residues arise from laundry fibres and traces of detergent components which can clog the filter They can be found on the front and side edges of the filter In extreme cases they can form stub born crust Residues are a sign that the filter is no longer a snug fit at the sides even if it appears to be perfect fluff is getting in unfiltered...

Page 60: ...her residues after cleaning remove the filter insert and clean it under running water If stubborn residues are not removed these can lead to faults over time Removing the filter insert If the filter insert is clogged up and soiled it must be removed and cleaned under running water Use the handle to pull out the filter insert at an angle forwards and to the right Then pull the filter insert out at ...

Page 61: ...r any accumulation of fluff If you notice any visible soiling care fully vacuum it up with a vacuum cleaner Use a dusting brush or the narrow crevice nozzle Risk of damage if cooling fins are cleaned incorrectly The cooling fins can suffer damage or distortion This could hinder the operational performance of the tumble dryer Clean using a vacuum cleaner with a dusting brush attached Only pass the ...

Page 62: ... at an angle behind the edge Then press on the handle until the fil ter is secured in position on the left Press the frame of the filter insert in at the positions marked PUSH until it audibly engages Refitting the fluff filter in the plinth Fit the fluff filter back on the handle Make sure it is the correct way round ...

Page 63: ...cured in position Cleaning and closing the fluff filter flap Use a damp cloth to remove any fluff Make sure that you do not damage the rubber seal when doing this Close the fluff filter flap The plinth filter must be inserted and the fluff filter flap must be closed to ensure the system is correctly sealed and that the tumble dryer will func tion correctly ...

Page 64: ...and dirt drawn in from the surrounding area Removing the grille Open the fluff filter flap Open the bottom right grille e g using a spoon handle Insert a spoon handle underneath the grille under the recess Press and lever the grille gently until it opens on the left hand side Open the grille from left to right and pull it off at an angle to the front ...

Page 65: ...ling Use a dusting brush or the narrow crevice nozzle Risk of damage if cooling fins are cleaned incorrectly The cooling fins can suffer damage or distortion This could hinder the operational performance of the tumble dryer Clean using a vacuum cleaner with a dusting brush attached Only pass the vacuum cleaner dusting brush over the fins lightly without applying any pressure Replacing the grille I...

Page 66: ...leaners Danger of electric shock caused by water There is a risk of electric shock if wa ter runs over or into the tumble dryer Never spray the tumble dryer with water Only ever clean the appliance with a slightly damp soft cloth Clean the tumble dryer and the seal on the inside of the door with a slightly damp soft cloth and a mild solution of washing up liquid and wa ter Dry all parts with a sof...

Page 67: ...can also happen if the items are already dry Open the door and check the laundry Add items if necessary Close the door to resume drying Dry individual items using the Warm air timed drying programme Power outage Pro gramme stopped There has been a power outage When power is resumed confirm with OK Touch the Start Stop sensor Open bottom right grille clean the heat exchanger lights up at the end of...

Page 68: ...r piece of fabric has been drawn into the loading area around the door and is blocking the holes in the laundry deflector To clear the message Touch the OK sensor Open the dryer door Remove the item causing the problem Only dry individual and small items with larger items If this is not the problem a more serious fault has oc curred See below The dryer is blocked with fluff or detergent residues C...

Page 69: ...e the door with the tumble dryer switched on Plinth filter not fitted Please fit it The plinth filter is missing Check the filter in the plinth Removing the filter during a drying programme will result in the cancellation of the programme Fault F If restart fails call Service lights up after a programme has been cancelled There is no obvious cause Note the message on the display Touch the OK senso...

Page 70: ...tion Programme packages Laundry or feather filled pillows smell after dry ing The laundry was washed with insufficient detergent Feathers are a natural product and this is quite nor mal Laundry use sufficient detergent next time Allow feather pillows to air after tumble drying Items made of synthetic fibres are charged with static electricity after drying Synthetic fibres tend to attract static ch...

Page 71: ...anger behind it Clean it if necessary The cooling fins behind the bottom right grille are soiled Clean as described in Bottom right grille airways under Cleaning and care The fluff filters and the filter in the plinth were still wet when they were replaced The fluff filters and the plinth filter must be dry The laundry is too damp Spin using a higher spin speed in the washing ma chine The drum is ...

Page 72: ... not come on The drum lighting switches off automatically when the door is closed To save energy the drum lighting will switch off after a few minutes if the door is left open for an extended period The drum lighting will come on when the door is opened if the tumble dryer is switched on The display is in a dif ferent language A different language has been selected Set the language you want The fl...

Page 73: ...tergent Tip Select a short wash programme with a maximum temperature of 40 C and a maximum spin speed of 600 rpm Select the Separate rinse programme for example You can re insert the plinth filter once the wash and spin cycle is complete You can continue to use a reactivated plinth filter provided that it does not show any signs of wear You must stop using a reactivated plinth filter if it shows s...

Page 74: ...orded for training purposes and that a call out charge will be applied to service visits where the problem could have been resolved as described in this booklet Please quote the model and serial num ber of your appliance when contacting Miele This information can be found on the data plate Open the door of your tumble dryer to find the data plate Optional accessories Optional accessories for this ...

Page 75: ...luff filter flap for the filter in the plinth Open only when a prompt appears in the display e 4 height adjustable screw feet f Bottom right grille Air cooling open ing Open only when a prompt appears in the display g Drain hose for condensation h Non return valve required i Non return valve recommended ...

Page 76: ... 76 Rear view a Interface for communicating with ex ternal devices b Mains connection cable c Recesses under the protruding lid for transporting the appliance d Module slot for external communica tion module e Drain hose for condensation ...

Page 77: ...surements in mm Side view 1191 777 1100 850 Steel plinth Steel plinth open or closed bases View from above Washer dryer stack min 300 1702 A stacking kit is needed This must be fitted by a Miele authorised service technician Miele accessory available to order ...

Page 78: ...onto its left or right side If the tumble dryer is being transpor ted upright always transport it on a sack truck with its left or right side resting on the truck Transporting the tumble dryer to its installation site Danger of injury due to unsecure lid The fixings at the back of the lid could break as a result of external forces There is a danger of the lid being pulled off when carrying the mac...

Page 79: ...using clamps that are welded to the floor of the vessel Secure all four of the tumble dryer s feet Downtime after installation Damage caused by switching the appliance on too soon This can damage the heat pump After setting up the tumble dryer wait for at least one hour before switching it on Levelling the tumble dryer The appliance must stand perfectly level on all four feet to ensure safe and pr...

Page 80: ...oom is well ventilated and switch the other appliances off if possible Otherwise running times and energy consumption could be increased External control equipment The XCI box accessory is needed to connect external control equipment such as payment systems or peak load control units Payment systems This tumble dryer can be fitted with a payment system optional Miele ac cessory In this case a Miel...

Page 81: ...Follow the warnings regarding leak ing or returning water if you select one of the following connection options Directed into a sink or basin Directed into a floor gully Connected directly to a sink drain outlet Connection to a drainage system already in use by another appliance e g a dishwasher or washing ma chine Water damage Should the end of the hose come loose overflowing water can cause dama...

Page 82: ... to the sink drain out let using nut 2 The nut is usually fitted with a washer which must be removed Attach the end of the hose 4 to ad apter 1 Use a screwdriver to tighten hose clip 3 up close to the nut Insert the non return valve 5 into the tumble dryer s drain hose 6 Install the non return valve 5 so that the arrow points in the direction of flow towards the sink Secure the non return valve us...

Page 83: ...ording to IEC EN 60947 This con nection process must be performed by a qualified electrician The plug connector or isolator switch should be easily accessible at all times Risk of electric shock from mains voltage If the tumble dryer is disconnected from the mains protective measures must be taken to ensure that the point of disconnection cannot acci dentally be switched on again Make sure the iso...

Page 84: ...ck of machine Test certifications awarded See data plate on back of machine LEDs Class 1 Designation of refrigerant R134a Refrigerant quantity 0 61 kg Refrigerant global warming potential 1430 kg CO2 e Appliance global warming potential 872 kg CO2 e Max floor load during operation 925 N Product safety standard EN 50570 EN 60335 A rated sound emissions LpA in accord ance with EN ISO 11204 11203 70 ...

Page 85: ...mity is available from one of the following internet addresses Products Download from www miele co uk For service information operating instructions etc go to www miele co uk do mestic customer information 385 htm and enter the name of the product or the serial number ...

Page 86: ...rvice will have to reset the code Make a note of your new code and store it in a safe place Closing the settings menu Touch the sensor The display will then go back to the pre vious menu level Touch the sensor The display will change to the main menu Controls Display Language The display can be set to appear in one of several different languages To select the language you want go to the Languages ...

Page 87: ...The user language is the same as the supervisor language The sensor is not active Set languages The languages for the setting Lan guage entry International can be changed Six languages can be selected All lan guages are available If you wish to add a new language to the language menu Six languages can be selected All lan guages are available If you wish to add a new language to the language menu F...

Page 88: ...anged Finish tone Keypad tone Welcome tone Fault alarm The audible signal that indicates an error can be switched off The volume cannot be changed here Res moisture display In addition to displaying the drying level the residual moisture can also be indicated as a percentage Factory default Without value With value Visibility parameters Various parameters are offered dis played when a programme is...

Page 89: ...s On 30 min Not curr prog The display will remain on while the programme is running but will go out 30 minutes after the end of the pro gramme Logo 30 min Not curr prog The display will remain on while the programme is running but the logo will light up 30 minutes after the end of the programme On after 30 min The display will go out after 30 minutes Machine off status In order to save energy the ...

Page 90: ...fault C F Weight unit You can decide whether load quanti ties are displayed in kg or lbs Factory default kg lb Logo You can choose whether the Miele Professional logo or your own logo appears in the display For the setting Controls the option Laun derette ext 12 prog Launderette basic int time or Laundrette basic ext time must be selected Miele Professional logo Customer logo Change code You can a...

Page 91: ...tion When activating any of these options the Supervisor level will no longer be available You will no longer be able to access the Supervisor level via the display Please follow the instructions below if you wish to change any other set tings Opening the Supervisor level launder ette version Switch the tumble dryer on and open the dryer door Touch the Start Stop sensor and hold it down whilst car...

Page 92: ... time and cannot be modified by the user This option is only available with an external payment system The maximum running time is spe cified during initial commissioning Launderette basic int time Four timed programmes with differ ent temperature levels are time con trolled via the tumble dryer electron ics The maximum laundry weight is 8 kg The set value indicates the maximum running time and ca...

Page 93: ...o be changed Another menu opens enabling you to select a new programme or change the parameters Confirm using the Save sensor Your selection is now active Special programmes You can put together five special re sidual moisture or time controlled pro grammes and assign your own pro gramme names First enter the programme name Select the special programme you want to change The Save as menu opens Use...

Page 94: ...temperature Process air cold 70 C Cooling down temp Process air 40 55 C Anti crease Drum rotation main direction 0 500 seconds Drum reversal 0 500 seconds Pause 100 3000 seconds Timed drying Running time 1 120 minutes Temperature Process air cold 70 C Drum rotation main direction 0 600 seconds Drum reversal 0 600 seconds Cooling down temp Process air 40 55 C Anti crease Drum rotation main directio...

Page 95: ...an also move and change the order of the favourites that you edit in the Supervisor level under Favourite programmes Touch the programme that you wish to move Press and hold the sensor until the frame changes Drag the programme to the required place Prog colour allocation You can assign a specific colour to a favourite programme In the list of fa vourites each favourite programme is given a colour...

Page 96: ... can be individu ally adapted You can change the residual moisture in this programme to one of 11 levels from 16 more dry to 26 more moist Factory default 20 Further cooling Before the end of the programme the temperature of the dried laundry is monitored and the cooling phase at the end of the programme is extended if necessary Changing this setting leads to increased energy consumption Factory d...

Page 97: ... fluff is detected Service interval The tumble dryer shows a custom message at a selected interval to prompt you to undertake specific maintenance tasks Three different messages can be cre ated 1 2 3 Each message is created in the language and alphabet of the cur rent supervisor language Your message is displayed at the end of the programme and can be acknow ledged with OK The same message ap pear...

Page 98: ...hed on Factory default Off On COM module selection This tumble dryer is equipped with an integrated WiFi module However the dryer can also be equipped with an external module Off Internal module factory default The internal WiFi module is used External module An XKM module or RS232 module is inserted into the module slot WiFi Control the networking of your tumble dryer Setup This message only appe...

Page 99: ...ed over the Internet Remote Programmes are selected on an ex ternal terminal Factory default Off Remote Update The RemoteUpdate function is used for updating the software in your tumble dryer The RemoteUpdate function is deactiv ated as standard If you do not install a RemoteUpdate you can continue to use your tumble dryer in the usual way However Miele recommends installing RemoteUpdates Activati...

Page 100: ... in stalled it cannot be undone Do not switch off the tumble dryer during a RemoteUpdate Otherwise the RemoteUpdate will be aborted and will not be installed SmartGrid The SmartGrid setting is only visible if a WiFi network has been set up and ac tivated This function can be used for starting your washing machine auto matically at a time when your energy supplier s energy costs are most eco nomica...

Page 101: ...p ies of the licencing conditions valid at the time and any further information The liability and warranty provisions of the Open Source licence terms and conditions as stated therein apply only in relation to the respective rights hold ers Payment system External hardware is connected via the Miele XCI box Setting for payment systems If you wish to change the settings after the commissioning proc...

Page 102: ...ogramme end The feedback signal is sent at the start and end of the programme Programme running The feedback signal is sent con stantly between the start and end of the programme Payment system lock To avoid tampering a programme lock can be set up in programme opera tion If the lock is applied the pro gramme is interrupted and payment credit is lost as soon as the door is opened The time for the ...

Page 103: ...ched off in increments of one minute from 30 minutes up to four hours If the programme does not end within the override time the coin box setting is reset The programme is cancelled Factory default 3 hours Duration Cool air The running time can be adjusted A time of between 10 minutes and 2 hours can be set in five minute inter vals Factory default 2 hours Duration Warm air The running time can be...

Page 104: ......

Page 105: ......

Page 106: ......

Page 107: ...ica 1 866 694 5849 Australia Asia Oceania 61 3 9764 7880 Europe Africa Middle East 49 5241 89 66 877 International Service Contacts E mail service miele marine com Manufacturer Miele Cie KG Carl Miele Straße 29 33332 Gütersloh Germany ...

Page 108: ...M Nr 11 257 550 00 en GB PDR 908 HP Marine ...

Reviews: