


Control Step / Description
Control
Action
Display
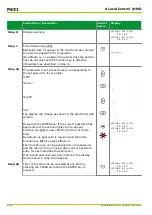
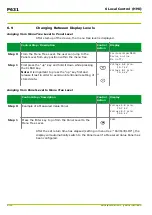
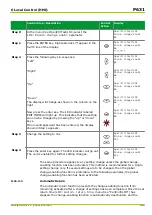
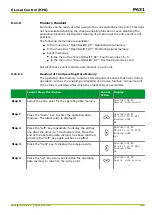
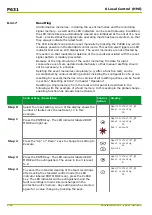
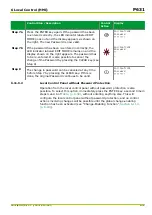
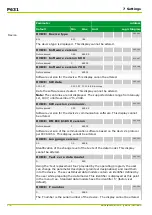
Step 0
Select a list setting (in this example, the parameter
MAIN: Fct.assig.trip cmd.1 at “Par/Func/Glob/
MAIN” in the menu tree). The down arrow (
↓
) indicates
that a list setting has been selected.
Par/Func/Glob/MAIN
Fct.assign.trip cmd.
↓
Step 1
Press the “down” key. The first function and the first
selected signal will appear in the third and fourth lines,
respectively. The symbol “#01” in the display indicates
the first item of the selection. If MAIN: Without
function appears for the first item, then this means
that no function assignment has yet been made.
Par/Func/Glob/MAIN
Fct.assign.trip cmd.
#01 DIST
Trip zone 1
Step 2
Scroll through the list of assigned functions by pressing
the “right” and “left” keys.
Par/Func/Glob/MAIN
Fct.assign.trip cmd.
OR #02 DIST
Trip zone 2
Once the end of the list is reached, the display shown
on the right will appear.
Par/Func/Glob/MAIN
Fct.assign.trip cmd.
#05 MAIN
?????
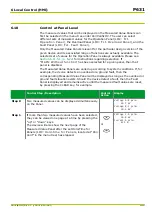
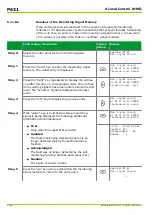
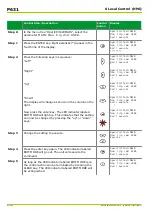
Step 3
Press the ENTER key at any position in the list. The LED
indicator labeled EDIT MODE will light up.
Par/Func/Glob/MAIN
Fct.assign.trip cmd.
#02 DIST
Trip zone 2
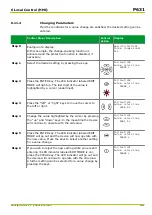
Step 4
Scroll through the assignable functions by pressing the
“right” and “left” keys in the input mode.
Par/Func/Glob/MAIN
Fct.assign.trip cmd.
#02 DIST
Trip zone 4
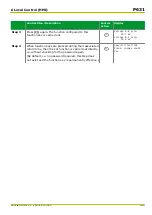
Step 5
Select the operator or the class using the “up” and
“down“ keys. In this particular case, only the “OR”
operator can be selected. There is no limitation on the
selection of classes.
Par/Func/Glob/MAIN
Fct.assign.trip cmd.
OR #02 DIST
Trip zone 4
Step 6
Press the ENTER key. The LED indicator will go out. The
assignment has been made. The unit will now operate
with the new settings.
If no operator has been selected, the “OR” operator is
always assigned automatically when the ENTER key is
pressed. There is no automatic assignment of classes.
Par/Func/Glob/MAIN
Fct.assign.trip cmd.
OR #02 DIST
Trip zone 4
Step 7
Press the “up” key to exit the list at any point in the
list.
Par/Func/Glob/MAIN
Fct.assign.trip cmd.
↓
Step 8
If you wish to reject the new setting while you are still
entering it (LED indicator labeled EDIT MODE is on),
press the CLEAR key. The LED indicator labeled EDIT
MODE will be extinguished.
Par/Func/Glob/MAIN
Fct.assign.trip cmd.
OR #02 DIST
Trip zone 2
6 Local Control (HMI)
P631
P631/EN M/R-11-C // P631-310-650
6-23
Summary of Contents for P631
Page 2: ......
Page 4: ......
Page 7: ...Changes after going to press...
Page 8: ......
Page 16: ...P631 Table of Contents 8 P631 EN M R 11 C P631 310 650...
Page 56: ...P631 2 Technical Data 2 28 P631 EN M R 11 C P631 310 650...
Page 236: ...P631 3 Operation 3 180 P631 EN M R 11 C P631 310 650...
Page 246: ...P631 4 Design 4 10 P631 EN M R 11 C P631 310 650...
Page 266: ...P631 5 Installation and Connection 5 20 P631 EN M R 11 C P631 310 650...
Page 276: ...6 8 Configurable Function Keys P631 6 Local Control HMI 6 10 P631 EN M R 11 C P631 310 650...
Page 548: ...P631 10 Commissioning 10 10 P631 EN M R 11 C P631 310 650...
Page 568: ...P631 12 Maintenance 12 8 P631 EN M R 11 C P631 310 650...
Page 570: ...P631 13 Storage 13 2 P631 EN M R 11 C P631 310 650...
Page 572: ...P631 14 Accessories and Spare Parts 14 2 P631 EN M R 11 C P631 310 650...
Page 576: ...P631 15 Order Information 15 4 P631 EN M R 11 C P631 310 650...
Page 582: ...P631 A2 Internal Signals A2 4 P631 EN M R 11 C P631 310 650...
Page 608: ...P631 A4 Telecontrol Interfaces A4 18 P631 EN M R 11 C P631 310 650...
Page 637: ......